EasyManua.ls Logo

Manitou Mara Inline - User Manual

Manitou Mara Inline
18 pages
Print Icon
To Next Page IconTo Next Page
Loading...
MARA 50 HOUR AIR CAN & PISTON | SERVICE GUIDE
Question and Answer IconNeed help?

Do you have a question about the Manitou Mara Inline and is the answer not in the manual?

Summary

Air Can Removal

Depressurize Air Spring

Depressurize air spring by removing valve cap and using pump's release valve.

Loosen Air Can

Loosen the air can using the specified wrench; do not remove fully yet.

Compress Shock to Unthread Air Can

Compress the shock in a dyno or frame to fully unthread the air can.

King Can Service

Air Can Service

Remove Air Can Internals

Remove the negative chamber MCU and spacer(s), then the dust wiper.

Prepare New Quad Ring

Remove new quad ring from seal kit and apply Slickoleum grease liberally.

Install Air Can Quad Ring

Install the air can quad ring into the lower groove, ensuring it is not twisted.

Install Air Can Glide Ring

Install the air can glide ring on top of the quad ring in the same lower groove.

Install Air Can Wiper Seal

Lightly grease and install the air can wiper seal into the upper groove.

Air Piston Service

Remove Piston Split Glide Ring

Remove the split glide ring from the air piston.

Air Can Install

Overview

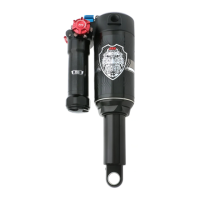
The provided document is a service guide for the Manitou Mara 50 Hour Air Can & Piston, specifically for the Mara Pro and Mara Inline rear shocks. This manual outlines the necessary steps for servicing the air can and air piston components of these bicycle suspension shocks.

Function Description:

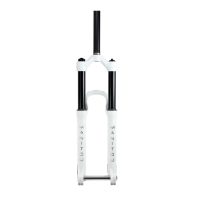
The Manitou Mara Pro and Mara Inline rear shocks are suspension components designed for bicycles, providing damping and spring functionality to absorb impacts and maintain tire contact with the ground. The air can and piston are critical elements of the air spring system within these shocks, responsible for generating the spring force that supports the rider's weight and absorbs terrain irregularities. Regular servicing of these components, as detailed in this guide, ensures optimal performance, longevity, and safe operation of the rear shock. The service involves disassembling the air can, replacing seals, greasing components, and reassembling the unit to maintain proper air pressure and smooth operation.

Important Technical Specifications (Derived from the manual's content):

  • Shock Models Covered: Mara Pro and Mara Inline rear shocks.
  • Service Interval: 50 hours of use for the air can and piston.
  • Required Tools & Parts (with Manitou Part Numbers):
    • Slickoleum grease: 10-oz Tub (PN 20-32929), 5MI Tube (PN 141-33604-K001)
    • Air Can Wrench: PN 142-37512-K033
    • Air Can Seal Install Tool: PN 172-32193-K001 (Optional)
    • Air Can Seal Kit: PN 142-31535-K002
    • King Can Seal Kit: PN 142-31535-K035
    • General tools: Safety Glasses, Nitrile Gloves, Lint-Free Rags, Isopropyl Alcohol, Plastic O-ring pick, Torque wrench, Bench mounted Vise, Hand Dyno, Shock Pump.
  • Seal Types: The service involves quad rings, glide rings, and wiper seals in the air can and piston.
  • Pressure Management: The shock contains preloaded springs, gases, and fluids under extreme pressures, requiring complete depressurization before service.

Usage Features (Implied from the device's nature and service instructions):

The Manitou Mara shocks are designed for bicycle suspension applications, offering adjustable damping and air spring characteristics to suit various riding styles and terrain. The air can and piston system allows for tuning of the air spring's progressiveness and sag. The "King Can" service mentioned suggests a larger volume air can option, which typically provides a more linear spring curve, beneficial for certain frame designs or rider preferences. The shock features a valve for air pressure adjustment using a shock pump, allowing riders to set their desired spring rate. The design incorporates a negative air chamber, which equalizes pressure with the positive chamber to provide a smoother initial stroke. The presence of a "hand dyno" in the required tools list suggests that the shock's performance can be tested and verified post-service to ensure proper function.

Maintenance Features (As described in the service guide):

The manual provides a detailed, step-by-step guide for a 50-hour service of the air can and piston, emphasizing safety and correct procedure.

  • Air Can Removal:
    • Depressurize the air spring completely using a shock pump and a 3mm hex key. This is a critical safety step.
    • Secure the shock in a vise, clamping on the upper eyelet or trunnion mounts (using soft jaws).
    • Loosen the air can one full turn with the specialized air can wrench (PN 142-37512-K033) to prevent damage from negative chamber pressure.
    • Compress the shock in a hand dyno or bicycle frame to fully unthread and remove the air can.
    • Remove the bumper and spacers, if present, for reassembly.
  • King Can Service (if applicable):
    • Remove the wire ring and slide the outer air can sleeve off the inner can.
    • Remove existing upper, lower, and mid (if present) O-rings.
    • Grease new O-rings from the King Can Seal Kit (PN 142-31535-K035) and install them into the seal glands using a plastic O-ring tool or by hand.
    • Slide the outer air can sleeve back onto the inner can and install the wire ring.
  • Air Can Service:
    • Remove the negative chamber MCU (Microcellular Urethane) and any spacers.
    • Carefully remove the dust wiper, glide ring, and quad ring from the air can using an O-ring pick.
    • Clean the air can thoroughly.
    • Liberally apply Slickoleum grease to the new air can quad ring from the Air Can Seal Kit (PN 142-31535-K002) and install it into the lower groove, ensuring it is not twisted.
    • Install the new air can glide ring on top of the quad ring in the same groove.
    • Lightly grease and install the new air can wiper seal into the upper groove. The optional Air Can Seal Install Tool (PN 172-32193-K001) can facilitate this process.
  • Air Piston Service:
    • Remove the split glide ring from the air piston.
    • Remove the air piston quad seal. Crucially, the white glide ring on the air piston should NOT be removed.
    • Clean the white glide ring and air piston with isopropyl alcohol.
    • Liberally grease the new air piston quad ring and install it onto the air piston.
    • Ensure the quad ring is not twisted and is pushed tight against the white glide ring, creating space for the split glide ring.
    • Install the new split glide ring onto the air piston.
  • Air Can Install:
    • Apply Slickoleum grease to the air piston seals.
    • Install the foam ring and any spacers onto the damper body.
    • Install the air can onto the shock, pushing it as far as possible. Due to the negative chamber, full installation may require mounting the shock in a frame or shock tester and compressing it.
    • Once partially compressed, thread the air can onto the top cap.
    • Tighten the air can onto the shock until it reaches a hard stop; do not overtighten.
    • Set the air pressure using a shock pump, clean the shock, and update tuning notes.

The manual emphasizes the importance of safety warnings, particularly regarding the high pressures within the shock, and strongly recommends that service be performed by a certified bicycle mechanic to prevent serious injury or death. Contact information for Manitou Customer Support is provided for assistance. The warranty information directs users to hayesbicycle.com/warranty.

Manitou Mara Inline Specifications

General IconGeneral
Intended UseTrail
AdjustmentsRebound, air pressure
Damper TypeHydraulic
DiameterNot applicable
MaterialAluminum

Related product manuals