Installation
MZ034
English
3
129
WARNING!
A special thread-lock treatment is applied to
the thread on the bolts (see 3A in Picture 3).
Bolts that are installed and later removed
lose this thread-lock treatment, and
therefore can never be used again.
WARNING!
Before installing a Post Mount braking
system, check that the protection film has
been removed from the brake caliper.
WARNING!
Make sure, before every ride, that the brake
cable of the disk brake system is correctly
connected to the proper mounting (see 3B &
3C in Picture 3).
WARNING!
The brake cable must never touch the crown and
stanchions.
3.3 Wheel Installation
Table 5 - Maximum wheel dimension
Fork
Maximum
wheel
dimension
Marathon 2.2” x 26”
MX - All Mountain - Z1 - 66 -
Dirt Jumper - 888 - Junior T
2.8” x 26”
Monster 3.0” x 26”
D-Street 24” 2.5” x 24”
In the event you need to install wheels with
dimensions larger than those specified in Table
5, above, you must verify that:
• The tire turns freely;
• The tire does not make any contact with the
brake arch or V-Brake system;
• The distance between the inflated tire and the
lower part of the lower crown is at least four
(4) mm when the forks’ legs are fully
compressed
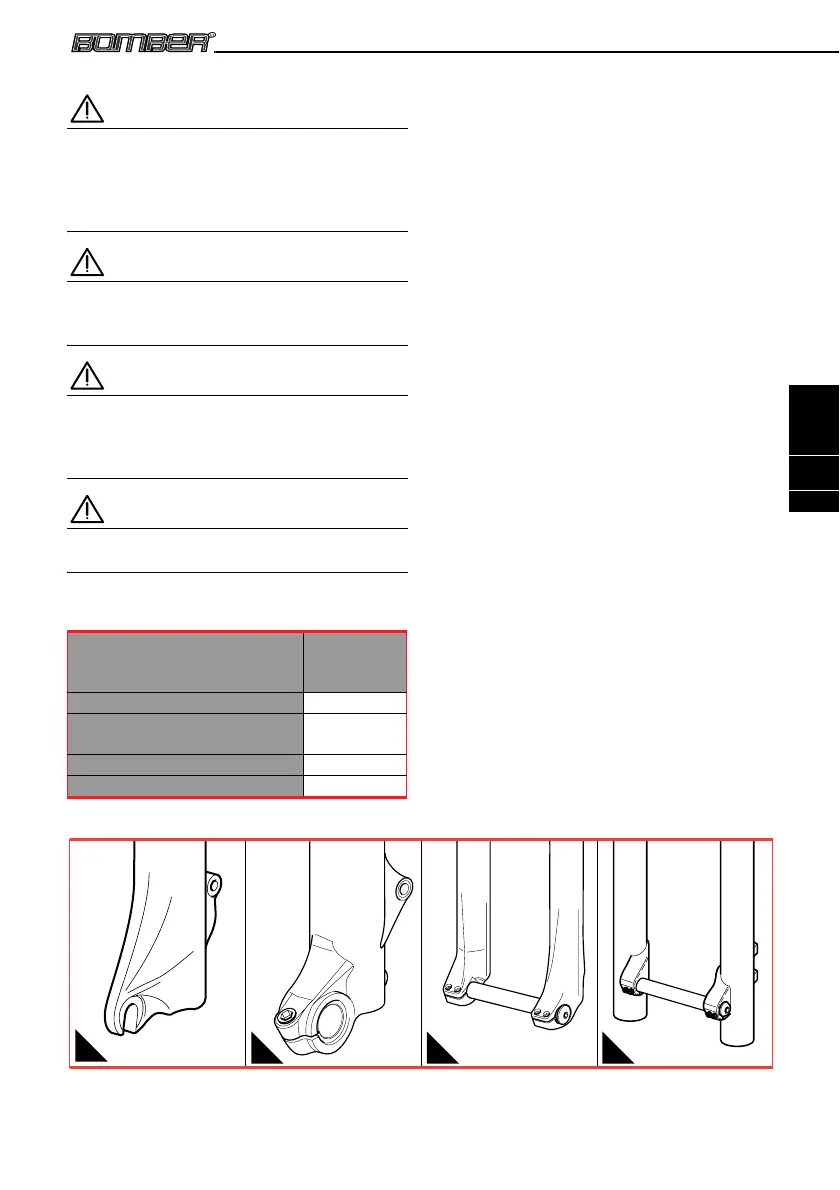
Picture 4 - Wheel securing systems: (4A) standard dropouts, (4B) ø 20mm through-hole axle (forks with ø 32mm
stanchions), (4C) ø 20mm through-hole axle (66 and 888 series forks), (4D) ø 20mm through-hole axle
(Monster).
A
B
C D
3.4 Wheel Axle Securing System
The system for securing the wheel axle to the
fork sliders can be standard, which uses the
traditional advanced dropouts, or have a 20 mm
diameter through-hole axle - see Picture 4
below.
Forks that are created for more intensive use
are provided with a wheel fastening system,
which originates from the motocross application
and uses a 20 mm axle.
3.4.1 Wheel Installation on a Standard
Fork
Install the wheel in compliance with the wheel
manufacturer’s instructions. For correct fork
function after installing the wheel, you will need
to:
• Check the fork-wheel alignment by fully
compressing the fork a few times. The wheel
should not make contact with, or come close
to any portion of the fork.
• Lift the front of the bicycle, and spin the wheel
a few times to verify correct alignment and
spacing with the disk brake or the V-Brake
brake pads. Check the owner’s manual of the
brake system for the proper specifications.