ASSEMBLY INSTRUCTIONS
11
WARNING: IT IS VERY IMPORTANT TO CHECK
AND ENSURE THAT EACH AND EVERY BURNER
IS FULLY ENGAGED WITH THE ADJACENT VALVE
ORIFICE BEFORE COMPLETING STEP 10.
FAILURE TO DO SO MAY
RESULT IN FIRE OR
EXPLOSION, POSSIBLY
CAUSING SERIOUS
INJURY OR DEATH. REFER TO MAINTENANCE
SECTION INSTRUCTIONS TO PROPERLY CHECK
THE ENGAGEMENT.
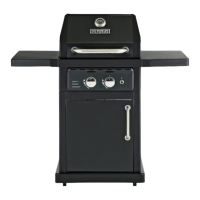
10. Open the lid and place the two heat tents (S)
on the brackets directly above the burners.
11. Place cooking grates (T) on the grill body
braces and grill rear panel, then insert the
warming rack (W) into the 2 holes located
on the back edge of the grill body (L).
12. With the left side table (O) in a perpendicular
position, align the slots in the left side table (O)
with the side table supports (M and N) and
insert. To lock the left side table (O) in the
upright position, swing the left side table (O)
90 degrees up, push towards the grill body (L),
and press down on the left side table (O)
near the grill body until it is fully fastened in
place. Repeat with the right side table (P).
12
11
10
S
L
W
T
L
O