NTP100 – Rev 2.2.0 Oct-12
4
© Masterclock
®
, Inc.
Pre-Installation Checklist
Before installing an NTP100 one should be prepared with the following basic configuration information that the device will
require. It may be necessary to obtain some or all of this information from a network administrator in your organization.
• IP address
• Gateway (router)
• Net mask
• Domain Name Servers
- Or –
• Confirm availability of DHCP/BOOTP server (for dynamic networking configuration)
All Masterclock, Inc. network appliances can be provided with a verbose name. The name is not used for any internal
purpose by the NTP100 and is arbitrary. It may be useful for organizing and managing devices once installed at a facility.
By default, device names are the product name abbreviation followed by the device’s Ethernet address (MAC address).
Customers may wish to designate names relating to their own organizational requirements. It is recommended that a robust
naming scheme be developed before devices are installed to different locations within an organization.
Network Security/Topology Considerations
Networks separated by physical routers will often block UDP broadcasts preventing WinDiscovery from locating
devices on a remote network. Under such circumstances, WinDiscovery must be operated from a computer within
the remote network or
routers separating the networks must be configured to pass through (both directions) UDP
broadcasts on port 6163. Consult your network administrator for additional information.
Personal computer firewall applications, such as ZoneAlarm
TM
, BlackICE
TM
, or the Windows XP firewall may
also prevent WinDiscovery from operating correctly. Configure the firewall to allow bi-direction UDP traffic on
port 6163.
Quick Start Information
Initial I/O Connections and Operation
Refer to the table below and begin your installation at the step indicated for your NTP100 model number.
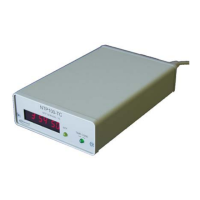
MODEL Front Panel View Rear Panel View Begin at
NTP100-GPS
&
NTP100-GPS-HS
STEP 1
NTP100-TC
STEP 3
NTP100-OSC
&
NTP100-OSC-HS
STEP 4