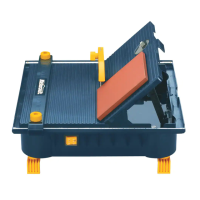
ADDITIONAL BLADE ADJUSTMENTS
(Fig. 19)
TOOLS REQUIRED
e 10 mm open-end wrench or 10 mm
combination wrench
e 4mmhexkey
e Framing square
e Medium size flat blade screwdriver
ADJUSTMENT PROCEDURE
Fig. 19
I
1 J
3
1. Turn saw switch OFF and remove plug from the power source.
2. Remove blade guard and splitter assembly, mitre gauge and rip fence.
3. Using the 10 mm hex wrench, slightly loosen the two middle blade alignment rod strap
bolts (1) and two rear blade alignment rod strap bolts (2) located on the underside of the
table (Fig. 19).
4. While standing at the rear of the saw, use a flat blade screwdriver and gently pry the
rear of the blade alignment rod to the LEFT or RIGHT. Using the framing square,
simultaneously measure the distance at the front and rear of the blade to an edge of a
mitre slot. When the distances are within 1/64" or less, tighten both rear blade alignment
rod strap bolts (2) while holding the rod firmly in place. NOTE: The blade alignment rod
will only move slightly.
5. If alignment is not achieved by rear adjustment, loosen the two front blade alignment rod
strap bolts (3).
6. While standing at the front of the saw, use a medium size flat blade screw driver and
gently pry the front of the blade alignment rod to the RIGHT or LEFT. Simultaneously
measure the distance at the front and rear of the blade to an edge of a mitre slot. When
the distances are with in 1/64" or tess, tighten both front blade alignment rod strap bolts
(3) while holding the rod firmly in place. NOTE: The blade alignment rod will only move
slightly to the right.
7. Tighten both middle blade alignment rod strap bolts (1). NOTE: Make sure all six bolts
are properly tightened and that the distance from the front and rear of the blade to the
mitre gauge groove are within 1/64" from one another.
8. Re-install blade guard and splitter assembly and adjust the alignment with the blade as
outlined earlier in this manual.