pH7.0 Buffer Calibration
The pH Drive is powered from your Ozone
Swim unit. The pH Drive will need power for
calibration, but with the pH Sensor removed
from the pH Tee, the pool pump must not be
running. You will therefore need to unplug
the pool pump from the Ozone Swim unit.
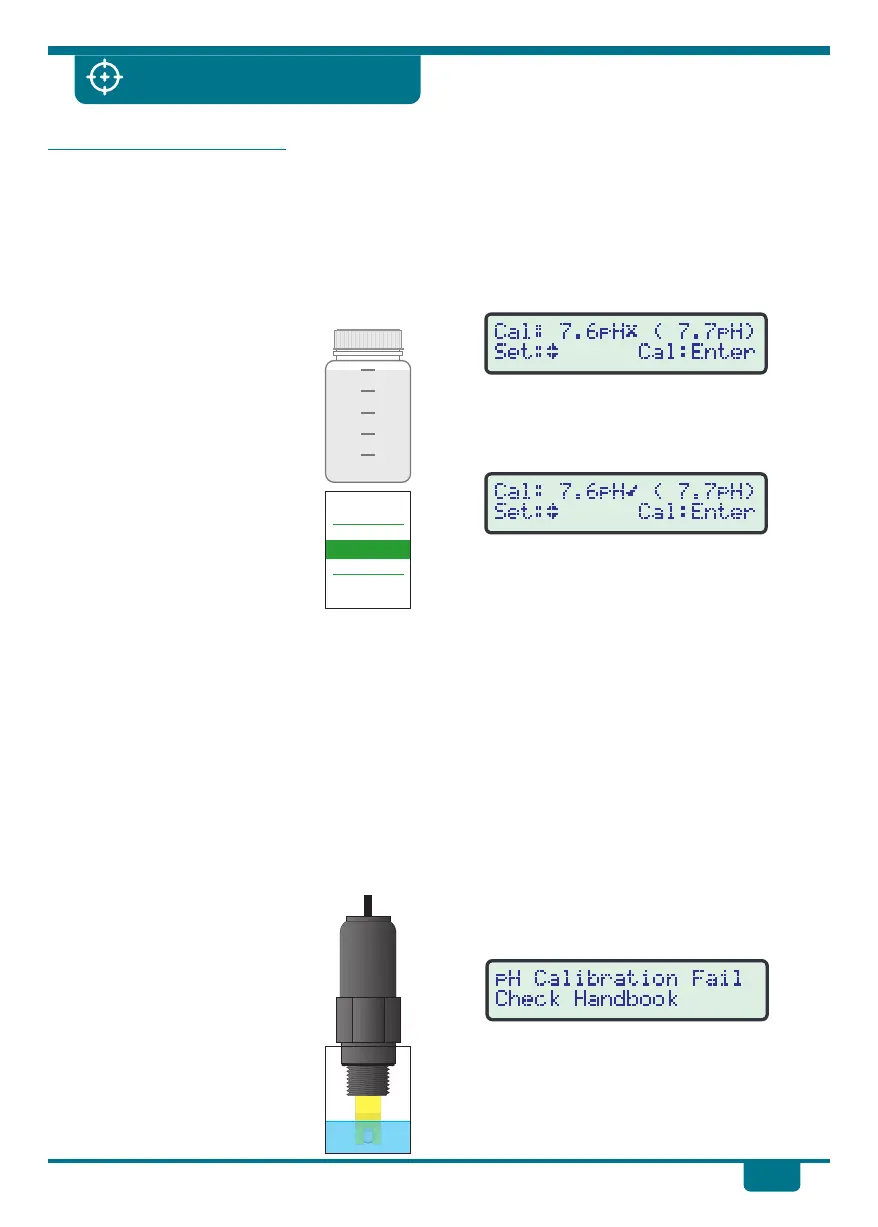
1. Prepare pH7.0 Calibration Buffer
!
A sachet containing 2 ziplock
bags of salt was supplied with
your pH Drive. Simply pour
BOTH sachets into the 250mL
bottle and fill to the 250mL
mar k w i t h d eio nis e d o r
distilled water. Shake well
until all salts have dissolved.
!
This solution will last up to 6
months after it has been
made, providing it is not
contaminated and is stored in
a cool, dark place
2. Remove the pH Sensor from the Tee
!
Disconnec t the pH Sensor to avoid
straining the cable and plug when
removing the sensor from the pH Tee.
Unscrew the sensor completely from the
Tee.
!
Reconnect the pH Sensor to the pH Drive.
!
Rinse the sensor well in clean water. De-
ionized or distilled water is ideal, but tap
water will suffice.
3. Place pH Sensor into pH7.0 Buffer
!
Decant a small amount of
pH7.0 buffer into a clean cup.
Place the pH Sensor into this
buffer, so it is immersed to
15mm or more, as per the
diagram on the right.
!
DO NOT place the pH Sensor
directly into the 250mL
bottle of pH7.0 buffer.
4. Calibration Procedure
!
Switch the pH Drive on by activating the
pool pump output of the Ozone Swim unit.
!
Press Setup to enter the user-friendly
menu system, then press ‡ and ˆ until
Calibrate pH Sensor is selected.
!
Press Enter to go to the Calibration screen.
The current reading is displayed in
brackets. The flashing “X” indicates that
the reading is not yet stable. DO NOT
calibrate until the “X” changes to a “ü”
!
Press ‡ and ˆ to set the “Cal:” pH value to
exactly 7.0.
!
Press Enter to calibrate the pH Sensor, or
press Cancel to quit without calibrating.
5. Re-fit pH Sensor and Power Connections
!
Disconnect the pH Sensor from the pH
Drive to avoid straining the cable and plug
when screwing into the pH Tee. Re-fit into
the pH Tee. Re-connect the pH Sensor to
the pH Drive when done.
!
Re-connect the pool pump to the Ozone
Swim power outlet.
!
Switch your pool equipment back on.
Calibration Failure
If pH calibration fails, the pH Drive will display
this message:
!
C l e a n t h e p H S e n s o r a s p e r t h e
troubleshooting section, then retr y
calibration.
!
If the calibration failure persists, the pH
Sensor will most likely need to be replaced.
15
pH Sensor Calibration
pH Buffer Powder
250mL Solution Powder
O
pH 7.00 @ 25 C
50
100
150
200
250
pH7.0 Buffer Calibration
The pH Drive is powered from your Ozone
Swim unit. The pH Drive will need power for
calibration, but with the pH Sensor removed
from the pH Tee, the pool pump must not be
running. You will therefore need to unplug
the pool pump from the Ozone Swim unit.
1. Prepare pH7.0 Calibration Buffer
!
A sachet containing 2 ziplock
bags of salt was supplied with
your pH Drive. Simply pour
BOTH sachets into the 250mL
bottle and fill to the 250mL
mar k w i t h d eio nis e d o r
distilled water. Shake well
until all salts have dissolved.
!
This solution will last up to 6
months after it has been
made, providing it is not
contaminated and is stored in
a cool, dark place
2. Remove the pH Sensor from the Tee
!
Disconnec t the pH Sensor to avoid
straining the cable and plug when
removing the sensor from the pH Tee.
Unscrew the sensor completely from the
Tee.
!
Reconnect the pH Sensor to the pH Drive.
!
Rinse the sensor well in clean water. De-
ionized or distilled water is ideal, but tap
water will suffice.
3. Place pH Sensor into pH7.0 Buffer
!
Decant a small amount of
pH7.0 buffer into a clean cup.
Place the pH Sensor into this
buffer, so it is immersed to
15mm or more, as per the
diagram on the right.
!
DO NOT place the pH Sensor
directly into the 250mL
bottle of pH7.0 buffer.
4. Calibration Procedure
!
Switch the pH Drive on by activating the
pool pump output of the Ozone Swim unit.
!
Press Setup to enter the user-friendly
menu system, then press ‡ and ˆ until
Calibrate pH Sensor is selected.
!
Press Enter to go to the Calibration screen.
The current reading is displayed in
brackets. The flashing “X” indicates that
the reading is not yet stable. DO NOT
calibrate until the “X” changes to a “ü”
!
Press ‡ and ˆ to set the “Cal:” pH value to
exactly 7.0.
!
Press Enter to calibrate the pH Sensor, or
press Cancel to quit without calibrating.
5. Re-fit pH Sensor and Power Connections
!
Disconnect the pH Sensor from the pH
Drive to avoid straining the cable and plug
when screwing into the pH Tee. Re-fit into
the pH Tee. Re-connect the pH Sensor to
the pH Drive when done.
!
Re-connect the pool pump to the Ozone
Swim power outlet.
!
Switch your pool equipment back on.
Calibration Failure
If pH calibration fails, the pH Drive will display
this message:
!
C l e a n t h e p H S e n s o r a s p e r t h e
troubleshooting section, then retr y
calibration.
!
If the calibration failure persists, the pH
Sensor will most likely need to be replaced.
 Loading...