80
TÉCNICA DE TRABAJO
TRONZADO UTILIZANDO UN
TRONCO O SOPORTE
S Recuerde que debe hacer siempre el pri-
mer corte por el lado retorcido del tronco.
S Deberá hundir el primer corte hasta un
1/3
del diámetro del tronco.
S Termine con el segundo corte.
tilando un tronco
1
er
corte
2
º
corte
2
º
corte
1
er
corte
1
er
corte
2
º
corte
Utilizan do un soporte
1
er
corte
2
º
corte
PODA Y RECORTE
ADVERTENCIA: Esté alerta y ten-
ga cuidado con los reculada. Cuando cortar
ramas y podar , nunca permita que la cadena
en movimiento toque ningún objeto en la
punta de la espada. Permitir tal contacto
puede causar graves heridas.
ADVERTENCIA: No se suba a los
árboles para podarlos o recortarlos. No per-
manezca de pié sobre escaleras, platafor-
mas, en un tronco o en cualquier posición en
la que pueda perder el equilibrio o el control
de la sierra.
PUNTOS IMPORTANTES
S Tenga cuidado con las ramas, pueden dar
latigazos. Tenga especial precaución al po-
dar ramas pequeñas. Éstas pueden engan-
charse en la motosierra y salir disparadas en
la dirección del operador o hacerle perder el
equilibrio.
S Preste atención y evite golpes por rebote.
Tenga cuidado con las ramas dobladas o
que soportan tensión. Evite golpes del rama-
je o de la sierra producidas por la tensión de
las fibras de la madera.
S De vez en cuando, despeje las ramas del
camino para no tropezar con ellas.
PODA
S Pode siempre los árboles después de talar-
los. Después podrá proceder a podarlos co-
rrectamente y con seguridad.
S Deje las ramas más grandes bajo el árbol
talado para que lo sujeten mientras trabaja.
S Comience por la base del tronco y trabaje
hacia la copa, podando todas las ramas.
Quite las ramas pequeñas de un solo corte.
S Siempre que sea posible, mantenga el árbol
entre usted y la motosierra.
S Pode los troncos y ramas más gruesos
con los sistemas de corte descritos en la
sección de TRONZADO SIN SOPORTE.
S Utilice siempre la técnica del corte por arriba
para las ramas pequeñas y las que estén
sueltas. Si utiliza el corte por debajo, al caer ,
las ramas pueden engancharse en la sierra.
RECORTE
ADVERTENCIA: Limite el recorta-
do de las ramas a aquellas que se encuen-
tren a la altura del hombro o más abajo. No
corte las ramas superiores. Este trabajo de-
berá hacerlo un profesional.
S El primer corte deberá llegar hasta
1/3 de
la parte inferior de la rama.
S Luego, con el segundo corte, termine de
cortar larama.Con el tercer corte por arri-
ba, deje un borde de 3 a 5 cm desde el
tronco del árbol.
Primer corte
Segundo corte
Tercer
corte
Borde
Técnica de recorte
9
Clutch
Cover
Lower
Hole
Guide Bar
Adjusting Pin
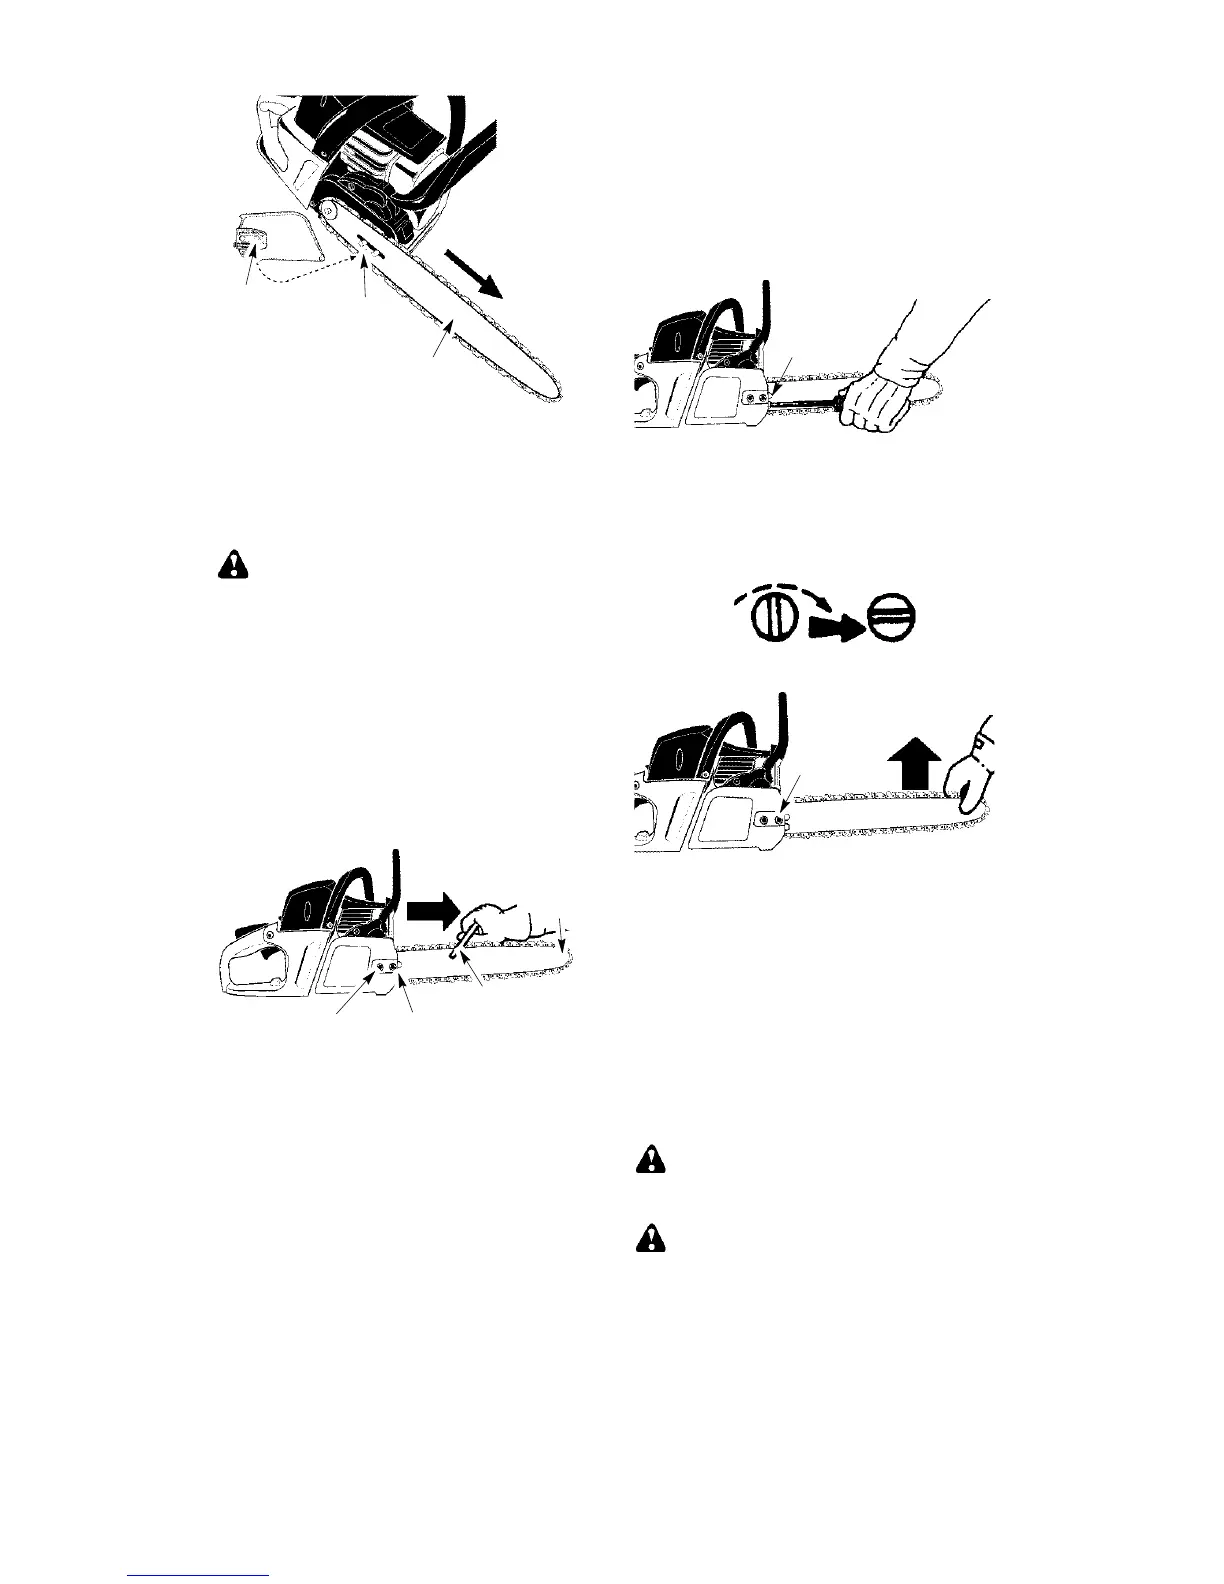
12. Install bar nuts and finger tighten only .
Once the chain is tensioned, you will
need to tighten bar nuts.
CHAIN TENSION (Including units
with chain already installed)
WARNING: W ear protective gloves
when handlingchain. The chain is sharp and
can cut you even when it is not moving.
NOTE: When adjusting chain tension,
make sure the bar nuts are finger tight only.
Attempting to tension the chain when the bar
nuts are tight can cause damage.
Checking the tension:
Use the screwdriver end of the chain adjust-
ment tool (bar tool) to move chain around
guide bar. If the chain does not rotate, it is too
tight. If the chain is too loose, itwill sag below
the bar.
Chain Adjustment
Tool
(Bar Tool)
Guid
Bar
Adjusting
Screw
Bar Nuts
Adjusting the tension:
Chain tension is very important. Chains
stretch during use. This is especially true
during the first few times you use your saw.
Always check chain tension each time you
use and refuel your saw .
1. Loosen bar nuts until they are finger tight
against the clutch cover .
2. Turn adjusting screw clockwise until chain
solidly contacts bottom of guide bar rail.
Adjusting
Screw
3. Using bar tool, roll chain around guide bar
to ensure all links are in bar groove.
4. Lift up tip of guide bar to check for sag.
Release tip of guide bar ,then turn adjust-
ing screw
1
/
4
turn clockwise. Repeat un-
til sag does not exist.
Adjusting Screw --
1
/
4
Turn
5. While lifting tip of guide bar, tighten bar
nuts securely with the bar tool.
Bar Nuts
6. Use the screwdriver end of thebar tool to
move chain around guide bar.
7. If chain does not rotate, it is too tight.
Slightly loosen bar nuts and loosen chain
by turning the adjusting screw
1
/
4
turn
counterclockwise. Retighten bar nuts.
8. If chain is too loose, it will sag below the
guidebar.DO NOT operate the saw if the
chain is loose.
NOTE: The chain is tensioned correctly
when the weight of the chain does not cause it
to sag below the guide bar (with the chain saw
sitting in an upright position), but the chain still
moves.
WARNING: If the saw is operated
with a loose chain, the chain could jump off
the guide bar and result in serious injury.
WARNING: Muffler is very hot during
and after use. Do not touch the muffler or al-
low combustible material such as dry grass
or fuel to do so.