52
a
b
c
d
Shift to the biggest (inmost) sprocket and check
whether the teeth of the sprocket and the teeth of
the guide pulley are all in a perfectly vertical line. Turn
the limit screw marked “L” clockwise until the rear
derailleur stops moving towards the spokes and can
neither be moved by actuating the shift lever nor by
pushing it with your hand.
This adjustment prevents the chain from getting
stuck between sprocket and spokes or the rear
derailleur or the derailleur cage from touching the
spokes, which could result in damage to the spokes,
the rear derailleur and the frame. In the worst case, it
could be impossible to continue cycling.
A
If your CENTURION bike has tipped over
or the rear derailleur received a blow,
the rear derailleur or its mount, also re-
ferred to as the derailleur hanger, might be bent.
It is advisable to check its range of movement
and readjust the limit screws, if necessary, after
such an incident or after mounting a new rear
wheel on your bike.
A
Be sure to do a test ride in an unfre-
quented place after adjusting the gears
((h), p. 51)
.
A
Let your CENTURION dealer maintain
and service your CENTURION bike reg-
ularly.
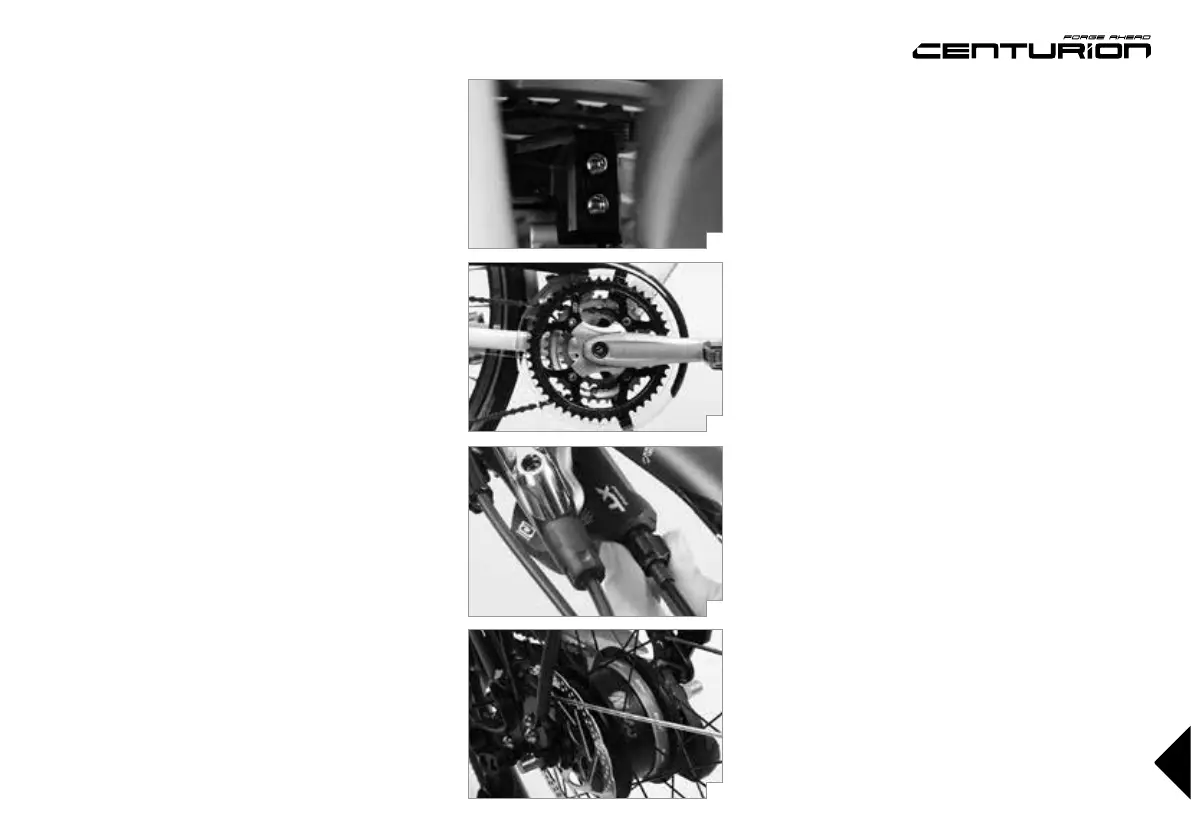
Adjusting the front derailleur
The range within which the front derailleur
(a)
keeps
the chain on the chainwheel without itself touching
the chain is quite small. If the chain tends to jump
off the chainwheel, you will need to reduce the
movement range in the same way as with the rear
derailleur, i.e. by turning the limit screws marked
“H“ and “L“. The limit screws are adjusted by your
CENTURION dealer. They do not alter their position
during normal use.
As with the rear derailleur, the cable of the front
derailleur
(b)
is subject to lengthening which leads
to a reduced precision in gear changing. If neces-
sary, shift to the small chainwheel and increase the
tension of the Bowden cable by turning the adjusting
bolt through which it passes at the entry to the gear
shifter
(c)
.
G
Always check after an accident wheth-
er the guide plates of the front derail-
leur are still parallel to the chainwheels.
Make sure they do not touch the large chainwheel
which would block the drive. Risk of an accident!
G
Adjusting the front derailleur is a very
delicate job. Improper adjustment can
cause the chain to jump off, thus inter-
rupting the power train. This can cause an acci-
dent!
A
Be sure to do a test ride in an unfre-
quented place after adjusting the gears.