EasyManua.ls Logo

Miller Millermatic 350P - User Manual

Miller Millermatic 350P
72 pages
Print Icon
To Next Page IconTo Next Page
Loading...
Millermatic 350 And
Millermatic 350P
with Roughneck 4012 Gun
Processes
Description
R
Arc Welding Power Source
and Wire Feeder
OM-1327 213 814N
200511
MIG (GMAW) Welding
Pulsed MIG (GMAW-P)
Flux Cored (FCAW) Welding
R
File: MIG (GMAW)
Visit our website at
www.MillerWelds.com

Table of Contents

Other manuals for Miller Millermatic 350P

Questions and Answers

  • S
    Sean CunninghamJul 30, 2025
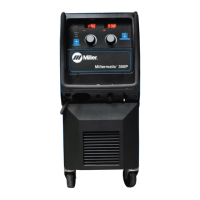
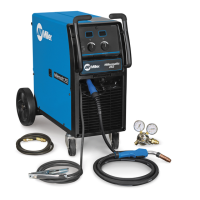
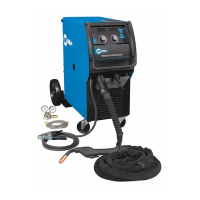
    How to fix Miller Millermatic 350P Welding System when there is no weld output and wire does not feed?
    • J
      James CollinsJul 30, 2025
      If your Miller Welding System has no weld output and the wire does not feed, here are a few things to check: * Ensure the line disconnect switch is On. * Replace the building line fuse or reset the circuit breaker if it's open. * Secure the gun trigger connections. If these steps do not solve the problem, have a Factory Authorized Service Agent check the Power switch, all board connections, and the main control board.
  • D
    Douglas WilliamsAug 3, 2025
    What to do if my Miller Millermatic 350P has no weld output but the wire feeds?
    • T
      Tiffany CampbellAug 3, 2025
      If your Miller Welding System has no weld output but the wire feeds, it could be due to a few reasons. One possibility is that thermistor RT1 or RT2 is open due to overheating. In this case, allow the fan to run so the unit can cool down to acceptable temperature limits. Other potential causes include a poor connection of the work clamp, which can be solved by ensuring good metal-to-metal contact. The contact tip may also need replacement. If these steps don't resolve the issue, a Factory Authorized Service Agent should check the main control board and main rectifier.
  • A
    amydunnAug 8, 2025
    Why is the wire speed low, high, or erratic on my Miller Millermatic 350P?
    • M
      Michael HansenAug 8, 2025
      If your Miller Welding System experiences low, high, or erratic wire speed, try these solutions: First, readjust the front panel settings. Next, ensure you're using the correct size drive rolls. Also, readjust the drive roll pressure. If the problem persists, consider replacing the inlet guide, contact tip, and/or liner. If these steps don't work, have a Factory Authorized Service Agent check the input voltage and main control board.
  • C
    Chris FreemanAug 12, 2025
    What to do if my Miller Welding System has no wire feed?
    • J
      Jeffrey GriffinAug 12, 2025
      If your Miller Welding System has no wire feed, you can try the following: 1. Turn the Wire Speed control to a higher setting. 2. Clear any obstruction in the gun contact tip or liner. 3. Readjust the drive roll pressure. 4. Change to the correct size drive rolls. 5. Rethread the welding wire. 6. Check the gun trigger and leads, and repair or replace the gun if necessary. Also, if 'H ? ?' appears on the voltmeter and ammeter displays, it indicates that thermistor RT1 or RT2 is open and the unit is overheated.
  • U
    ugonzalezAug 16, 2025
    Why does my Miller Millermatic 350P Welding System have low weld output?
    • J
      Joyce WashingtonAug 16, 2025
      If your Miller Welding System has low weld output, ensure the unit is connected to the proper input voltage, or check for low line voltage. If the issue persists, have a Factory Authorized Service Agent check the main control board and user interface board.
  • T
    Theresa SharpAug 21, 2025
    How to fix low weld output on a Miller Millermatic 350P?
    • J
      Joseph MaciasAug 21, 2025
      To fix low weld output on your Miller Welding System, connect the unit to the proper input voltage or check for low line voltage.
  • A
    Anthony LopezAug 25, 2025
    How to troubleshoot a Miller Welding System with no weld output and no wire feed?
    • K
      Kerry HillAug 26, 2025
      If your Miller Welding System has no weld output and the wire isn't feeding, ensure the line disconnect switch is On. Also, replace the building line fuse or reset the circuit breaker if it's open. Check and secure the gun trigger connections.

Summary

Safety Precautions and Hazards

Safety Symbols and Hazards

Explains manual symbols and potential hazards associated with arc welding.

Additional Safety & Warnings

Covers additional installation/operation symbols, Prop 65, and EMF information.

Principal Safety Standards

Lists key safety standards and references for welding equipment.

Installation Guide

Unit Specifications & Duty Cycle

Details unit specs, duty cycle limitations, and overheating prevention.

Output Terminals & Volt-Ampere Curve

Guide for connecting output terminals and understanding volt-ampere characteristics.

Work Clamp & Gun Holder Installation

Steps for installing the work clamp and welding gun holder.

Welding Gun Installation

Guide on how to properly install the welding gun.

Spool Gun & XR Gun Connection

Instructions for connecting Spoolmatic and XR series guns.

Wire Polarity & Gas Supply Setup

Setting gun polarity and installing the shielding gas supply.

Wire Spool & Electrical Service

Installing wire spool and guide to electrical service requirements.

Input Voltage & Power Connection

Selecting input voltage and connecting 1-phase or 3-phase power.

Welding Wire Threading

Step-by-step guide to threading welding wire for various gun types.

Operation Guide

Controls & MIG Mode Operation

Overview of controls and operation in MIG mode.

Operation Modes & Features

Explains Jog mode, Weld Status, Gun-On-Demand, and Tip Saver.

Pulse MIG Voltage & Gun Control

Voltage adjustment in Pulse MIG and Gun-On-Demand for Pulse MIG.

Weld Parameters & Crater Fill

Recommended weld parameters and crater fill settings.

Programming Features

MIG & Pulse Mode Programming

How to program the unit for MIG and Pulse welding modes.

Timer & Crater Fill Programming

Details on timer functions and setting crater fill parameters.

Arc Times & Hot Start Programming

Programming arc times, starts, and hot start parameters.

Hot Start & System Reset

How to set hot start parameters and perform a system reset.

Maintenance & Troubleshooting

Routine Maintenance & Overheating

Guidelines for regular maintenance and actions for overheating.

Capacitor Voltage & Drive Roll Maintenance

Safely measuring capacitor voltage and changing drive rolls/guides.

Troubleshooting Common Issues

A guide to diagnosing and resolving common welding problems.

Help Displays and Error Codes

Explains the meaning of various help messages and displays.

Electrical Diagrams

200 V;230 V;460 V Model Circuit Diagram

Electrical schematic for 200V, 230V, and 460V models.

460 V;575 V Model Circuit Diagram

Electrical schematic for 460V and 575V models.

Warranty Information

Warranty Support & Claims

Information on warranty claims, distributor support, and service.

Owners Record and Service Contact

Service and Parts Information

Contact details for distributors, service agencies, and parts ordering.

Miller Millermatic 350P Specifications

General IconGeneral
Input Phase3-Phase
Duty Cycle60% at 350 A
Wire Feed Speed50 - 700 IPM
Input Voltage208/230/460 V
Wire Diameter Range0.030 - 0.045 in
ProcessesMIG, Pulsed MIG
Rated Output350 A at 34 V, 60% Duty Cycle

Videos

How to Set Up the Millermatic 350P Aluminum MIG Welder

Related product manuals