11Instruction Manual
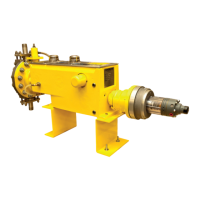
4.1 DIAPHRAGM REPLACEMENT
(FIGURE 2, SHEET 1 & 2)
The HPD diaphragm is extremely durable and often
lasts for many years of service. As a preventive
measure, however, Milton Roy recommends that
the diaphragms be replaced yearly to coincide
with annual check valve replacement. The liquid
end must be removed from the pump to replace
the diaphragm. The following is the diaphragm
replacement procedure:
1. Stop pump and relieve all pressure from system.
Isolate the liquid end from all sources of process
liquid with appropriate valving and purge liquid
end of all process uid.
2. Disconnect both the suction inlet and discharge
outlet from the piping system.
NOTE:
Approximately one pint of oil will still be present
in the contour plate area which will be released
when the diaphragm is removed. Prepare your
work area accordingly.
3. Remove the catchall cover and drain catchall of
hydraulic oil by removing pipe plug at bottom of
casing.
4. Completely loosen the piston rod retention nut
(1750) located inside the catchall.
5. Disconnect all tubing that connects the liquid
end to the pump body.
NOTE:
The liquid end is very heavy (150 lbs. or more).
A hoist is required to move it.
6. Support liquid end with a hoist and unscrew
nuts (980) that hold the displacement chamber
(630) to the pump body. Pull liquid end and
plunger assembly (2000) OFF, being careful
to protect the plunger from damage. Carefully
raise liquid end and plunger over catchall and
pull plunger from liquid end, allowing hydraulic
uid to drain back into catchall. Pull plunger
rmly but carefully, being careful not to bend or
otherwise damage the plunger.
7. Remove relieve valve (1040) and rell valve
(400) from displacement chamber.
8. Place liquid end, diaphragm head up
(bolts (710) on top), on a bench or other clean,
at, and convenient working area.
9. Once the diaphragm head is adequately
supported, the diaphragm head bolts (710)
can be removed. Carefully pull the diaphragm
head (700) away from the displacement
chamber. The diaphragm (670) may pull OFF
with the diaphragm head or remain with the
displacement chamber. Remove diaphragm
(670). (When equipped with leak detection
(See Section 5) remove two diaphragms,
leak detection ring A (8080), leak detection
ring B (8081), and leak detection ring spacer
(8082). Leak detection rings A, leak detection
rings B, and leak detection ring spacer can be
reused).
10. Clean all sealing surfaces and install new
diaphragm (670). (When equipped with
leak detection (See Section 5) install two
diaphragms, leak detection ring A (8080), leak
detection ring B (8081), and leak detection
ring spacer (8082) removed previously.
Apply a small amount of mineral oil between
the diaphragms. Stacked diaphragms and
rings may be aligned using the three small
holes as a guide).
NOTE:
Apply anti-seize thread lubricant to the bolts.
11. Reinstall liquid end on catchall, using the bolts
as a guide.
NOTE:
The bolt torque value stamped on the head only
applies to the material grade supplied with the
pump.
SECTION 4 - MAINTENANCE
 Loading...