5. Cut away the plasterboard and/or brick work
to the required depth.
Important! This depth ‘X’ will depend on the
nished wall thickness e.g. tiles or facia board.
Refer to the table for this measurement.
For stud partitions depth ‘X’ refers to the
distance from the rear mounting e.g. timber
noggin, to the front of the wall (before tiling).
Finished Wall
Surface
Finished Wall
Thickness
Depth ‘X’
Rear Mounting (Solid
Wall or Timber Noggin)
Finished Wall Thickness
(e.g. tile and adhesive)
Wall Cutout Depth
‘X’
4 mm 81 - 63 mm
6 mm 79 - 61 mm
8 mm 77 - 59 mm
10 mm 75 - 57 mm
12 mm 73 - 55 mm
14 mm 71 - 55 mm
16 mm 69 - 55 mm
18 mm 67 - 55 mm
20 mm 65 - 55 mm
22 mm 63 - 55 mm
24 mm 61 - 55 mm
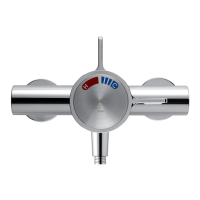
6. Ret the building-in shroud to the mixer using
the two shroud screws removed earlier.
7.
Make sure that the mixer is level and central
in the hole, and square to the nished wall
surface (or the control components will not t
correctly), then mark the positions of two xing
screw holes on the wall.
8. For solid walls drill two 6 mm holes for the wall
plugs.
9.
Fit the hot and cold supply pipework (Hot -
Left, Cold - Right).
10.
Caution! It is essential at this point
that the supply pipework is thoroughly
ushedthroughbeforeconnectiontothe
mixer. Failure to do so may result in product
malfunction and will not be covered under the
guarantee.