This Quick Start Guide is for the following
Series 275 Mini-Convectron Modules:
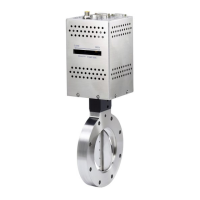
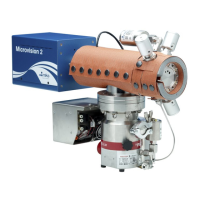
Figure 1: Mini-Convectron with 1 Process Control
Setpoint and No Display
Figure 2: Mini-Convectron with 2 Process Control
Setpoints and No Display
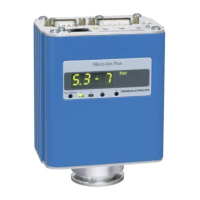
Figure 3: Mini-Convectron with 2 Process Control
Setpoints and Digital Display in Torr or
Pascal
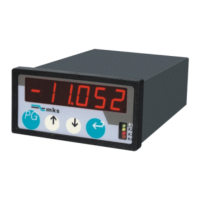
Figure 4: Mini-Convectron with 0 Process Control
Setpoints and Digital Display in Torr or
Pascal
Catalog Numbers for Mini-Convectron
Modules covered in this Quick Start
Guide and Instruction Manual 275512
Modules with 1 Process Control Setpoint and
No Digital Display: (Figure 1)
• 275800-EU thru 275809-EU
Modules with 2 Process Control Setpoints and
No Digital Display: (Figure 2)
• 275870-EU thru 275879-EU
Modules with 2 Process Control Setpoints and
Digital Display in Torr or Pascal: (Figure 3)
• 275904-EU thru 275914-EU (display in Torr)
• 275904-EU-P thru 275914-EU-P (display in Pascal)
Modules with 0 Process Control Setpoints and
Digital Display in Torr or Pascal (Figure 4)
• 275915-EU thru 275923-EU (display in Torr)
• 275915-EU-P thru 275925-EU-P (display in Pascal)
General Description
The Series 275 Mini-Convectron Vacuum Gauge Module
is a CE Compliant, high precision convection enhanced
Pirani-style gauge and electronics enclosure that
measures vacuum pressures from 1 x 10
-4
Torr to 1000
To rr.
Benefits of the design include:
• Compact, convenient, cost saving vacuum
measurement.
• Each gauge is calibrated at the factory which assures
the highest performance.
• All-metal electronics enclosure provides immunity to
RF noise.
• Power requirement of only 11.5 Vdc to 26.5 Vdc.
• Replaceable gauge which can easily be replaced
using only a screwdriver.
The nonlinear output signal (Vdc) can be used to as a
pressure reading and sent to other devices in the
process to control process actions.
The adjustable setpoint relays can be used to control
various devices such as safety interlock, valve, digital
input for a scanner, or programmable logic controller.
The setpoint relay trip points can be set to customized
pressure settings to turn power ON or OFF to the
appropriate device.
Intended Use
The intended use of this instrument is to measure
vacuum pressure in the range of 1 x 10
-4
Torr to 1000
Torr. This device is to be used only in accordance with
the instructions in this Quick Start Guide and the
Instruction Manual, p/n 275512.
Improper Use
• Removal of any factory installed components
• Modifying any factory installed components
• Removal of any labeling or warranty seals
• Operation of this device in any condensing vapor or
liquid environment
• CE Conformity: The manufacturer’s declaration
becomes invalid if the user modifies the original
product or installs additional components.
Safety Notices
These safety precautions must be observed during all
phases of installation, operation, and service of this
product. Failure to comply with these precautions or with
specific warnings elsewhere in this instruction guide
violates safety standards of design, manufacture, and
intended use of the instrument. MKS Instruments, Inc./
Granville-Phillips disclaims all liability for the customer's
failure to comply with these requirements.
These instructions do not and cannot provide for every
contingency that may arise in connection with the
installation, operation, or maintenance of this product. If
you require further assistance, please contact MKS,
Granville-Phillips Division at the address given on this
instruction guide.
Safety Notices / Warnings
Figure 5: Safety Symbol on the Mini-Convectron
Module
System Grounding
High Voltage
Installation of the Mini-Convectron
Module on the Vacuum Chamber
Physical Dimensions of the Module
Figure 6: Dimensions of the Mini-Convectron
Module
Table 1: Mini-Convectron Vacuum Connections
Install Pressure Relief Devices
Before installing the module, install appropriate pressure
relief devices in the vacuum system.
Granville-Phillips does not supply pressure relief valves
or rupture disks. Suppliers of pressure relief valves and
pressure relief disks can be located via an online search,
and are listed on ThomasNet.com under “Relief Valves”
and “Rupture Discs. Confirm that these safety devices
are properly installed before installing and operating
the Mini-Convectron Module.
Mounting Location
• Locate the Mini-Convectron Module where it can be
easily accessed.
• For greatest accuracy and repeatability, locate the
Mini-Convectron Module in a stable, room-
temperature environment. Ambient temperature
should never exceed 40 °C (104 °F) operating, non-
condensing, or 85 °C (185 °F) non-operating.
• Locate the Mini-Convectron Module away from
internal and external heat sources and in an area
where ambient temperature remains reasonably
constant. Do not mount the Module above other
equipment that generates excessive heat.
• Do not locate the Mini-Convectron Module directly
below the chamber which may allow sputtering
particles or other contamination to fall into the gauge.
• Do not locate the Mini-Convectron Module near the
pump, where gauge pressure might be lower than
system vacuum pressure.
• Do not locate the Mini-Convectron Module near a gas
inlet or other source of contamination.
• Do not locate the Mini-Convectron Module where it
will be exposed to corrosive gases such as mercury
vapor or fluorine.
• Do not locate the module where it will vibrate.
Vibration causes convection cooling, resulting in
inaccurate high pressure readings.
Mounting Orientation
For proper operation of the module above 1 Torr, orient
the module so the axis is horizontal. Although the
Convectron gauge will read correctly below 1 Torr with
the module mounted in any position, inaccurate readings
will result at pressures above 1 Torr if the module axis is
not horizontal.
Figure 7: Recommended Mounting Orientations
Attach the Mini-Convectron Module to the
Vacuum Chamber
Connect the Mini-Convectron Module to the vacuum
system flange using the appropriate gasket and
mounting hardware.
Figure 8: Common Vacuum Connections
For a 1/8-inch pipe thread:
The 1/8 NPT pipe thread accommodates a standard 1/8
NPT female fitting.
1. Wrap the threads of the port to the vacuum chamber
with thread seal tape.
2. Without using a wrench or other tool, tighten the
module just enough to achieve a seal.
For a VCR or VCO-type fitting:
1. Remove the plastic or metal bead protector cap from
the fitting.
2. If a gasket is used, place the gasket into the female
nut.
3. Assemble the components and tighten them to
finger-tight.
4. While holding a back-up wrench stationary, tighten
the female nut 1/8 turn past finger-tight on 316
stainless steel or nickel gaskets, or 1/4 turn past
finger-tight on copper or aluminum gaskets.
For an NW10KF through NW50KF flange:
The KF mounting system requires O-rings and centering
rings between mating flanges.
1. Tighten the clamp to compress the mating flanges
together.
2. Seal the O-ring.
For an NW16CF (1.33 inch) or NW35CF (2.75 inch)
flange:
To minimize the possibility of leaks with ConFlat flanges,
use high strength stainless steel bolts and a new, clean
OFHC copper gasket. Avoid scratching the seal
surfaces. To avoid contamination, install metal gaskets.
1. Finger tighten all bolts.
2. Use a wrench to continue tightening 1/8 turn at a
time in crisscross order (1, 4, 2, 5, 3, 6) until flange
faces make contact.
3. Further tighten each bolt about 1/16 turn.
Electrical Connections and Power
Requirements
The cable is user-supplied. Granville-Phillips does not
supply the cable. Install externally shielded cable and
connect the shield to ground.
At the module end of the cable, connect the shield to the
outer shell of the subminiature D connector.
Connect 11.5 to 26.5 Vdc power supply to terminals 3
and 4.
• Terminal 4 (ground) is negative (–).
• Terminal 3 (input) is positive (+).
See the Grounding Requirements and Specifications in
this document.
Figure 9: 9-Pin Connector for Modules with 1
Setpoint Relay
Figure 10: 15-Pin Connector for Modules with 2
Setpoint Relays
Grounding Requirements
If the gauge has a ConFlat-type flange, the module will
be properly grounded via the vacuum chamber
connection.
If the gauge has an NWxxKF flange, check continuity
between the gauge and the vacuum chamber.
If the fitting requires a rubber gasket, rubber O-ring,
Teflon tape, or other material that prevents metal-to-
metal contact between the housing base and the vacuum
chamber, attach a ground connection as illustrated in
Figure 11.
1. Attach a metal hose clamp or other metal clamp to
the gauge stem of the housing.
2. Install a 3.31 mm
2
(12 AWG) or larger copper wire
between the clamp and a metal ground lug, bolt, or
stud on the vacuum chamber.
Figure 11: Ground Connection
Operation
It is important to understand that the pressure indicated
by a Convectron Gauge depends on the type of gas, the
orientation of the gauge axis, and on the gas density in
the gauge. Convectron Gauges are normally factory
calibrated for N
2
(air has approximately the same
calibration). With proper precautions, the Convectron
Gauge may be used for pressure measurement of
certain other gases.