EasyManua.ls Logo

modway EEI-2155 User Manual

modway EEI-2155
4 pages
To Next Page IconTo Next Page
Page #1 background imageLoading...
Page #1 background image
Customer Service 908-368-1025
www.modwayfurniture.com Page 1 of 4
EEI –2155 OFFICE CHAIR
Hardware:
Component:
1
Bolt M6x18mm x8
2
Allen Wrench x1
Thank you for purchasing the MODWAY OFFICE CHAIR
Before you start, here is some helpful advice:
1.We suggest you spend a short time reading through this leaflet and then follow the simple step by step
instructions.
2.Owing to the size and weight of the office chair, we recommend that it is assembled by two adults, on a carpeted
or padded area, in the room that it is intended for. Approximate assembly time: 15 minutes.
3.Please do not use any tools other than those provided or recommended in these instructions.
4.Please do not throw away any of the packaging or instructions until you have checked all the components and
hardware and the furniture is fully assembled.
5.Assemble all components loosely until advised to tighten. Depending on use, it may be necessary to tighten the
components from time to time, so please save the tools that have been provided.
6.Please keep all pieces out of reach of small children.
B
A
C
F
3
Plastic Cover x6
F
E
A
Chair Back with Arm x1
B
Chair Seat x1
C
D
Control Mechanism x1
E
Chair Base x1
F
Castor x5 Cylinder Column x1
F
F
D
Question and Answer IconNeed help?

Do you have a question about the modway EEI-2155 and is the answer not in the manual?

modway EEI-2155 Specifications

General IconGeneral
CategoryIndoor Furnishing
ColorAzure
Product NameEEI-2155
MaterialFabric
StyleModern
Dimensions33"L x 31.5"W x 34.5"H
Product Dimensions33"L x 31.5"W x 34.5"H

Summary

Assembly Steps Overview

Step 1: Attach Castors

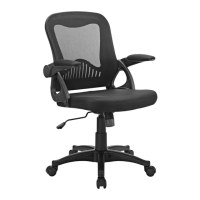
Insert castors into the chair base upside down on a carpeted surface.

Step 2: Assemble Seat and Back

Attach chair back with arms to the seat using bolts and tighten with Allen wrench.

Step 3: Attach Control Mechanism

Secure the control mechanism to the bottom of the chair seat using bolts.

Step 4: Insert Cylinder Column

Insert the cylinder column into the bottom of the control mechanism.

Step 5: Connect Chair Base

Insert the assembled chair base into the cylinder column.

Step 6: Final Adjustments

Carefully turn over the chair and place armrests in the correct position.

Related product manuals