EasyManua.ls Logo

Moen 87659SRS User Manual

Moen 87659SRS
8 pages
To Next Page IconTo Next Page
Page #1 background imageLoading...
Page #1 background image
ONE HANDLE PULLOUT KITCHEN FAUCET
WITH SOAP DISPENSER
MODEL 87659SRS
MEZCLADORA MONOMANDO RETRÁCTIL PARA
COCINA CON DOSIFICADOR DE JABÓN
MODELO 87659SRS
ROBINET DE CUISINE À BEC RÉTRACTABLE ET UNE
POIGNÉE AVEC DISTRIBUTEUR DE SAVON
MODÈLE 87659SRS
Please Contact Moen First
For Installation Help, Missing or
Replacement Parts
(USA)
1-800-BUY-MOEN (1-800-289-6636)
Mon - Fri 8:00 AM to 7:00 PM, Eastern
Sat. 9:00 AM to 3:00 PM Eastern
WWW.MOEN.COM
(Canada)
1-800-465-6130
Mon - Fri 7:30 AM to 7:00 PM, Eastern
WWW.MOEN.CA
Por favor, contáctese primero con
Moen
Para obtener ayuda de instalación, piezas
faltantes o de recambio
01-800-718-4345
Lunes a viernes de 8:00 a 20:00 hs.
(Costa Este)
Sáb. 8:00 a 18:30 hs. (Costa Este)
WWW.MOEN.COM.MX
Veuillez dabord contacter Moen
en cas de problèmes avec linstallation, ou
pour obtenir toute pièce manquante ou
de rechange
1-800-465-6130
Du lundi au vendredi :
de 7 h 30 à 19 h, HE
WWW.MOEN.CA
INS2228A - 5/15
Installation Guide
Guía de instalación
Guide d’installation
HELPFUL TOOLS
For safety and ease of
replacement, Moen
recommends the use of these
helpful tools.
HERRAMIENTAS ÚTILES
Para que el cambio de la llave
sea fácil y seguro, Moen le
recomienda usar estas útiles
herramientas.
OUTILS UTILES
Par mesure de sécurité et
pour faciliter l’installation,
Moen suggère l’utilisation des
outils suivants.
CAUTION — TIPS FOR REMOVAL OF OLD FAUCET:
Always turn water supply OFF before removing existing faucet or
disassembling the valve. Open faucet handle to relieve water pressure
PRECAUCIÓN — CONSEJOS PARA CAMBIAR LA LLAVE MEZCLADORA:
Siempre CIERRE la toma de agua antes de quitar la llave existente o desmontar la válvula.
Abra la llave para liberar la presión, y asegúrese de que esté bien cerrada el agua.
UGGESTIONS POUR ENLEVER L’ANCIEN ROBINET :
Toujours couper l’alimentation en eau avant d’enlever ou de démonter le
robinet. Ouvrir le robinet pour libérer la pression d’eau et pour s’assurer que
l’alimentation en eau a bien été coupée.
Above sink
Encima del lavabo
Au-dessus de l’évier
Below sink
Debajo del fregadero
Sous l'évier
Icon Legend/Leyenda de Iconos/
Légende des icônes
Question and Answer IconNeed help?

Do you have a question about the Moen 87659SRS and is the answer not in the manual?

Moen 87659SRS Specifications

General IconGeneral
FinishSpot Resist Stainless
Flow Rate1.5 GPM
Handle TypeLever
Installation TypeDeck Mount
Number of Handles1
Faucet Height15.5 inches
Spout Height8.5 inches
Supply Lines IncludedYes
ADA CompliantYes
Model Number87659SRS
MaterialMetal
WarrantyLimited Lifetime
TypePull Down Kitchen Faucet
CollectionArbor
Spray TypeAerated Stream, Powerful Cleaning Spray

Summary

Helpful Tools

Safety Warning: Old Faucet Removal

Tips for Removal of Old Faucet

Provides crucial safety advice and steps to follow before removing an old faucet.

Parts List and Diagram

Faucet Installation Steps

Step 1: Install Faucet Body Gasket

Guides the installation of the faucet body gasket into the faucet body groove.

Step 2A: Single Hole Installation

Details the process for a single-hole faucet application, including spout base and gasket placement.

Step 2B: Three Hole Installation

Outlines the procedure for a three-hole application, involving deck plate gasket and deck plate.

Step 3: Three Hole Installation Details

Continues the three-hole installation, focusing on spout base and faucet body placement on deck plate.

Step 4: Check Faucet Rotation

Instructs to verify that the faucet rotates correctly after initial placement.

Step 5: Install Mounting Bracket

Details installing the mounting bracket and nut based on deck thickness.

Step 6: Tighten Mounting Nut

Explains how to use the installation tool to tighten the mounting nut securely.

Step 7: Attach Hose Protector

Guides the hand-threading of the hose protector onto the hose.

Step 8: Insert Pullout Hose

Instructs to insert the pullout hose into the opening and feed it through the faucet body.

Step 9: Install Hose Weight

Details attaching the hose weight onto the pullout hose for proper retraction.

Step 10: Connect Quick Connect Adapter

Guides removal of hose cap and connection to the quick connect adapter.

Step 11: Attach Flexible Lines

Covers attaching flexible supply lines to shut-off valves and tightening them.

Step 12: Test Faucet and Check Leaks

Instructs to turn on water, run faucet, and check for any leaks.

Step 13: Prepare Spray Wand

Details removing the spray wand cap and verifying internal components before attaching hose.

Step 14: Tighten Hose Nut to Wand

Explains how to tighten the hose nut to the spray wand, avoiding overtightening.

Step 18: Final Assembly and Installation

Guides the final assembly of the soap dispenser pump and base, and confirms finished installation.

Spray Wand Operation Features

Soap Dispenser Installation

Step 15: Install Soap Dispenser Base

Details placing the soap dispenser base through the gasket and into the sink hole.

Step 16: Mount Soap Dispenser Nut

Guides threading and hand-tightening the mounting nut onto the soap dispenser base.

Step 17: Attach Soap Dispenser Bottle

Instructs to thread the bottle onto the base and fill with liquid soap.
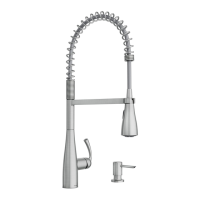
Warranty Information

Related product manuals