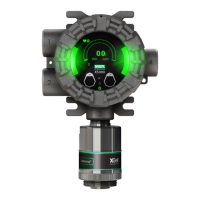
4.2.2 Sensor Setup
Configure gas unit, range, calibration level (i.e. span value), warning and alarm levels and whether they are latching or non-
latching.
The Sensor Setup menu will go through each sub menu before exiting Sensor Setup.
1. Hold finger on button while menu selections scroll across screen.
2. Remove finger when Setup menu appears.
3. Touch button when Sensor Setup appears (first option).
4. The following menus are available under Sensor Setup.
When "Finished?" is selected under each of the following menus, the next menu will start.
a. Sensor 1/Sensor 2
b. Disable
c. Gas Label & Unit
d. Range
e. Cal Level (Span Value)
f. Warning Level
g. Warning Action
h. Alarm Level
i. Alarm Action
j. Diffusion Supervision
k. Reset
5. Select "Finished?" after the Reset menu to go back to the main Setup menu.
Disable Sensor (for Digital Sensors Only)
When removing a sensor from the transmitter while under power, the S5000 will enter a Sensor Missing fault condition after the
twominute SwapDelay period has expired (if enabled). If SwapDelay is disabled, the transmitter will go into Sensor Missing
fault immediately after removing the sensor from the transmitter. If the system is off at the time a sensor is removed, the
transmitter will go into fault after its startup sequence. This fault condition can be removed by disabling the affected sensor
position.
Disabling a sensor removes the fault and stops communications with the sensor, the sensor’s reading on the display is
removed, and the mAchannel for that sensor position is set to 0mA. By default, the S5000 has the Sensor 2 position
disabled. If at any time a sensor is connected to a position that is disabled, the device will automatically enable that sensor
position.
To disable the sensor after removal:
1. Go to Sensor Setup menu.
2. Touch button when Disable appears on screen.
3. Select Sensor 1 or Sensor 2.
Current status (enabled/disabled) displays.
4. Touch button to toggle to desired status.
48
4 Operation US