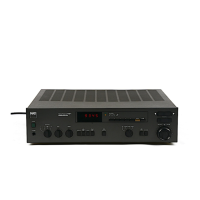
www.SteamPoweredRadio.Com
ENGLISH
A NOTE ON INSTALLATION
This unit may be installed on any sturdy, level surface.
Since its power transformer generates a magnetic hum field
of moderate strength, a turntable (especially one with a
moving-coil pickup cartridge) should not be located directly
to the left of the amplifier nor directly above
it.
The amplifier generates a modest amount of heat and
thus requires some ventilation.
Do
not place
it
on a rug or
other soft surface that
it
could sink into, obstructing the air
inlets on its bottom. And be careful not to obstruct the air
outlet grille on the top cover.
CAUTION:
To
prevent a fire or shock hazard, do not
permit liquid or moisture to enter the amplifier. If liquid
is
accidentally spilled on it, immediately shut off its power and
unplug its AC power cord. Allow sufficient time for complete
evaporation to occur before operating the amplifier again. (If
the liquid
is
anything but water and/or alcohol, the amplifier
should be examined by a service technician before power
is
applied to
it
.)
Do
not open the amplifier, or attempt to modify or repair
it yourself. Refer all servicing to a qualified technician.
CAUTION: TO PREVENT ELECTRIC SHOCK
DO
NOT USE
THIS
(POLARIZED)
PLUG WITH AN EXTENSION CORD, RECEPTACLE
OR
OTHER OUTLET UNLESS THE
BLADES CAN
BE
FULLY INSERTED TO PREVENT BLADE EXPOSURE.
ATTENTION: POUR PREVENIR LES CHOCS ELECTRIQUES NE
PAS
UTILISER
CETTE FICHE POLARISEE
AVEC
UN PROLONGATEUR, UNE PRISE
DE
COURANT
OU
UNE AUTRE SORTIE
DE
COURANT, SAUF SI LES
LAMES
PEUVENT ETRE
INSEREES A FOND SANS LAISSER AUCUNE PARTIE A DECOUVERT.
Th
lig. h. tning flash with arrowhead. with
in
an
equilater
al
angle. 1s intended
to
alert the user of the presence of
ninsulated "dangerous voltage
··
wi
th
in
th
e product's enclo-
sure: that may be of sufficient magnitude to constitute a
risk of electric shock to persons.
3
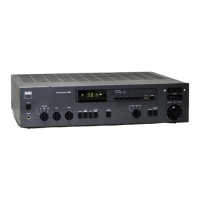
REAR PANEL CONNECTIONS
1.
AC LINE CORD
Plug the AC line cord into a "live" wall socket.
2. AC OUTLETS (not
in
U.K. model)
The AC power line cords of other stereo compo-
nents may be plugged into these accessory outlets. The
SWITCHED outlet.
is
intended for all-electronic products
(e.g
.,
a tuner, equalizer, or other signal processor), and will
be switched on and off by the amplifier's main POWER
button. The UNSWITCHED outlet should be used to power
products involving mechanical operations
(e
.g., a turntable
or tape deck); such products should
be
switched on and off
with their own power switches.
The UNSWITCHED outlet can also
be
used to power
any device containing a clock timer, or a digital tuner that
requires uninterrupted AC power to maintain station tuning
information stored
in
its memory.
3. SPEAKERS A
If the wire connecting each loudspeaker will be less than
6 meters (20 feet) long, then connections should be made
using 18-gauge wire such as common lamp cord ("zip" cord),
available from hardware and electrical-supply stores
in
either
white, black, or brown insulation.
If the wiring to the speakers will be longer than 6 meters,
heavier 16-gauge or 14-gauge wire
is
preferred. Heavy-duty
wiring
is
especially desirable if you are using speakers of
low impedance.
The loudspeaker terminals are heavy duty binding posts.
Each binding post consists of a threaded metal shaft and a
red or black screw-on bushing. Connections may be made
in
either of two ways.
(1)
A small horizontal hole through the lower end of
the threaded shaft accepts bared wires up to
16
gauge
in
thickness.
To
make connections, separate the two conductors
in
each speaker cable. Strip off about a half-inch
(1
cm) of
insulation from each, and
in
each conductor twist the exposed
wire strands together. Unscrew the bushing a few turns to
expose the hole, insert the bare speaker wire into the hole
in
the metal shaft, and screw the bushing down tight.
(2)
A standard spring-type banana plug may be inserted
axially into the top of each binding post. The binding posts
have the
¾-
inch
(19
mm) spacing required to accept stan-
dard dual-banana plugs. Purchase dual-banana plugs and
install them on your speaker cables (or purchase speaker
wires with dual-banana plugs already attached), and plug
the dual-banana connectors into the binding-post terminals.
Phasing. Stereo speakers should operate
in
phase
with each other
in
order to yield a good stereo image and
to
reinforce rather than cancel each other's output at low
frequencies.
If
your speakers are easily moved, their phasing
can easily be checked. Make the connections to both speak-
ers, place the speakers face-to-face only a few inches apart,
play some music, and listen. Then swap the connection of
the two wires at the back of ONE of the speakers, and listen
again. The connection which produces the fullest, boomiest
bass output is the correct one. Connect the wires securely to
the speaker terminals, being careful not to leave any loose
strands of wire that might touch the wrong terminal and
create a partial short-circuit; then move the speakers to
their intended locations.
Th
ex
.clamation point w. ithin
an
equ. ilateral trian. gle
is
intended
alert the user of the presence of important operating and
maintenance (servicin
g)
instructio
ns
in
the literature
accompanying the appliance.

 Loading...