© National Instruments Corporation 3 NI-DAQmx and DAQ Device Installation Guide
CompactDAQ Devices
Complete the following steps to install a C Series I/O module in a
CompactDAQ system:
1. Attach a ring lug to a 14 AWG (1.6 mm) wire. Connect the ring lug to the
ground terminal on the side of the NI cDAQ chassis using the ground
screw. Attach the other end of the wire to the system safety ground.
Additionally, attach a wire with a ring lug to all other C Series I/O
module cable shields. You must connect this wire to the ground terminal
of the chassis using the ground screw.
Caution If hazardous voltages, greater than 42.4 V or 60 VDC to
earth ground, are present, special safety guidelines apply. Refer to
the C Series module user guide before continuing.
2. Install C Series I/O modules. Squeeze both C Series I/O module latches,
insert each I/O module into an empty module slot, and press until both
latches lock the module in place. Refer to the C Series I/O module user
guide for more information, such as signal connections, safety
precautions, and module ratings.
.
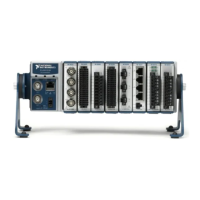
Figure 1. Setting up a cDAQ Chassis
3. If you have a USB cDAQ chassis, connect the chassis using the USB
cable supplied with your chassis to any available USB port on your
computer system. If you have an Ethernet cDAQ chassis, connect the
chassis to your network using a CAT5e or crossover Ethernet cable. Refer
to the DAQ Getting Started Guide for network configuration information.
4. Connect the power source to the chassis. Most cDAQ chassis require an
external power supply that meets the specifications listed in the chassis
user documentation.
1 USB or Ethernet Connector 2 C Series I/O Module
2
1