6
1. Introduction
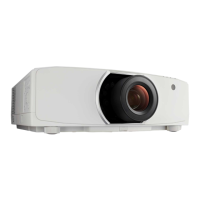
❸ Part Names of the Projector
Front/Top
Thelensissoldseparately.ThedescriptionbelowisforwhentheNP13ZLlensismounted.
Controls
(→ page 9)
Lens
Remote Sensor (located on the
front and the rear)
(→ page 13)
Remote Sensor
(→ page 13)
Zoom Lever/Zoom Ring (→ page
28)
Lens Cap
(The optional lens is shipped with
the lens cap.)
Focus Ring
(→ page 23)
Adjustable Tilt Foot
(→ page 29)
Indicator Section
(→ page 9)
Lens Release Button
(→ page 142)
Adjustable Tilt Foot
(→ page 29)
Exhaust vent
Heated air is exhausted from here.
Mounting the strap
Beforestartingtouse,mountthestrapstothelampcoverandtheltercoverforpreventingthemfromdroppingdown.
Lamp cover
Preparation:Removethelampcoverfromtheprojector.
Refertotheclause“Replacingthelamp”onpage156 about the lamp cover installation.
1. Insert the L-shaped part of the lamp cover strap (flat resinoid strap) to the protruded section on the rear
face of the lamp cover as the below illustration.
Hole for xing the strap
2. Insert the opposite side of the lamp cover strap to the hole on the projector body.
Lamp Cover (→ page 156)
Security Bar
Attach an anti-theft device.
The security bar accepts security
wires or chains up to 0.18 inch/4.6
mm in diameter.

 Loading...