4
1. Place dehydrator in a warm, dry room on a stable, level, heat-resistant
surface. Leave at least 6 inches of free space around the entire appliance.
2. Place food onto the trays and load trays into the dehydrator. Avoid
overloading trays or overlapping food. Close dehydrator door.
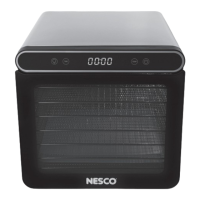
3. Plug appliance into a 120-volt power source. The entire control panel will
Illuminate for 3 seconds and then turn o except for the POWER button
which will remain illuminated while the dehydrator is in standby mode. The
dehydrator will remain in standby mode while it is plugged in.
4. Press the power button to activate dehydrator. All control panel functions
will illuminate for 3 seconds after which the arrow buttons will turn o. TIME,
TEMPERATURE, POWER and interior light buttons will remain illuminated.
5. To set the time, press the TIME button. The display will flash countdown
time and the increase and decrease arrow buttons will illuminate. If the
arrow buttons are not pressed within 3 seconds, they will become inactive.
To reactivate, simply press the TIME button again and enter in the count-
down time desired. Pressing either arrow button will result in a 30-minute
increment adjustment. To adjust the time faster, press either arrow button
for more than 1 second. After desired countdown time is set, the time
display will stop flashing and the arrow buttons will turn o. The countdown
time range for this dehydrator is from 1 hour to 24 hours.
6. To set the temperature, press the TEMP button. The display will flash the
current temperature setting and the increase and decrease arrow buttons
will illuminate. If the arrow buttons are not pressed within 3 seconds, they
will become inactive. To reactivate, simply press the TEMP button again
and select the drying temperature desired. Note, pressing either arrow
button will result in an adjustment in 5° increments. After desired
temperature is set, the display will stop flashing and the arrow buttons will
turn o. The temperature range for this dehydrator is from 90°F to 160°F.
7. After the time and temperature are set, press the POWER button to start
dehydrator’s programmed drying cycle, the fan and heater will turn on. The
display shows the amount of time left during the countdown cycle.
NOTE: You can change the time and temperature at any time by pressing
TEMP/TIME.
8. After the display has counted down to 00:00, the fan will continue to run for
an additional 10 seconds and then turn o. The display will also go into a
standby mode only leaving the POWER button illuminated.
9. Unplug the dehydrator. To remove trays, use a kitchen towel, heat-resistant
glove, or oven mitt to handle them.
10. For final clean-up, reference the Care and Cleaning of this manual.
NOTE: If you press the POWER button during operation, the dehydrator will
turn o and go into standby mode. The dehydrator will always save your
previous temperature and time settings. To restart the dehydrator, press
the POWER button, confirm the time and temperature, then press the
POWER button again.
Operating Instructions