*UHHQ /LQNDW
<HOORZ /LQNDW
3RZHU
5HVHW
,'
)DQ
6WDFN
0DVWHU
)DFWRU\
'HIDXOWV
*67;6
)
)
*UHHQ */LQN<HOORZ *
%OLQN $&7
6)3
)
)
/LQN$FW0RGH
3RZHU
5HVHW
)DQ
)DFWRU\
'HIDXOWV
;67
7
) )
7
CC
19
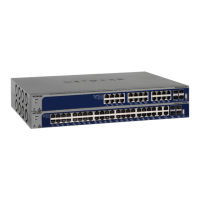
XS712T Smart Switch
Figure 7. Connecting devices to the switch
Note: Ethernet specifications limit the cable length between the switch and
the attached device to 100 meters (328 feet).
To connect devices to the switch:
Using a Category 5 (Cat 5) unshielded twisted-p
air (UTP) cable terminated with an RJ-45
connector, connect each computer to an RJ-45 network port on the switch front panel.
See the previous figure.
Step 5: Install an SFP Transceiver Module
The following procedure describes how to install an optional SFP (or SFP+) transceiver
module into one of the SFP ports of the switch.
Note: Contact your NETGEAR sales office to buy these modules. If you do
not want to install an SFP module, skip this procedure.
To install an SFP transceiver:
1. I
nsert the transceiver into the SFP port.
2. Press firmly on the fla
nge of the module to seat it securely into the connector.
You can install up to two Gigabit or 10-Gigabit Ethernet modules using this procedure.
 Loading...