EasyManua.ls Logo

newell DYMO LabelManager 210D+ - User Manual

newell DYMO LabelManager 210D+
18 pages
Print Icon
To Next Page IconTo Next Page
Loading...
User Guide
LabelManager 210D+

Other manuals for newell DYMO LabelManager 210D+

Question and Answer IconNeed help?

Do you have a question about the newell DYMO LabelManager 210D+ and is the answer not in the manual?

Summary

Getting Started with Your Label Maker

Powering the Label Maker

Learn how to connect the label maker to power sources, including batteries and AC adapter.

Label Cassette Installation

Step-by-step guide to insert the DYMO D1 label cassette correctly into the device.

Getting to Know the Label Maker

Key Functions and Navigation

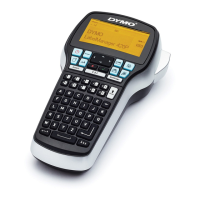
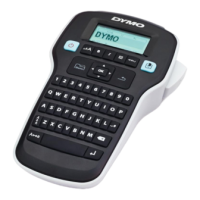
Explore essential keys like Navigation, CAPS, Shift, NEW, Backspace, Menu, and Cancel for operation.

Printing Your Label

Formatting Your Label

Text Enhancements and Alignment

Add borders, underlines, create two-line labels, align text, and use mirror text formatting.

Adding Special Characters

Creating Fixed-Length Labels

Using the Label Maker Memory

Caring for Your Label Maker

Troubleshooting Common Issues

Problem Resolution Guide

Guides on resolving issues like no display, poor print quality, tape jams, and character limits.

Overview

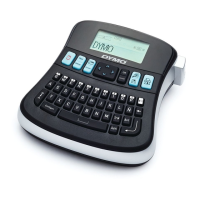
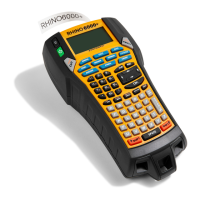
The DYMO LabelManager 210D+ is an electronic label maker designed for creating high-quality, self-adhesive labels for a wide variety of applications. It offers a range of customization options, including different font sizes, styles, and label widths, to suit various labeling needs. The device uses DYMO D1 label cassettes, available in 1/4" (6 mm), 3/8" (9 mm), or 1/2" (12 mm) widths and a variety of colors.

Function Description

The primary function of the LabelManager 210D+ is to allow users to design and print custom labels. Users can input text, apply various formatting options, and then print the labels. The device features an LCD display that shows up to 13 characters at a time, with feature indicators appearing black when selected. It supports up to 99 characters and spaces per label.

Usage Features

Power and Setup:

The label maker can be powered by six high-capacity AA alkaline batteries or an optional 9 Volt, 2 Amp AC power adapter. To conserve power, the device automatically turns off after two minutes of inactivity. When powered on, the last created label and previously selected style settings are restored. Upon first use, the label maker guides the user through a setup process to select the language, units of measurement (inches or mm), and the width of the installed tape cassette. These settings remain until changed or the device is reset.

Label Creation and Formatting:

  • Text Entry: Users can enter text using the QWERTY keyboard. The CAPS key toggles between uppercase and lowercase character entry, with lowercase as the default. The Shift key allows for temporary case changes or entering uppercase characters when in lowercase mode.
  • Navigation and Editing: Navigation keys allow users to review and edit labels, move through menu selections, and confirm choices with the OK button. The Backspace key deletes characters to the left of the cursor, with a hold function for deleting multiple characters. The NEW key clears the current text and formatting to start a new label.
  • Printing: The print key initiates the printing process, allowing users to select the number of copies (up to 9). Pressing the print key along with the Shift key provides a preview of the label. After printing, the cutter button is used to cut the label.
  • Font Size: Five font sizes are available, applying to all characters on a label. The usable font sizes depend on the selected label width and whether a box or underline is added.
  • Font Width: Two font widths are available: normal and wide.
  • Font Styles: Six font styles can be applied to all alphanumeric characters and some symbols: Normal, Bold, Italic, Outline, Shadow, and Vertical.
  • Borders and Underline Styles: Users can enhance labels with various border and underline styles, including Underline, Square, Rounded, Edged, Pointed, Parchment, Call Out, Flowers, and Crocodile. A label can be underlined or enclosed in a box, but not both simultaneously. For two-line labels, an underline applies to both lines, while a box encloses both lines as a single unit.
  • Two-Line Labels: The device supports printing a maximum of two lines on a label, though only one line is possible on 6 mm (1/4") labels. The LCD displays an icon indicating the currently displayed line.
  • Text Alignment: Text can be aligned to the left, right, or center on the label, with centering as the default.
  • Mirror Text: The mirror format allows printing text that reads from right to left, as seen in a mirror.
  • Fixed-Length Labels: While label length is typically determined by text length, users can set a fixed length for specific applications, ranging from 1.5" (40 mm) to 15" (400 mm). If the text exceeds the fixed length, a message will display the smallest possible label length for the text.

Special Characters:

  • Symbols and Punctuation: A comprehensive list of symbols is available. Shortcut keys provide quick access to punctuation, currency, and math symbols.
  • Clip Art: The label maker includes a selection of clip art images that can be inserted into labels.
  • International Characters: The device supports an extended Latin character set using RACE technology. Pressing the accented character key and then repeatedly pressing a letter scrolls through available variations of that letter (e.g., 'a' will show 'a à â æ').

Memory Features:

The label maker has a powerful memory feature that allows users to save up to nine frequently-used labels, including their text and formatting. Saved labels can be recalled and inserted into new labels. Users can open saved labels, with a prompt to confirm overwriting current label content if applicable.

Maintenance Features

Cleaning:

The label maker requires minimal maintenance. Regular cleaning helps ensure proper functioning. The cutter blade, which is extremely sharp, should be cleaned each time the label cassette is replaced. To clean the cutter blade, remove the label cassette, press and hold the cutter button to expose the blade, and then clean both sides of the blade with a cotton ball and alcohol.

Troubleshooting:

The user guide provides solutions for common problems such as "No display" (ensure power is on, replace batteries), "Poor Print Quality" (replace batteries/power adapter, ensure cassette is installed, replace cassette, clean print head), "Poor Cutter Performance" (clean cutter blade), "Too many characters" (delete buffer text), "Too many lines" (delete a line, insert wider cassette), "Batteries almost discharged" (replace batteries/connect AC adapter), and "Tape Jam" (remove jammed label, replace cassette, clean cutter blade). For further assistance, DYMO Customer Support can be contacted.

Environmental Information:

The device is designed with environmental considerations. Users are encouraged to utilize appropriate take-back systems for end-of-life equipment to promote reuse and recycling of materials, minimizing environmental impact. The crossed-bin symbol on the device indicates its suitability for such systems.

newell DYMO LabelManager 210D+ Specifications

General IconGeneral
CategoryLabel Maker
Print TechnologyThermal Transfer
Maximum Print Width12 mm
Label Widths Supported6 mm, 9 mm, 12 mm
ModelLabelManager 210D+
DisplayLCD
Character StylesNormal, Bold, Italic, Outline, Shadow
Power SourceBatteries or USB
Label Material CompatibilityD1

Related product manuals