EasyManua.ls Logo

NewLine FLEX - User Manual

NewLine FLEX
12 pages
Print Icon
To Next Page IconTo Next Page
Loading...
Quick Guide
TT-2721AIO
Question and Answer IconNeed help?

Do you have a question about the NewLine FLEX and is the answer not in the manual?

Summary

Unpacking and Initial Setup

Unpacking your Newline Flex

Guide to safely removing the Newline Flex from its packaging and preparing it for use.

Newline Flex Features

Tilting Capability

Information on the Newline Flex's ability to be tilted up to a 45-degree angle for optimal viewing.

Camera Installation

Instructions for installing the modular camera, both front and rear facing, using thumb screws.

Controls and Modules

Control Buttons Overview

Details the function and location of the physical control buttons on the Newline Flex device.

SDM Module Installation

Procedure for installing the optional Smart Display Module (SDM) by removing the faceplate and securing the module.

Stylus Attachment

Instructions on how to magnetically attach the stylus to the side of the Newline Flex.

Connectivity and USB Capabilities

I;O Connection Interface

Diagram and explanation of the various input/output ports available on the Newline Flex.

USB Type-C Capabilities

Overview of the Newline Flex's USB Type-C port, detailing data transfer, audio, video, touch, and power delivery features.

Device Controls and Functions

Power and Camera Control

Functions for powering the device on/off and enabling/disabling the camera.

Microphone and Volume Control

Functions for muting/unmuting the microphone and adjusting volume levels.

Menu Access

How to access the Flex system menu for further settings.

On-Screen Display (OSD) Settings

Display Modes

Explains various display modes like Standard, Graphics, Reading, Movie, Night, and Eye protection.

Picture Settings

Details adjustments for Brightness, Contrast, Gamma, Image Scale, Black Balance, and Sharpness.

Color Temperature and Appearance

Color Temperature Adjustment

Covers warm, cool, and custom color temperature settings using RGB values.

Color Saturation and Tone

Explains adjustments for color intensity (Saturation) and image tone (Hue).

Picture-in-Picture;Picture-by-Picture Modes

PIP;PBP Mode Configuration

Details on setting up Picture-in-Picture (PIP) and Picture-by-Picture (PBP) modes, including source selection and layout.

Advanced OSD and System Settings

OSD Settings Configuration

Settings for OSD display time, transparency, and language selection.

Other System Settings

Covers input source, response time, volume modes, USB Type-C Power Delivery, and system reset.

Usage Notes and Behavior

Source Selection and Audio Output

Notes on automatic source selection, dialogue boxes for switching, and audio output behavior with line out.

Volume Indicator and USB Port Behavior

Information on volume adjustment indicators and dynamic USB 3.0 port behavior.

Optional Accessory Installation

Rubber Stopper Installation

Instructions for installing optional rubber stoppers to increase the device's tilt angle and stability.

Overview

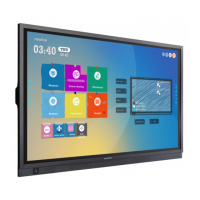
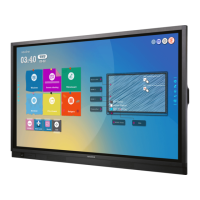
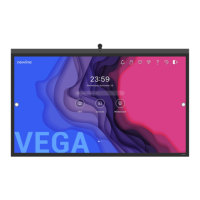
The Newline FLEX (model TT-2721AIO) is a versatile interactive display designed for various professional and personal uses, offering a blend of intuitive controls, flexible positioning, and extensive connectivity. This quick guide outlines its setup, operation, and key features, emphasizing its adaptability and user-friendly design.

Unpacking and Initial Setup

Setting up the Newline FLEX is a straightforward process. Begin by laying the carton on a flat surface and opening the box. Carefully remove all packing materials surrounding the device. Once the packing is clear, lift the FLEX out of the box and place it on a sturdy, flat surface. Finally, remove any remaining packaging and set up the device in your designated area. The design ensures a smooth and safe unboxing experience, preparing the device for immediate use.

Flexible Positioning

One of the standout features of the Newline FLEX is its ability to be tilted up to 45 degrees. This adjustable tilt mechanism allows users to find the optimal viewing and interaction angle, whether for presentations, collaborative work, or personal use. This flexibility enhances ergonomics and user comfort, making the device suitable for prolonged use in various settings.

Modular Camera Installation

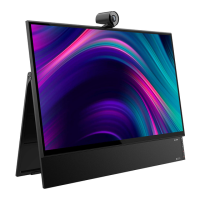
The Newline FLEX supports a modular camera, which can be installed in either a front-facing or rear-facing orientation. For front-facing installation, align the USB Type-C connector of the camera with the port on the FLEX, and gently push down until it is fully seated. Secure the camera using the two provided thumb screws. Similarly, for rear-facing installation, align the USB Type-C connector with the camera facing to the rear, push down until fully seated, and secure with the thumb screws. This modular design offers flexibility in camera placement, catering to different communication and recording needs.

Control Buttons

The device features a set of intuitive control buttons located on the side, providing quick access to essential functions:

  • Power Button: Turns the system On or Off. If a Smart Display Module (SDM) is installed, the FLEX will power on and boot directly to the SDM source. When powered off, both the SDM and FLEX will shut down. If no SDM is installed, the FLEX powers off immediately.
  • Volume Up/Down: Adjusts the audio output level. An on-screen volume adjustment indicator appears when these buttons are pressed.
  • Menu: Provides access to the FLEX’s on-screen display (OSD) menu, allowing users to configure various settings.
  • Microphone Mute/Unmute: Enables or disables the integrated microphone array. When disabled, the button turns red, indicating the microphone is off.
  • Camera Toggle On/Off: Enables or disables the attached FLEX camera. When disabled, the camera button turns red, indicating the camera is off.

Smart Display Module (SDM) Integration

The Newline FLEX is designed to accommodate an optional Smart Display Module (SDM), which is sold separately. Installing the SDM enhances the device's capabilities by providing additional processing power and functionalities. The installation procedure is as follows:

  1. Unscrew the two security screws using a Phillips head screwdriver to remove the blank SDM faceplate.
  2. Align the SDM grooves and firmly push the module into place, ensuring it is correctly seated.
  3. Use the screws from step one to secure the SDM module. This modularity allows users to upgrade and customize their FLEX to meet evolving needs.

Stylus Attachment

For enhanced interaction, the FLEX includes a stylus that can be magnetically attached to either the right or left side of the device. This convenient storage solution ensures the stylus is always within reach when needed for annotations, drawing, or precise navigation.

I/O Connection Interface

The Newline FLEX offers a comprehensive range of input/output ports to support diverse connectivity requirements:

  • DC (19V Input): For power supply.
  • Line Out: Audio output for headphones.
  • Line In: Audio input.
  • HDMI In (2.0): For connecting external video sources.
  • Touch Port: Enables touch functionality for externally connected devices.
  • USB Type-C: Supports Audio/Video/Touch and provides up to 60 Watts of power delivery.
  • USB 3.0: A dynamic USB port for easy access to externally connected devices.

USB Type-C Capability

The device’s USB Type-C port is highly versatile, supporting various functionalities depending on the connected device and cable:

  • USB 2.0 High Speed: Basic data transfer.
  • USB 3.1 Gen 1 (Formerly USB 3.0) Super Speed: Supports data transfer, audio, video, and touch.
  • USB 3.1 Gen 2 (Formerly USB 3.1) Super Speed Plus: Supports data transfer, audio, video, and touch.
  • USB 3.1 Gen 1 (Formerly USB 3.0) Super Speed with Power Delivery: Supports data transfer, audio, video, touch, and power delivery.
  • USB 3.1 Gen 2 (Formerly USB 3.1) Super Speed Plus with Power Delivery: Supports data transfer, audio, video, touch, and power delivery.
  • Thunderbolt 3: Offers the highest level of performance, supporting data transfer, audio, video, touch, and power delivery. By default, USB-C Power Delivery is disabled in Energy Saving Mode. To utilize this feature, it must be enabled in the "Other Settings" menu.

On-Screen Display (OSD) Functions

The OSD menu provides extensive control over the display's settings, categorized into Display Mode, Image Settings, Color Temperature Settings, PIP/PBP Mode, OSD Settings, and Other Settings.

Display Mode:

  • Standard mode: Ideal for browsing websites.
  • Graphics mode: Optimized for viewing photos and graphics.
  • Reading mode: Suitable for viewing documents.
  • Movie mode: Enhances the experience for watching movies.
  • Night mode: Designed for comfortable night browsing.
  • Eye protection mode: Reduces blue light to minimize eye strain.

Image Settings:

  • Brightness: Adjusts the overall image brightness.
  • Contrast: Modifies the image contrast.
  • Gamma: Adjusts the median value of brightness.
  • Image scale: Offers "Full screen" to enlarge the image to fill the screen (suitable for 16:9 aspect ratio) and "4:3" to scale the image to a 4:3 aspect ratio.
  • Black balance: Adjusts the brightness of the black areas.
  • Sharpness: Adjusts the clarity of the image.

Color Temperature Settings:

  • Warm color temperature: Provides a warmer tone.
  • Cool color temperature: Provides a cooler tone.
  • Custom color temperature: Allows users to select specific red (R), green (G), and blue (B) values for personalized color calibration.
  • Saturation: Adjusts the intensity of the color.
  • Tone: Adjusts the image tone.

PIP/PBP Mode:

The Picture-in-Picture (PIP) and Picture-by-Picture (PBP) modes allow users to display multiple sources simultaneously.

  • Sub-input selection: Choose the secondary input source.
  • PIP location: Adjust the position of the PIP window (top left/top right/bottom left/bottom right).
  • PIP size: Adjust the size of the PIP window.
  • Sound channel: Select the audio source for the displayed content.
  • Picture exchange: Swap the main and sub-pictures.

OSD Settings:

  • OSD display time: Sets how long the OSD menu remains on the screen.
  • OSD transparency: Adjusts the transparency of the OSD menu.
  • Language: Selects the language for the OSD menu.

Other Settings:

  • Input signal source: Selects the active input source.
  • Response time: Improves the response time of the LCD display.
  • Volume: Adjusts the volume and selects the sound mode.
  • USB Type-C Power Delivery: Enables or disables USB Type-C charging.
  • Reset: Restores all OSD settings to their default values.

Notes on Operation

  • Automatic Source Selection: By default, the SDM source is automatically selected. If other sources are detected, a dialogue box will appear, prompting the user to switch sources.
  • Audio Output Modes: When connecting to the line out port, a dialogue box will appear, asking to choose between single or double screen mode. In single screen mode, the line out outputs left and right channels, but the embedded speakers will have no output. In double screen mode, both the embedded speakers and line out will have sound.
  • Volume Adjustment Indicator: When the volume adjustment buttons are pressed, an on-screen indicator appears, allowing users to adjust the volume or mute/unmute the audio.
  • Dynamic USB 3.0 Port: The dynamic USB 3.0 port automatically switches to any connected device for easy access. The modular camera and integrated microphone will also automatically switch to the active source.

Rubber Stopper Installation (Optional)

For added stability, especially when increasing the tilt angle, optional rubber stoppers can be installed. To do this, fully extend the rear kickstand and apply the self-adhesive rubber stoppers under the hinge on both sides of the FLEX. These stoppers provide an added safety measure, allowing users to increase the minimum tilt angle from 10 degrees to 25 degrees in situations requiring extra stability.

The Newline FLEX is designed to be a robust and adaptable interactive display, offering a rich set of features and controls to enhance productivity and collaboration in various environments.

NewLine FLEX Specifications

General IconGeneral
Screen Size27 inches
TouchscreenYes
Panel TypeIPS
Refresh Rate60 Hz
Aspect Ratio16:9
Touch TechnologyInfrared
Response Time8 ms
Resolution3840 x 2160
Touch Points20
Built-in SpeakersYes

Related product manuals