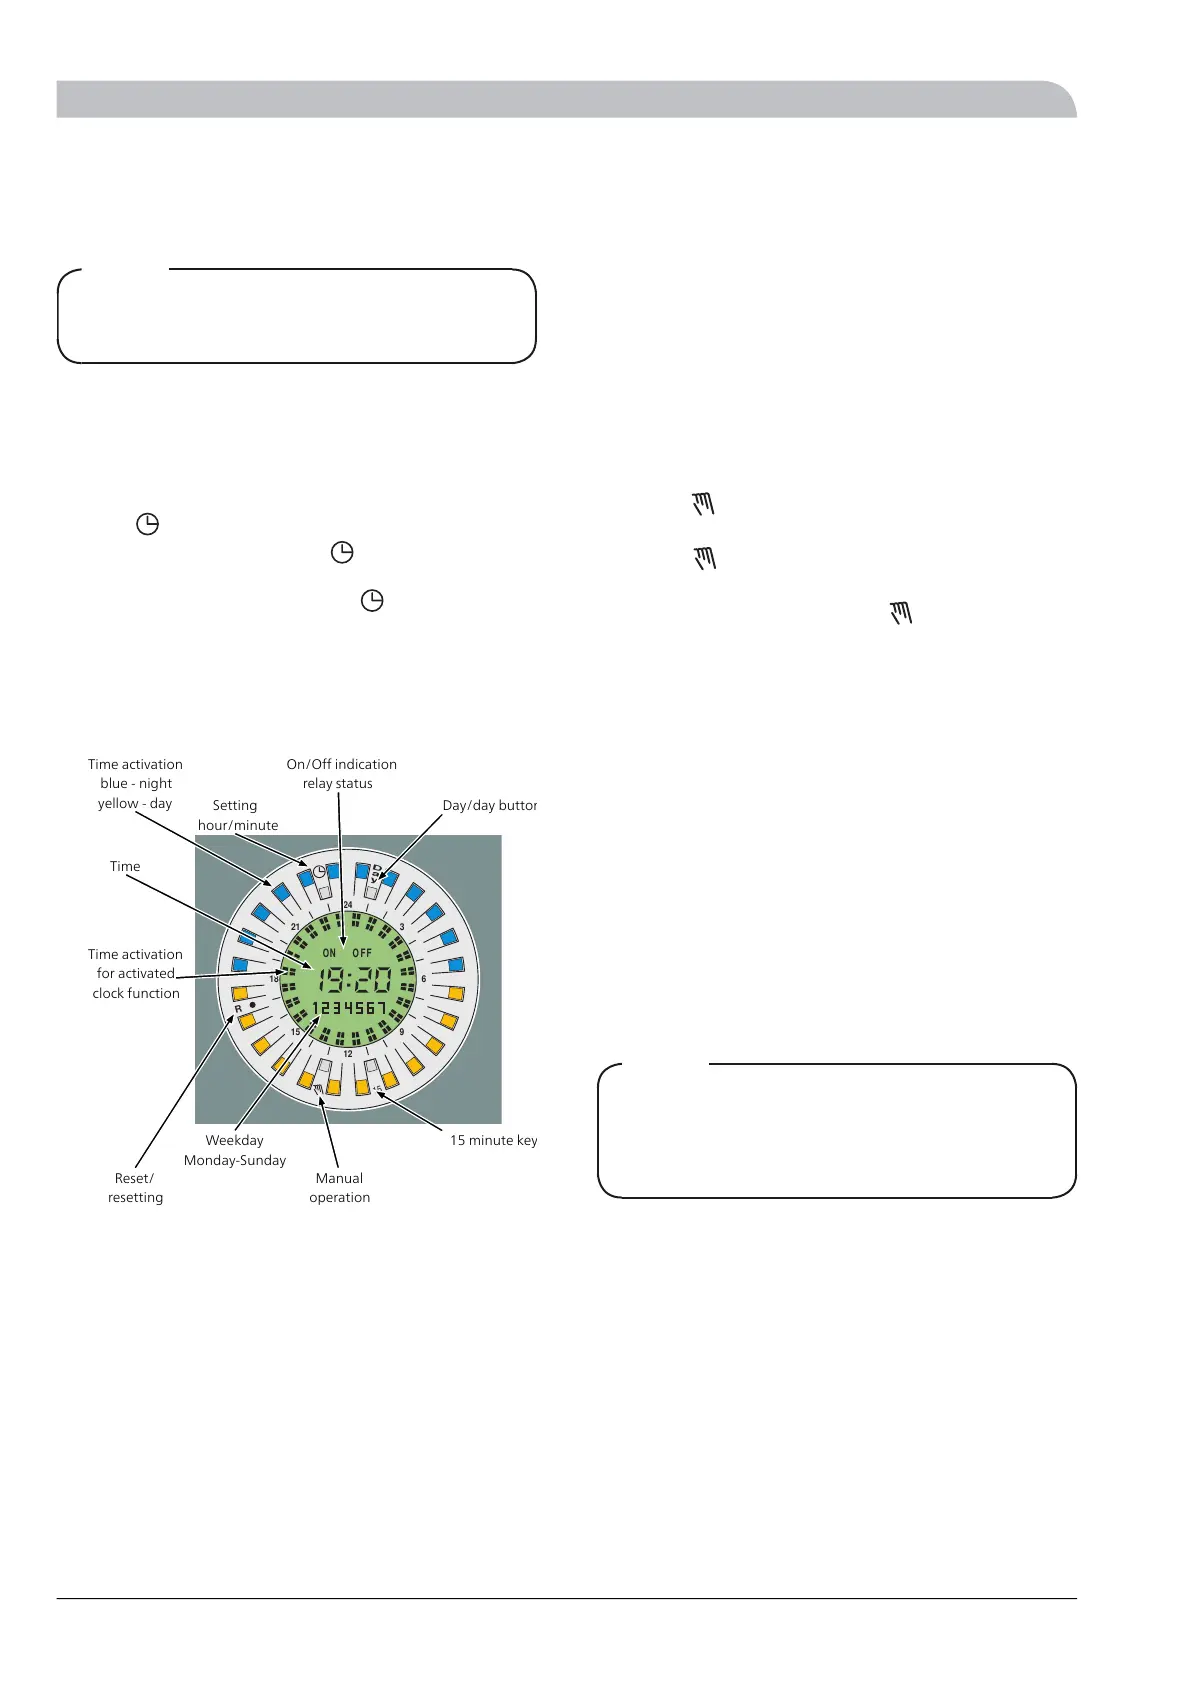
Clock
Setting of time
NOTE
Setting is only necessary if automatic timing is re-
quired.
Resetting of clock
All programmed data in the clock can be erased by insert-
ing a pin in the hole (R) and pushing. This is usually done
at start-up/commissioning.
Setting of time
Press the button. The ON/OFF indicator on the clock's
LCD display will go out. Hold the button in, to advance
the hours. Release the button at the required hour. Set
the minutes by short presses on the button.
Set weekdays by pressing the “Day” button until the re-
quired weekday is set. Wait until the clock ON/OFF indic-
ator relights, 5 seconds after the button was last pressed.
When the correct time and day have been programmed,
the clock can be programmed for function, see program-
ming the clock.
D
a
y
15
12
24
21
618
R
3
9
15
O N O F F
2
1
bar
3
0 4
20 100
40 80
60
°C
0 120
On/Off indication
relay status
Day/day button
Setting
hour/minute
Time activation
blue - night
yellow - day
Time
Time activation
for activated
clock function
Reset/
resetting
Weekday
Monday-Sunday
Manual
operation
15 minute key
Programming of clock
This programming is done to determine what times night
reduction is to be activated. The clock is programmed as
follows:
■
Press the “Day” key until the day you want it shown in
the display.
■
Program the desired time for night reduction by pressing
the buttons, which are placed around the clock display.
The numbers around the display indicate the 24 hours
of the day.
One press: Night reduction activated the full hour.
Two presses: Night reduction activated in the first half
hour.
Three presses: Night reduction activated in the second
half hour.
Four presses: Night reduction deactivated the full hour.
■
Select a new day with the “Day” key, and repeat the
previous procedure.
■
When programming is completed press the ”Day” button
for the current day.
The clock can also be programmed in 15 minute intervals.
Start by selecting the desired half hour where the 15
minute activation is desired. Press the same segment but-
ton again, and hold it in. By pressing the ”15” button in
this mode the desired 15 minute interval can be selected.
The clock can also be operated manually (not normally
used). This is done as follows:
■
Press the button, and keep it pressed in or 3 seconds.
The relay will switch off and OFF will start to flash.
■
Press the button and the relay will shift between on
and off, ON/OFF will flash all the time.
■
To return to automatic press the button again and
keep it pressed for 3 seconds. ON/OFF indication will
now light constantly.
Night reduction
This setting is used to change the heating during certain
periods during the day and night.
Night reduction is activated by the timer. The mode is se-
lected using the switch (25).
The clock's programmed on/off determines the times
when the supply temperature should change to give a
change of room temperature. ON indicates night reduction
on. OFF indicates night reduction off.
If a reduction in the temperature is required, the value is
reduced using the “Night reduction” knob. If an increase
in the room temperature is required, the value is increased
using the "Night reduction" knob. The setting range is -10
to +10. One step change gives approx. 1 degree change
in the room temperature.
NOTE
NOTE! An increase in the room temperature may be
inhibited if the thermostats for the radiators or under
floor heating are set too low, if so these must be
turned up.
If you want to temporarily or permanently change the
room temperature the "night reduction" switch can be
used in addition to the manual on/off on the clock. The
button switches between ”Constant day", Constant night”
and ”Automatic” modes. See section "Front panel" on page
5.
EVC 1310
English
Clock