Do you have a question about the Nikon Microphot-FXA and is the answer not in the manual?
Gentle handling to avoid sharp impacts.
Remove lamphouse, grip indicated handholds.
Select location with limited exposure to dust, vibration, etc.
Confirm voltage selection and correct fuse rating.
Keep away from volatile substances due to heat.
Avoid overexposure warning or strong light exposure.
Set film sensitivity carefully, e.g., ISO 6 or lower.
Use soft brush or gauze; moisten with alcohol for persistent dirt.
Use mild soap/water; avoid organic solvents; handle lettering gently.
Avoid dismantling to prevent impaired efficiency and accuracy.
Cover instrument and store in a place free from moisture and fungus.
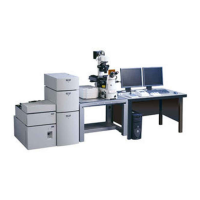
Identifies various parts of the microscope system with labels.
Details connectors and mounts on the rear of the microscope.
Describes camera mounts, TV mount, and controls on the upper right.
Details camera mounts, magnifier, ND filter, and other controls on the upper left.
Explains controls like motorized nosepiece, reticle illumination, and filter cassette.
Details stage controls, condenser, LCD, and focus knobs on the lower left.
Explains film loading, advance, rewind, and DX cable connection.
Describes mounting the large format adapter and film holders.
Details the front and rear panels of the power supply unit.
Explains the LCD display, numerical keys, and function keys.
Details the main screen components, camera displays, and mode indicators.
Steps to power on the microscope system.
Verifying the diascopic illumination indicator.
Adjusting lamp voltage using the brightness control switch.
Inserting specific filters into the optical path.
Rotating the nosepiece to select the 10x objective.
Instructions for correctly placing the specimen.
Raising the condenser to its full limit.
Opening the field and condenser aperture diaphragms.
Raising the stage and centering the condenser.
Moving the stage to position the specimen in the viewfield.
Engaging the photomask in the optical path.
Using the triaxial focus knob to focus the specimen.
Correcting focus for observer's eyesight using diopter adjustment.
Adjusting eyepiece tubes for a single, clear viewfield.
Centering the condenser using the field diaphragm image.
Switching to the 40x objective and re-centering the condenser.
Selecting the objective and adjusting the field diaphragm.
Adjusting brightness using ND filters or the control switch.
Setting the condenser diaphragm to 70-80% of the objective's N.A.
Overview of cameras that can be mounted on the MICROPHOT-FXA.
Procedures for loading film and attaching the 35mm dark box.
Instructions for mounting large format adapters and film holders.
Guidance on using the Nikon F3 camera body with the microscope.
Initial settings for AUTO mode: measurement range, illumination, lamp voltage.
Setting the optical path for the camera to be used.
Pushing selector knobs to engage the photomask.
Positioning the specimen and adjusting focus using stage and photomask.
Adjusting exposure time, lamp voltage, and measurement area.
Activating the shutter and interrupting exposure.
Advancing the film to the next frame or changing film.
Switching between Diascopic and Episcopic illumination methods.
Enabling Voltage Lock for stable lamp voltage at 9V for optimal color balance.
Adjusting lamp voltage and using color compensation filters for optimal color reproduction.
Performing shutter, nosepiece rotation, and reticle illumination with control grips.
Using the triaxial focus knob for precise specimen focusing.
Adjusting aperture diaphragm for optimal contrast, resolution, and depth of focus.
Adjusting the field diaphragm to prevent stray light and improve contrast.
Loosening stage clamp to rotate stage for convenient photo composition.
Operating under different photomicrographic modes: AUTO, MANUAL, TIME, etc.
Using the intermediate magnification selector for various magnifications.
Choosing between objective, film, or observation surface magnification displays.
Troubleshooting optical issues like vignetting, dirt, and poor image quality.
Troubleshooting operational issues like focus, specimen movement, and eye fatigue.
Troubleshooting electrical issues like lamp failure, insufficient brightness, and flickering.
Troubleshooting photomicrographic issues like sharpness, image fog, brightness, and contrast.
Explains error messages and their corresponding causes and countermeasures.
| Brand | Nikon |
|---|---|
| Model | Microphot-FXA |
| Category | Microscope |
| Language | English |