7 8CUSTOMER CARE - AU: 1800 099 385CUSTOMER CARE - NZ: 0800 112660
WARNING: Handle the Stacked Blade Assembly with care, as the blades are sharp.
WARNING: Remove utensils prior to processing. Failure to remove may cause the pitcher to be damaged or
to shatter, which may cause personal injury.
WARNING: Never leave the appliance unattended while in use.
CAUTION: Do not blend hot liquids, doing so may cause excessive pressure buildup, resulting in risk of the
user being burned.
IMPORTANT: Make sure that the motor base is plugged in for use.
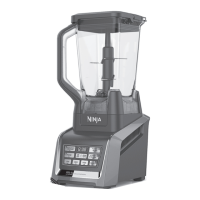
Fig. 2
HIGH
PULSE
LOW
DOUGH
SMOOTHIE
SINGLE
SERVE
PUREE
FROZEN
BLENDING
FROZEN DRINKS
SMOOTHIES
PUREE
PULSE
HIGH
MED
LOW
AUTO
AUTO
AUTO
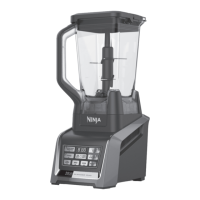
Fig. 4a
HIGH
PULSE
LOW
DOUGH
SMOOTHIE
SINGLE
SERVE
PUREE
FROZEN
BLENDING
FROZEN DRINKS
SMOOTHIES
PUREE
PULSE
HIGH
MED
LOW
AUTO
AUTO
AUTO
Fig. 4b
Fig. 1
HIGH
PULSE
LOW
DOUGH
SMOOTHIE
SINGLE
SERVE
PUREE
FROZEN
BLENDING
FROZEN DRINKS
SMOOTHIES
PUREE
PULSE
HIGH
MED
LOW
AUTO
AUTO
AUTO
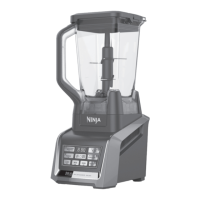
Fig. 3
Fig. 5a
Fig. 5b
Assembly and Use for the Ninja
®
Blender
1 Review warning and caution statements above before
proceeding to number 2.
2 Place the motor base on a clean, dry, level surface such
as a counter or tabletop.
3 Holding the Stacked Blade Assembly by the top of the
shaft, place it onto the drive gear inside the pitcher.
Ensure that the Stacked Blade Assembly is seated
properly and is standing upright. (Fig. 1)
NOTE: The Stacked Blade Assembly will fit loosely on
the drive gear.
4 Align and lower the pitcher onto the motor base.
(Fig. 2) Handle should be aligned slightly to the right of
the “LOCK” symbol on the motor base.
5 Rotate the pitcher clockwise until it locks in place, you
will hear a click when the lock is engaged. (Fig. 3)
6 The pitcher can be placed on the motor base two ways;
the handle can be on the front right corner or the front
left corner. (Fig. 4a, Fig. 4b)
7 Add the ingredients to the pitcher, making sure that
they do not exceed the highest measured marking line
on the side of the pitcher.
NOTE: When blending any kind of liquids, such as
mixtures of any drinks or smoothies, do not exceed the
“MAX LIQUID” mark (2L) on the pitcher.
NOTE: If you need to add additional ingredients while
the appliance is processing, open the pour spout cap
and pour the ingredients in through the opening.
8 Holding the lid by the handle in the upright position, place
it on top of the pitcher aligning the triangle ( ) located on
the lid with the triangle ( ) located on the pitcher’s handle.
(Fig. 5a) Press the handle down until you hear a click.
The triangles on the lid and the blender handle MUST be
aligned in order for the blender to turn on. (Fig. 5b)
9 Plug the power cord into the electrical outlet and press
the power button ( ).
IMPORTANT: As a safety feature, the power light
( ) will flash and the motor will not work if the
pitcher and lid are not installed correctly. When
the pitcher and lid are installed properly, the
power light (
) will be solid, indicating that the
appliance is ready for use.
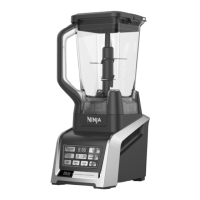
ASSEMBLY
NOTE: Nutri Ninja
®
| Ninja Blender Duo with Auto-iQ
®
Technology can sense which jar is on the motor base.
The available function lights will illuminate depending
on which jar is placed on the motor base. (Fig. 6)
11
Review warning and caution statements at the top of
page 8 before proceeding to number 12.
12 Press the power button to turn on the unit. Select
the speed or Auto-iQ program that best suits your
needs. The Auto-iQ program will stop the appliance
automatically at the end of the program. (Fig. 7)
NOTE: Pulse ingredients for even chopping by holding
the Auto-iQ Pulse button until your desired consistency
is reached.
NOTE: Max PULSE iteration is 30 Pulses. After 30
Pulses allow 10 minutes to pass before running the
PULSE function up to an additional 30 Pulses.
13 To pause the appliance, press the selected speed or
Auto-iQ program a second time. When the program is
paused, the light on the program button will flash until
you press it again to resume the rest of the program.
14 When you have reached your desired consistency, stop
the appliance by pressing the power button (
) and
wait for the Stacked Blade Assembly to stop turning.
(Fig. 8)
15 Turn the pitcher anticlockwise to remove and then lift
off the base. (Fig. 9)
CAUTION: Never insert your hands in the pitcher
as the blades are sharp. Always use a spatula to
dislodge food that has stuck to the sides of the
pitcher.
16 Open the pour spout cap and use the spout to empty
liquid contents.
17 For thicker consistencies, first remove the lid by
pressing the release button and pulling the lid handle
up to a 90 degree angle to lift lid off the pitcher. Then,
carefully remove the Stacked Blade Assembly by the
top of the shaft. Place Stacked Blade Assembly away
from the work area to avoid accidental contact. Finally,
empty contents from the pitcher. (Fig. 10)
18 Make sure that the unit is unplugged when not in use.
19 To release the motor base from the counter or tabletop,
place your hands underneath both sides of the motor
base and gently pull the unit up and towards you.
(Fig. 11
)
Fig. 8
USE REMOVAL
Fig. 6
Fig. 9Fig. 7
Fig. 10 Fi g. 11
AUTO
 Loading...