9ninjakitchen.eu
WARNING: Handle the blade assemblies with care when washing, as the blades are loose and sharp. Contact with
the blades’ edges can result in laceration.
WARNING: Stacked Blade Assembly is loose and sharp and not locked in place. Make sure lid is locked onto jug
before pouring contents. If pouring without lid, carefully remove blade assembly first. Failure to do so will result in
a risk of laceration. Refer to the Ninja Owner’s Guide for additional information.
8
Dishwasher
All parts except the motor base
are top-rack dishwasher safe and
should NOT be cleaned with a
heated dry cycle.
Hand-Washing
Wash containers, lids, and blade
assemblies in warm, soapy water.
When washing the blade assemblies,
use a dishwashing utensil with a handle.
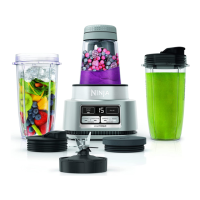
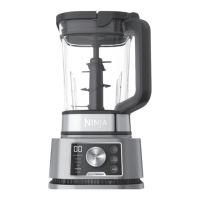
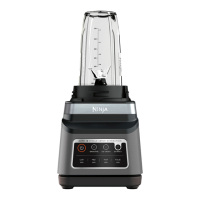
2 .1 L* JUG
Crush, chop, and make
smoothie bowls in one
compact versatile jug
*1.9L max liquid capacity
JUG LID
With spout for
easy pouring
MOTOR BASE
Powerful high-speed motor
with 1800 peak watts
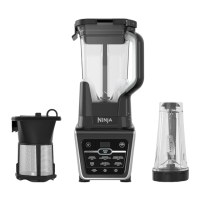
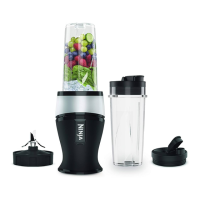
600ML SINGLE-SERVE CUP
WITH SPOUT LID
Create delicious drinks to take on the go
DISPLAY
Easy-to-use START/STOP dial,
BlendSense button, manual,
mode, and pulse buttons
HYBRID EDGE
BLADES ASSEMBLY
High-grade stainless steel blades
breakdown frozen whole fruits and
veggies, nuts, seeds, and ice for
smoother blends
NINJA DETECT
TOTAL CRUSHING® &
CHOPPING BLADES
(STACKED BLADE
ASSEMBLY)
Blast through frozen fruit
and ice in seconds
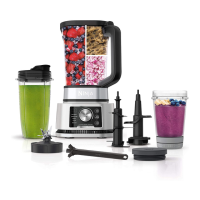
What's in the box
CLEANING
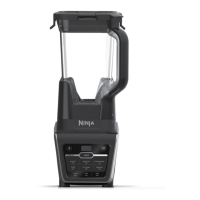
1 Place jug on the
base and turn
clockwise to lock
in place.
2 Holding Stacked
Blade Assembly by
the top of the shaft,
insert it into jug.
1 When powering on the unit, the BlendSense program will be active by default.
Press the dial to begin the program.
For Manual programs or Processing Mode programs, press the desired button
above the dial. Use the dial to select your desired speed (1–10) or Processing
Mode program, then press the dial to begin. To stop a program at any time,
press the dial again.
2 When blending is complete, turn jug anti-clockwise and lift to remove.
3a To pour out thinner mixtures, ensure lid is locked in place, then
open pour spout.
3b For thicker mixtures, press RELEASE button and lift handle to
remove lid, then carefully lift out blade assembly before pouring.
3 Install the lid,
then press to
lower the handle
to lock in place.
NOTE: The jug lid handle will not fold down unless it is attached to the jug.
ASSEMBLY
Jug
USING
THE
BLEND & ENJOY
ENGLISH
 Loading...