Do you have a question about the NordicTrack GRT500 and is the answer not in the manual?
Covers what is included and excluded from the warranty, and who is covered.
Outlines customer duties, manufacturer actions, and how to obtain service.
General safety warnings to be read before using the training system.
Advises consulting a physician before starting an exercise program.
Information about warning decals placed on the system and how to obtain replacements.
Provides the overall height, width, and length of the assembled training system.
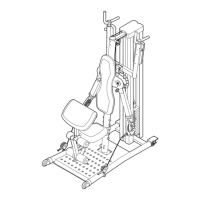
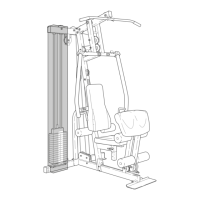
Guides the user to familiarize themselves with the major parts of the training system.
Covers tips for easier assembly, required persons, time, location, and unpacking.
Lists necessary tools and explains how to identify parts using the provided chart.
Outlines the three main stages of assembly and general procedures like orientation and tightening.
Instructions for attaching inner caps, stabilizer, and base components to the main upright.
Instructions for securing the base to the upright and attaching leg lever lock and foot plate.
Instructions for installing weight bumpers, guides, and attaching the top frame assembly.
Instructions for attaching the press frame and tightening locknuts to complete frame assembly.
Instructions for routing and attaching the high cable to a pulley on the main upright.
Instructions for attaching a pulley for the high cable and re-inserting the securing bolt.
Instructions for routing the high cable through pulleys on the press frame and main upright.
Instructions for routing the high cable between the press frame and uprights via pulleys.
Instructions for attaching high cable pulleys to pulley plates and the top frame.
Instructions for routing the high cable through the top frame's pulley assembly.
Instructions for securing the high cable and routing the low cable through leg lever and base.
Instructions for attaching low cable pulleys and securing associated components like spacers and tabs.
Instructions for finalizing low cable routing, attaching pulleys to uprights, and securing them.
Final checks for smooth cable movement, proper routing, and tensioning the high cable.
Instructions for attaching press/fly arms, lubricating bushings, and installing grips.
Instructions for attaching the seat to the seat upright and adjusting its height.
Instructions for attaching the backrest to its frame and installing foam pads.
Describes how to adjust the backrest position using an adjustment knob.
Instructions for installing pad tubes and foam pads on leg lever and base components.
Instructions for attaching the curl pad to the curl post and securing it to the base.
Instructions for attaching the shroud to the stabilizer and top frame using clips, screws, and bolts.
Final check for tightening all parts and ensuring smooth cable movement.
Visual guide showing the correct routing path for both high and low cables through pulleys.
Identifies the low and high cables by number and visual representation.
Explains how to choose the desired resistance by inserting the weight pin into the weight stack.
Details how to connect accessories like lat bar, row bar, etc., to the cable system using clips and chains.
Guides the user on how to adjust the seat's vertical position using an adjustment knob.
Explains how to convert the press/fly arms between fly and press configurations.
Describes how to change the backrest angle using an adjustment knob.
Explains how to use the leg lever lock to stabilize the leg lever for specific exercises.
Provides instructions on how to tighten cables that may stretch during initial use for proper resistance.
Explains how to reduce cable slack by moving pulleys to different mounting holes.
Offers solutions for cables slipping off pulleys or becoming twisted, recommending re-installation.
Identifies various nuts, bolts, washers, and small parts with their respective part numbers and diagrams.
Identifies different types of bolts, washers, and bushings with their part numbers and diagrams.
Identifies various caps, clips, and other miscellaneous small parts with their part numbers and diagrams.
Lists key structural and functional components of the system with quantities and key numbers.
Lists all hardware, cables, and accessories with their quantities and key numbers.
Provides instructions and necessary information for ordering replacement parts from customer service.
Explains how to read the chart that shows approximate resistance levels at different weight stations.
| Product Type | Treadmill |
|---|---|
| User Weight Capacity | 300 lbs |
| Speed Range | 0 - 10 mph |
| Incline Range | 0 - 10% |
| Running Surface | 20" x 55" |
| Weight Capacity | 300 lbs |
| Weight | 203 lbs |