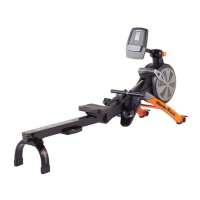
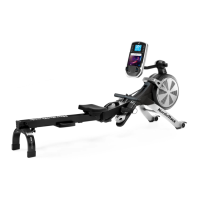
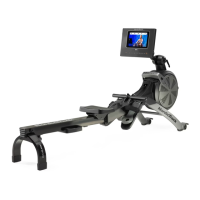
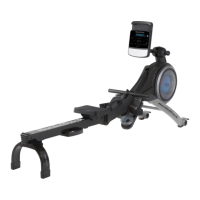
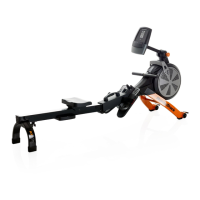
The NordicTrack RW200 is a home-use rowing machine designed to provide an effective exercise for increasing cardiovascular fitness, building endurance, and toning the body. It offers a convenient and private way to engage in rowing exercises.
Function Description
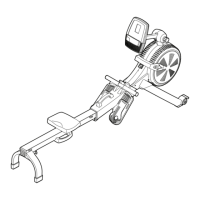
The RW200 rower simulates the action of rowing, engaging multiple muscle groups for a full-body workout. Users sit on a sliding seat and pull a row bar connected to a resistance mechanism, mimicking the motion of rowing a boat. The console provides real-time feedback on workout progress and allows for resistance adjustments.
Usage Features
Assembly and Setup:
The assembly process requires two persons and common tools like a Phillips screwdriver and an adjustable wrench. Users are advised to register their product online at my.nordictrack.com to document ownership, activate the warranty, and ensure priority customer support. The rower can be folded for storage to conserve space, and it's recommended to store it in a location where children cannot tip it. When storing for extended periods, the power adapter should be unplugged or batteries removed from the console.
Power and Console:
The console can be powered by a power adapter or four D batteries (alkaline batteries recommended). If using the power adapter, it should be plugged into a properly installed outlet. If the rower has been exposed to cold temperatures, it should be allowed to warm to room temperature before plugging in the power adapter to prevent damage to the console displays or other electronic components.
Resistance Adjustment:
The rower offers both digital and manual resistance adjustments. Digital resistance can be adjusted using the Silent Magnetic Resistance increase and decrease buttons on the console. Manual fine-tuning is done by moving the Resistance Handle: pushing it forward increases resistance, and pulling it backward decreases it.
Foot Pad Adjustment:
To adjust the foot pads, users sit on the seat, place their feet in the foot pads, and press the Footrest Bracket to slide the foot pad to the desired position. The Footrest Bracket is then released to engage a tab in a slot. Straps are tightened over the feet. It's important to ensure both foot pads are in the same position.
Console Viewing Angle Adjustment:
The console's viewing angle can be adjusted by loosening a knob, raising or lowering the neck to the desired angle, and then tightening the knob. Users are cautioned not to hold or pull on the console itself during this adjustment.
Rowing Technique:
Correct rowing form involves three phases:
- CATCH: Slide the seat forward until knees almost touch the chest, pulling the row bar until hands are directly above feet.
- DRIVE: Push backward with legs, leaning back slightly at the hips (not the waist) with a straight back. As legs straighten, pull the row bar toward the chest, keeping elbows outward.
- FINISH: Legs should be nearly straight. Continue pulling the row bar until hands are even with the chest.
After the finish phase, arms are extended forward, and the seat is pulled forward using legs. This sequence should be performed with a smooth, fluid motion, breathing normally throughout.
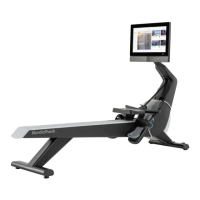
Console Features and Modes:
The advanced console offers various features for effective and enjoyable workouts:
- Manual Mode: Allows users to adjust resistance and view continuous exercise feedback, including calories, distance, resistance level, strokes, strokes per minute (SPM), time, and watts. The watts meter provides a visual representation of power output.
- Preset Workouts: Offers a selection of preset workouts that automatically change the row bar's resistance. These workouts are divided into segments with programmed watts targets or calorie goals and resistance settings.
- iFit Connectivity: Supports Bluetooth connections to tablets via the iFit app for recording and tracking workout information. Users press the iFit Sync button to pair their tablet.
- Heart Rate Monitor Connectivity: Compatible with Bluetooth Smart heart rate monitors. Users press the iFit Sync button to connect. If connecting both a heart rate monitor and a tablet, the heart rate monitor must be connected first.
- Sound System: Allows users to play music or audio books through the console's sound system by plugging a 3.5 mm audio cable from a personal audio player into the console's jack. Volume can be adjusted via console buttons or the audio player.
Moving the Rower:
- Unfolded Position: Stand behind the rower, lift the rail until it rolls on its wheels, then carefully move it to the desired location and lower the rail. Do not hold or pull on the console.
- Folded Position: After folding the rower, hold the frame handle, place a foot on a stabilizer foot, and tip the rower until it rolls on its wheels. Move it to the desired location and tip it into the storage position. Do not hold or pull on the console.
Exercise Guidelines:
- Consult Physician: Before starting any exercise program, especially for individuals over 35 or with pre-existing health problems, consult a physician.
- Exercise Intensity: Use heart rate as a guide for proper intensity. The manual provides a chart for recommended heart rates for fat burning and aerobic exercise based on age.
- Workout Structure: Includes warming up (5-10 minutes of stretching and light exercise), training zone exercise (20-30 minutes with heart rate in the training zone), and cooling down (5-10 minutes of stretching).
- Exercise Frequency: For maintenance or improvement, complete three workouts per week with at least one rest day. Up to five workouts per week can be done after a few months.
Maintenance Features
Regular Inspection:
Regular maintenance is crucial for optimal performance and to reduce wear. All parts should be inspected and properly tightened each time the rower is used. Any worn parts should be replaced immediately.
Cleaning:
The rower can be cleaned with a damp cloth and a small amount of mild detergent. It's important to keep liquids away from the console and keep the console out of direct sunlight to avoid damage. For best results, the rail, seat carriage, and carriage rollers should be cleaned daily.
Console Troubleshooting:
- If the console does not turn on, ensure the power adapter is fully plugged in.
- If console displays become dim when using batteries, refer to assembly step 8 on page 9 for battery installation instructions.
- If a replacement power adapter is needed, contact customer care. Only a manufacturer-supplied regulated power adapter should be used to avoid damaging the console.
Reed Switch Adjustment:
If the console does not display correct feedback, the reed switch may need adjustment. This involves removing the resistance handle and the right and left shields. The Reed Switch is then located, and the Left Fan is turned until a Magnet aligns with the Reed Switch. The Reed Switch's screws are slightly loosened, it's slid closer to or away from the Magnet, and then the screws are retightened. The Left Fan is turned repeatedly to ensure the console displays correct feedback before reattaching the removed parts.