J
Jake SloanSep 23, 2025
How to fix poor color reproduction on my Olympus Analytical Instruments?
- VVincent EverettSep 23, 2025
To correct poor color reproduction on your Olympus Analytical Instruments, re-adjust the white balance.
How to fix poor color reproduction on my Olympus Analytical Instruments?
To correct poor color reproduction on your Olympus Analytical Instruments, re-adjust the white balance.
What to do if I see a 'LOW BATTERY' message on my Olympus Analytical Instruments?
If you see a 'LOW BATTERY' message on your Olympus Analytical Instruments, immediately stop any image recording, copying, USB formatting, or deleting operations. Replace the battery or connect the AC adapter to continue using the instrument.
Why my Olympus Analytical Instruments system cannot be turned on?
If the system cannot be turned on, ensure the AC adapter or battery is correctly connected. Also, verify that you are pressing the power button on the main unit. If it still fails to turn on, check that you are using the designated AC adapter or battery for the Olympus Analytical Instruments.
What to do if my Olympus Analytical Instruments shows 'RECORDING MEDIA FULL'?
To address a 'RECORDING MEDIA FULL' error on your Olympus Analytical Instruments, delete any unnecessary data from the USB flash drive to free up space. Alternatively, replace the current USB flash drive with a new one.
What to do if Olympus Analytical Instruments shows 'IMAGE CAPTURE ERROR'?
If you encounter an 'IMAGE CAPTURE ERROR' on your Olympus Analytical Instruments, stop the inspection and turn the instrument off, then turn it on again.
Why can't angulation be returned to its original attitude on my Olympus Analytical Instruments?
If the angulation of your Olympus Analytical Instruments cannot be returned to its original attitude, the angulation lock might be engaged. Press down the [ANGLE LOCK] lever to release the angulation lock.
Why is the illumination dim on my Olympus Analytical Instruments?
If the illumination is dim on your Olympus Analytical Instruments, wipe the optical adapter tip with a clean piece of gauze or a cotton swab.
What to do if my Olympus Analytical Instruments system cannot be turned off?
If the system cannot be turned off, remove the AC adapter or the battery from the main unit to turn off the power.
Why is the illumination not working on my Olympus Analytical Instruments?
If the illumination on your Olympus Analytical Instruments does not light up, first ensure the LIGHT button is turned on. If it still doesn't work, check if the insertion tube's distal end or the optical adapter is dirty and wipe it with a clean piece of gauze or cotton swab. You can also use a brush to remove any foreign matter.
What to do if Olympus Analytical Instruments shows 'HIGH TEMPERATURE (DISTAL END)'?
If you get a 'HIGH TEMPERATURE (DISTAL END)' message on your Olympus Analytical Instruments, immediately pull the insertion tube out of the observation object.
Highlights crucial safety warnings and symbols used throughout the manual.
Provides essential safety rules for handling the instrument and its components.
Explains the meaning of hazard symbols and associated risks for safe operation.
Outlines initial preparation steps before commencing observation, including power setup.
Details the sequential steps for preparing the instrument before operation.
Provides instructions on how to correctly attach the optical adapter to the insertion tube.
Step-by-step guide on how to view an object using the instrument.
Covers formatting the USB flash drive and understanding image capacity.
Step-by-step guide on navigating and using the instrument's menu system.
Introduces the stereo measurement function and prerequisites like optical adapters.
Provides a visual guide to the sequence of steps for stereo measurement.
Details the correct method for attaching the stereo optical adapter and important cautions.
Step-by-step guide to register a new stereo optical adapter with the main unit.
Explains how to select a registered stereo optical adapter and confirm its details.
Details how to check measurement accuracy before and after performing measurements.
Guides on observing the measurement area and selecting display modes for optimal viewing.
Explains how to use spot ranging to measure the distance to the measurement area.
Guides on selecting the appropriate measurement method (e.g., distance, depth).
Details how to specify measurement points and reference points for accurate measurements.
Explains the various components and indicators displayed on the measurement screen.
Describes different measurement methods including distance, point-to-line, and depth.
Guides on how to move the cursor and specify measurement points on the image.
Covers procedures for replacing the battery and O-ring for instrument upkeep.
Details how to clean the insertion tube, distal end, and optical adapter.
Lists common error messages and provides solutions for resolving them.
Addresses problems related to illumination not working and optical adapter attachment.
Explains how to request repair services and details warranty considerations.
Outlines specifications related to the stereo measurement function, including measurement types.
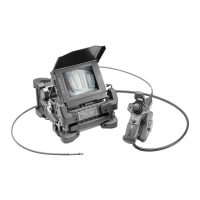
| Model | IPLEX IV9420RX |
|---|---|
| Category | Industrial Videoscope |
| Insertion Tube Diameter | 4.0 mm |
| Working Length | 2.0 m |
| Field of View | 90° |
| Minimum Observation Distance | 3 mm |
| Light Source | LED |
| Operating Temperature | -10°C to 40°C |
| Storage Temperature | -20°C to 60°C |
| Direction of View | Forward |
| Image Sensor | 1/6 type color CCD |
| Battery Life | 120 minutes |