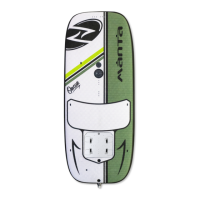
The device described in the manual is the Onean Manta, a jet-powered watersport board.
Function Description
The Onean Manta is designed for watersports, allowing users to glide across the water using an electric jet propulsion system. It is intended for use in fresh and salt water, ideally in calm conditions with no wind. The board is not designed for use in wave-breaking areas. It features a wireless controller for thrust control and a magnetic security key (kill switch) that automatically stops the jet in case of a fall or detachment. The board's design emphasizes safety, with multiple security mechanisms to prevent damage and injury.
Important Technical Specifications
Manta Board:
- Construction: EPS core with laminated fiberglass and epoxy full sandwich.
- Weight (without battery): 17 kg / 37 lbs
- Length: 230 cm / 7′ 6″
- Width: 90 cm / 35.4″
- Thickness: 15 cm / 5.9″
- Volume: 200 L
Jet Unit:
- Nominal Power: 800 kW
- Nominal Voltage: 44.4 VDC
- Static Push: 500 W
- Impeller: 63.6 mm diameter, custom designed and CNC machined from high-strength, corrosion-resistant tempered aluminum, hard anodized for increased surface hardness.
- Stator+Nozzle: Custom designed and CNC machined from high-strength, corrosion-resistant tempered aluminum, hard anodized, fixed joint.
Battery:
- Type: Multicell Lithium-Ion
- Weight: 14 kg / 30 lbs
- Max. Electric Discharge: 130 A
- Nominal Capacity: 40.0 Ah
- Nominal Voltage: 44.4 V
- Protection: Short circuit, overcharge, temperature protection.
- Waterproof Rating: IP68 Certified
Chargers:
- Input Power: 220-230 VAC (110 VAC also available)
- Charging Current: 15 A
- Output Voltage: 50.4 VDC
- Protection: Over voltage, thermal, short circuit, reverse polarity protection.
Wireless Controller:
- Watertight.
- Displays: Thrust, battery level.
- Features: Pressure sensor Drop, Induction charging.
- Frequency: 2.4 GHz
- Battery: LiPo 300 mAh
Qi Charger for Wireless Controller:
- Technology: Qi inductive technology.
- Input: 5 V - 2 A
- Output: 5 V - 1 A
Accessories:
- Tooling Kit: Contains conventional manual tools, screw set, and custom tools for impeller extraction/insertion. All high-strength and corrosion-resistant.
- Footstraps: Pre-formed arch, 7 mm neoprene padding, internal adjustment system, twist control system.
- Leash + Security Key: 7-Feet coiled leash, padded neoprene cuff, stainless steel swivels, custom-made security magnet pull system.
- Fins: Hard plastic and fiber G5 fins.
- Grease: White grease for battery connectors, blue grease for mechanical maintenance.
- Handle: Made of highly durable thermoplastic rubber, doubled and stitched end webbing for strength and security.
Usage Features
First Assembly:
- Fin Installation: Fins are inserted into the finbox and secured with screws.
- Leash Installation: The leash is attached to the board via a screw insert on the non-slippery surface.
- Battery Magnet Insertion: A cylindrical magnet is inserted into a hole inside the battery compartment.
- Female Connector Installation: Female connectors are screwed into the bottom of the battery using a provided tool.
- Footstrap Positioning: Footstraps are placed over desired inserts (front and back) and secured with screws, accommodating both goofy and regular riders.
Battery Use and Configuration:
- Transport and Storage: Battery must be below 20% charge for transport. Store between 0°C and 40°C (32°F and 104°F) for less than 3 months, in a ventilated area with 0%-80% humidity, away from metallic objects.
- Connection/Disconnection: Check watertight seal and housing for cleanliness and damage. Turn the vent counter-clockwise, place the battery on the pad, then into the compartment. The blue LED on the board's front indicates connection. To disconnect, turn the vent counter-clockwise and pull the battery by the upper handle. Keep the vent closed when not in use.
- Charging: Battery must be removed from the board for charging. Connect the charger to the battery, respecting color codes (red to red, black to black). Connect the charger to a wall outlet first, then the battery. LEDs on the charger indicate charging status (yellow for normal, green for full). Disconnect when fully charged. Supervise charging and avoid extreme temperatures or direct sunlight.
Wireless Controller Use and Configuration:
- Synchronization: With the battery disconnected and the controller off, place the drop over the logo. Press the drop until the first LED blinks, then press again to enter the submenu. The controller searches for the board, and the sync LED blinks. Insert the battery to complete synchronization. Both LEDs will blink faster when synched.
- Power Control: The Manta has three power levels: 0% (off), 50%, and 100%. Press the "Drop" button once for 50% power (400W), twice for 100% power (750W), and a third time to stop (0W). If at 50% power, two presses are needed to stop.
- Charging: Connect the Qi charger via USB. Place the controller on the charging pad. The green LED blinks while charging and turns off when full. Press the drop to check the controller's battery status.
Leash and Security Mechanisms:
- Leash Attachment: Attach the leash below the knee of the front leg.
- Security Magnet Key: Place the magnetic key on the board before use. It acts as a kill switch, stopping the jet if detached (e.g., during a fall).
- Automatic Stops: The jet automatically stops due to engine overheat, battery overheat, loss of communication with the controller, jet tightening/blockage, magnetic key disconnection, or if the controller is submerged. To reactivate, disconnect and reconnect the security magnet.
Safety Guidelines:
- Pre-Water Check: Always check the board, safety disconnection system, battery, and wireless controller for good condition.
- Entry/Exit: Avoid wave break areas. Position yourself between the board and the wave. Always get on the board from one side.
- Impeller Safety: Never place hands or feet near the impeller due to powerful suction and sharp edges.
- Braking: The board has no braking system; it will continue moving due to inertia after throttle release. Slow down gradually.
- Post-Use: Do not touch the steel tube immediately after use as it may be hot.
- General Safety: Wear a life vest and helmet. Do not go further offshore than you can swim back. Do not operate alone. Be aware of climate changes, tides, and shallow waters. Avoid use during electric storms. Do not use near swimmers or scuba divers. Ensure deep water, free of coral reefs. Avoid high currents or waves. Do not use behind another board. Avoid overturning the board. Do not grab or lift the board by discharge connectors. Do not remove the goretex vent.
Maintenance Features
Board Maintenance:
- Rinsing: Rinse the jet with fresh water after every use, especially in saline environments, to remove salt from the shaft and impeller.
- Battery Disconnection: Do not leave the battery connected for long periods.
- Stainless Steel Tube: Clean frequently to ensure proper heat dissipation.
- Storage: Avoid placing upside down or exposing to direct sunlight for long periods.
- Greasing: Periodically apply blue grease to the impeller and stator/nozzle. Also apply grease to male and female connectors.
- Discharge Connectors: Keep clean between uses.
- Impact: Do not impact the turbine or rest the board on it.
Battery Maintenance:
- Handling: Handle with care outside the board to prevent damage to the watertight seal. Do not use if dropped or damaged.
- Storage: Store in a dry place, away from direct sunlight.
- Submersion: Do not submerge the battery.
- Disposal: Dispose of batteries at recycling facilities.
- Connector Care: Keep male and female connectors in good condition. Unscrew, clean with isopropyl alcohol, apply white grease (for electronic contacts), then re-screw. Lack of maintenance can cause irreversible damage.
- Protection: Always protect battery connectors with plastic covers when not charging to prevent water entry.
Wireless Controller Maintenance:
- Sunlight Exposure: Do not leave exposed to direct sunlight to prevent overheating of the internal lithium battery.
- Cleaning: Rinse with fresh water after use and let it dry. Remove from its cover during storage to prevent humidity damage. Use a cloth and fresh water for cleaning.
- Handling: Do not drop, open, crush, or burn. Do not pull the drop cable.
Charger Maintenance:
- Lubrication: Keep female and male charge connectors lubricated. Apply white grease inside the battery's female charge connector, then insert the charger's male connector to distribute the grease.
Repairs and Replacements:
- General: Clean the board with fresh water after every use. Introduce grease into the stator bearing periodically. Keep battery power connectors dry and clean.
- Impeller: Manipulate with extreme caution due to sharp edges. Do not activate the board while replacing the impeller. Detailed instructions are provided for unmounting and mounting the impeller, including specific tools and screw sequences.
- Connectors: Periodically apply white grease inside and outside connectors. If battery power connectors are excessively corroded, they must be replaced using a tube hex key to unscrew old connectors and screw in new ones.