3
4.3
|
Securing the ambient air temperature cable
Clip the cable to the underside of the oven.
5. Using the Ooni Connect™ Digital Temperature Hub
5.1
|
Download the Ooni app
5.2
|
Powering On/O device
a. Turn on the device with a short press of the power button.
b. Turn o the device with a long press on the power button.
Turn o your device when not in use to save battery.
The device will automatically switch o after 45 minutes.
5.3
|
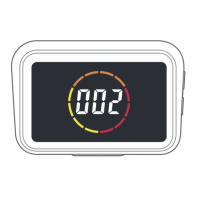
Setting the Oven ID
After the first power on, you will need to set the Oven ID for your Ooni Connect™
Digital Temperature Hub. Use the Temperature Cycle Button and the Back-Light
button to cycle between the Oven ID numbers until you reach the correct one.
The Oven ID for Ooni Karu 2 Pro is 002.
Confirm this Oven ID by pressing the Power Button.
5.4
|
Changing the Oven ID
Press and hold the Temperature Cycle Button and Back-light button together
for 3 seconds to re-select the Oven ID. Simply update the Oven ID and confirm
the selection.
Scan to download the Ooni app
Setting up your Ooni Connect™ Digital
Temperature Hub is simple, and the Ooni app
will walk you through each step. If you already
have the Ooni app, be sure to update to the
latest version.