1
1 General
1.1 For your information...
Please read this manual carefully before using your appliance. It contains important safety advice; it explains how to use
and look after your appliance so that it will provide you with many years of reliable service.
Should a fault arise, please first consult the section on “Troubleshooting”. You can often rectify minor problems yourself,
thus saving unnecessary service co
sts.
Please keep this manual in a safe place and pass it on to new owners for their information and safety.
Assembly and installation may only be carried out by trained specialists and taking into account the applicable laws,
regulations and standards. All safety and warning information as well as the handling instructions in the enclosed
documents must be observed.
1.2 Intended use
The appliance is to be used solely for preparing food in the home or in other environments. Similar environments:
Use in shops, offices and other similar working environments.
Use in agricultural enterprises.
Use by customers in hotels, motels and other typical living environments.
Use in breakfast buffets.
It may not be used for any other purpose and may only be used under supervision.
GENERAL
EN
1.3 Explanation for symbols and indications
The following appliance was produced according to state of the art technology. Machines nevertheless give rise to risks
which cannot be constructively avoided.
In order to guarantee sufficient safety for the use, safety instructions are also given. These instructions are marked by way
of the highlighted texts which follow.
Sufficient safety in operation will only be guaranteed whene these instructions are observed.
The designated text passages have different meanings:
DANGER
Note indicating an imminent threat which may result
in death or very serious injury.
CAUTION
Note indicating a potentially dangerous situation
which may result in death or very serious injury.
IMPORTANT
Note indicating a dangerous situation which may
result in minor injury or damage to the appliance.
NOTE
Note to be observed in order to make handling the
appliance easier.
WARNING OF ELECTRICAL ENERGY!
RISK OF FATAL INJURY!
Live components have been installed near this
symbol. Covers bearing this sign may only be
removed by a certified skilled electrician.
This symbol has been applied to surfaces which get
hot. There is a risk of serious burning or scalding.
The surfaces may also be hot after the appliance has
been switched off.
OBSERVE REGULATIONS FOR HANDLING
ELECTROSTATICALLY SENSITIVE
COMPONENTS AND MODULES (ESDS)
Electrostatically endangered components and
modules are located behind covers bearing the
adjacent symbol. Never touch plug connections, strip
conductors or component pins. Only qualified staff
members who are familiar with ESDs are authorised
to carry out any technical intervention work.
5 Cleaning and care
x Switch the hob off and let it cool down before you clean it.
x Never clean the glass ceramic hob with a steam cleaner or similar appliance!
x When cleaning make sure that you only wipe lightly over the ON/OFF key. The hob may otherwise be
accidentally switched on.
x Observe all safety and warning information.
x Regular cleaning and maintenance ensures long service life of the appliance and opt
imal function.
Component Cleaning cycle
Operating panel Immediately after every soiling
Glass ceramic hob
Clean with conventional glass ceramic detergents immediately
after soiling and on a weekly basis
Air inlet glass
After cooking very greasy dishes; at least once a week. Clean
by hand (Do not put this part in the dishwasher!)
Grease filters
Clean when the fan power level indicator shows F. (Do not put
this part in the dishwasher!)
Condensation filter Every time you clean the grease filters (do not put this part in
the dishwasher!).
Water collector When some water overflows and flows in the air inlet opening.
Carbon filters (only in C - version)
Regenerate if odours have built up, extraction power is
dwindling or the fan power level indicator shows C. Every 2
years the carbon filters must be replaced.
5.1 Glass ceramic hob
Important! Never use aggressive cleaning agents such as rough scouring agent, abrasive saucepan cleaners, rust
and stain removers etc.
Cleaning after use
x Always clean the entire hob when it has become soiled. It is recommended that you do so every time the hob
is used. Use a damp cloth and a little washing up liquid for cleaning. Then dry the hob with a clean dry cloth
to ensure that there is no de
tergent left on the surface of the hob.
Weekly cleaning
x Clean the entire hob thoroughly once a week with commercial glass cerami
c cleaning agents. Please follow
the manufacturer's instructions carefully. When applied, the cleaning agent will coat the hob in a protective
film which is resistant to water and dirt. All the dirt will remain on the film and can then easily be removed.
Then rub the hob dry with a clean cloth. Make sure th
at no cleaning agent remains on the surface of the hob
since this will react aggressively when the hob is heated up and will change the surf
ace.
5.2 Specific soiling
Heavy soiling and stains (lime scaling and shiny, mother-of-pearl-type stains) can best be
removed when the hob is still slightly warm. Use commercial cleaning agents to clean the hob.
Proceed as outlined under Item 2.
First soak food which has boiled over with a wet cloth and then remove remaining soiling with
a special glass scraper for glass ceramic hobs. Then clean the hob again as described under chapter
5.1.
17
CLEANING AND CARE
EN
Burnt sugar and melted plastic must be removed immediately, when they are still hot, with a glass
scraper. Then clean the hob again as described under Item 2.
Grains of sand which may get onto the hob when you peel potatoes or clean lettuce may scratch the
surface of the hob when you move pots around. Make sure that no grains of sand are left on the hob.
Changes to the colour of the ceramic surface have no effect on the function and stability of the glass
ceramic. These colour changes are not changes in the material but food residues which were not
removed and which have burnt into the surface.
Shining areas are caused by wear from pan bottoms or unsuitable cleaning agents, especially when
using cookware with aluminium bases or by unsuitable cleaning agents. They are difficult to remove with
standard cleaning agents. You may need to repeat the cleaning process several times. In time, the
decoration will wear off and dark stains will appear as a result of using aggressive cleaning agents and
faulty pan bases.
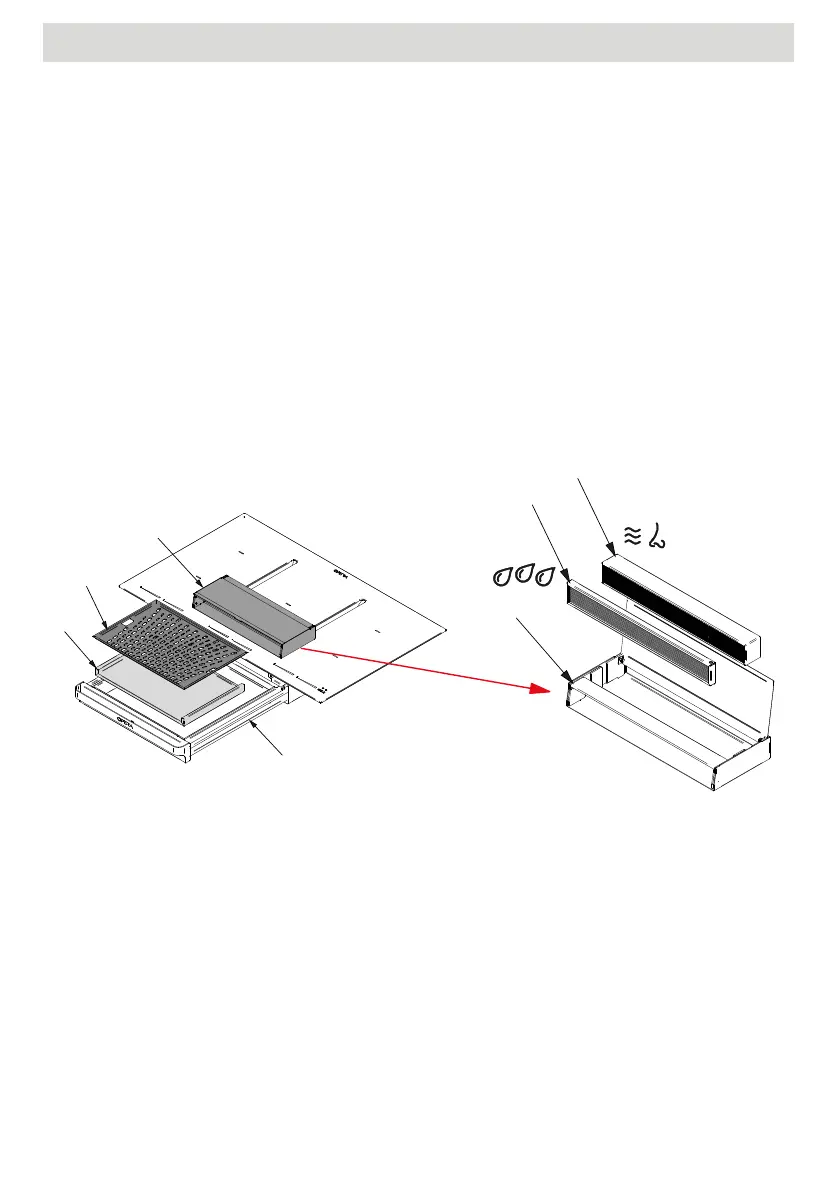
5.3 How to remove the filters from the appliance
To gain access to the grease (5) and activated carbon (6) filters, open the filters drawer (1) and remove
the condensation filter (3) and the water collector (2). Now the filters box (4) can also be removed. The
grease and activated carbon filter are placed inside it.
The activated carbon filters are available only in C-version!
18
CLEANING AND CARE EN
Burnt sugar and melted plastic must be removed immediately, when they are still hot, with a glass scraper. Then
clean the hob again as described under Item 2.
Grains of sand which may get onto the hob when you peel potatoes or clean lettuce may scratch the surface of
the hob when you move pots around. Make sure that no grains of sand are left on the hob.
Changes to the colour of the ceramic surface have no effect on the function and
stability of the glass ceramic.
These colour changes are not changes in the material but food residues which were not removed and which have
burnt into the surface.
Shining areas are caused by wear from pan bottoms or unsuitable cleaning agents, especially when using
cookware with aluminium bases or by unsuitable cleaning agents. They are difficult to remove with standard
cleaning agents. You may need to repeat the cleaning
process several times. In time, the decoration will wear off
and dark stains will appear as a result of using aggressive cleaning agents and faulty pan bases.
5.3 How to remove the filters from the appliance
To gain access to the grease (5) and activated carbon (6) filters, open the filters drawer (1) and remove the
condensation filter (3) and the water collector (2). Now the filters box (4) can also be removed. The grease and
activated carbon filter are placed inside it.
The activated carbon filters are available only in C-version!
5.4 Grease filters
The grease filters absorb the greasy particles from cooking vapours.
Make sure that the cooktop and cooktop extractor are switched off (see the Operation chapter).
Wait until the fan indicator shows 0.
Remove the grease filters
Use a cleaner and degrea
s
er in one.
Rinse the grease filters with hot water.
Use a soft brush to clean the grease filters.
After cleaning, rinse the grease filters well.
Dry the grease filters with a tea towel.
Press below the symbol and hold for 3 seconds to reset the filter timer.
Do not put in the dishwasher.
5
4
1
4
3
2
60
EN CLEANING AND CARE
 Loading...