Do you have a question about the Ortur Laser Master 2 and is the answer not in the manual?
Essential safety instructions for operating the laser engraver, including eye protection and safe environment setup.
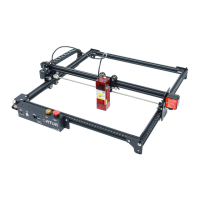
Assemble the initial frame structure using aluminum profiles and corner connectors.
Secure the frame by locking screws and adding more aluminum profiles.
Install the X-axis assembly onto the completed bottom frame.
Install timing belts, base anchors, and spacers for the motion system.
Secure the timing belt end and install the Y-axis limit switch.
Mount the mainboard assembly and the Y motor onto the frame.
Connect the laser module to its backboard and mount it.
Connect all necessary wires and secure them with cable ties.
Download and install LaserGrbl software and necessary drivers for Windows.
Connect the engraver via USB and verify connection in Device Manager.
Configure settings, adjust parameters, focus laser, and start engraving.
Download and install LaserBurn software, then start the new device wizard.
Configure GRBL controller, name device, set work area, and adjust origin.
Set auto-home, make the device default, and prepare for use.
| Engraving Area | 400 x 430 mm |
|---|---|
| Control Software | LaserGRBL, LightBurn |
| Connectivity | USB |
| Positioning Accuracy | 0.01 mm |
| Laser Wavelength | 445 ± 5 nm |
| Supported Materials | Leather, Paper, Wood, Acrylic |
| Output Voltage | 12V |
| Operating Systems | Windows, macOS, Linux |
| Supported File Formats | BMP, JPG, PNG, DXF |
| Engraving Speed | 3000 mm/min |