EasyManua.ls Logo

Orved MULTIPLE 315VM P4 - User Manual

Orved MULTIPLE 315VM P4
176 pages
Go to English
Print Icon
To Next Page IconTo Next Page
Loading...
Manuale d’istruzione
Operating and service manual
Mode d’emploi et d’entretien
Bedienungs- und Wartungshandbuch
Manual de uso y mantenimiento
MULTIPLE 315VM P4-P8 / VM12 / VM16
VM18 / VM18 H / VM53 / VM53 H
VM1800 / VM19 / VM20 / VM30
VM20 TANDEM
CONFEZIONATRICI SOTTOVUOTO A CAMPANA
VACUUM CHAMBER PACKAGING MACHINES
CONDITIONNEUSES SOUS VIDE À CLOCHE
KAMMER - VAKUUM-VERPACKUNGSMASCHINEN
MÁQUINAS ENVASADORAS AL VACÍO DE CAMPANA
REV. 00
Ed. 10 - 2005
Cod.: 1500154
I
GB
F
D
E
ORVED Srl Soc. Unipersonale - Via dell'Artigianato, 30 - 30024 MUSILE DI PIAVE (VE) ITALY
Tel.: ++39 0421 54387 - 340340 / Telefax: ++39 0421 333100 - 332295
E-mail: orved@orved.it - orved.ve@tin.it - Internet: www.orved.it
AZIENDA CON
SISTEMA DI GESTIONE
PER LA QUALITÁ
CERTIFICATO DA DNV
=UNI EN ISO
9001:2000=
COMPANY WITH
QUALITY MANAGE-
MENT SYSTEM
CERTIFIED BY DNV
=UNI EN ISO
9001:2000=

Table of Contents

Questions and Answers

  • W
    William ChambersAug 17, 2025
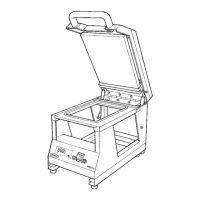
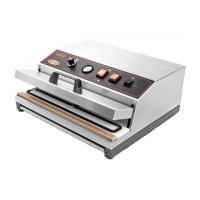
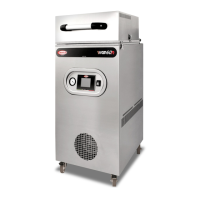
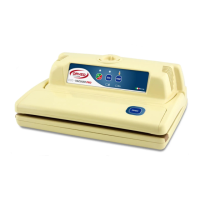
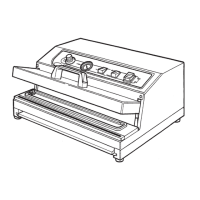
    Why is my Orved MULTIPLE 315VM P4 Kitchen Appliances showing poor sealing?
    • S
      Stephanie HuffAug 18, 2025
      If your Orved Kitchen Appliances machine isn't sealing properly, start by cleaning the sealing bar. If the issue continues, the sealing time might be insufficient for the bag's thickness. Try increasing the sealing time using the “SEAL” control knob. Also, inspect the Teflon cover and red silicone for wear and replace them if necessary.
  • W
    wellslaurieAug 20, 2025
    What to do if Orved MULTIPLE 315VM P4 does not create vacuum in chamber?
    • E
      Elizabeth RossAug 20, 2025
      If your Orved Kitchen Appliances machine is not creating a vacuum in the chamber, ensure you lower the cover with both hands, applying sufficient pressure during appliance startup. Also, check that the jars evacuation valve (in models MULTIPLE-VM12-VM16) is closed. If you have a model with a gas option, make sure the gas function is deactivated using the “GAS” control knob. Finally, if none of the above work, the pump fuse (PF1) on the power board may have blown; in this case, contact a service center to change the fuse.
  • S
    Sonia YoungAug 22, 2025
    Why the Orved Kitchen Appliances machine does not seal?
    • F
      Frank AliAug 22, 2025
      If your Orved Kitchen Appliances machine is not sealing bags, first check the sealing bar connection wires and clean the contacts if necessary. If you have a model with a gas option, ensure the gas quantity is not more than 70% by adjusting the “GAS” control knob. Also, verify that the sealing bar fuse (PF2) on the power board is intact and replace it if blown. Finally, make sure the seal bag is not perforated, and replace it if necessary.
  • J
    John TaylorAug 25, 2025
    How to fix insufficient vacuum in chamber of Orved MULTIPLE 315VM P4?
    • S
      Sydney MooreAug 26, 2025
      If you're experiencing insufficient vacuum in the chamber of your Orved Kitchen Appliances, first, increase the evacuation time using the “VAC” control knob. Then, check the oil and the pump exhaust filter to ensure the vacuum pump performance is sufficient. If the cover gasket is worn, replace it. For models MULTIPLE - VM12 - VM16, ensure the external containers evacuation valve is closed.
  • R
    Rhonda RosarioAug 27, 2025
    How to prevent seal seam burns and bubbles in Orved MULTIPLE 315VM P4 Kitchen Appliances?
    • H
      Haley Baker MDAug 28, 2025
      If the seal seam of your Orved Kitchen Appliances shows burns and bubbles, it means the sealing time is too long. Decrease the sealing time using the “SEAL” control knob.
  • B
    Benjamin AustinAug 30, 2025
    What to do if Orved MULTIPLE 315VM P4 has insufficient vacuum in bag?
    • A
      Abigail LoweAug 30, 2025
      If you find that the vacuum in the bag is insufficient or the bag does not maintain vacuum with your Orved Kitchen Appliances, ensure the bag is positioned correctly, centered on the sealing bar and projecting 20 mm beyond it. If the bag is perforated, use a thicker bag and wrap the product with cling film or soft paper. If the sealing is insufficient, increase the sealing time using the “SEAL” control knob. Also, check the bag for defects and replace it if necessary. Ensure the bag opening is clean, free from oil or grease, and that the bag size is appropriate for the product dimensions.
  • E
    Emily GomezSep 1, 2025
    How to troubleshoot Orved Kitchen Appliances machine not working?
    • M
      Mitchell RogersSep 1, 2025
      If your Orved Kitchen Appliances machine isn't working, first, ensure it's switched on using the main power switch. Next, check the power supply by verifying the plug is correctly inserted into a functioning socket with the correct voltage and that the power cable is intact. Also, inspect fuses PF3 and PF4 on the power board to confirm they are intact and correctly inserted. If the problem persists, it may indicate machine damage, and you should contact a service center.
  • J
    Jordan LongSep 4, 2025
    Why PLexiglas cover of Orved Kitchen Appliances does not close?
    • A
      Andrew WeaverSep 4, 2025
      If the Plexiglas cover of your Orved Kitchen Appliances does not close, the cover gasket may be worn and needs replacement. Alternatively, the hinges might be out of alignment, requiring adjustment; contact a service center for hinge adjustments.
  • B
    Brian AvilaSep 6, 2025
    How to fix narrow irregular sealseam on Orved MULTIPLE 315VM P4 Kitchen Appliances?
    • S
      sosaemilySep 6, 2025
      If you observe a narrow, irregular seal seam on your Orved Kitchen Appliances, the sealing time is likely too short. Increase the sealing time using the “SEAL” control knob.
  • H
    harveystefanieSep 9, 2025
    What to do if lid opens during GAS cycle of Orved MULTIPLE 315VM P4?
    • T
      Tina WilliamsSep 9, 2025
      If the lid of your Orved Kitchen Appliances opens during the GAS cycle, the gas percentage is likely too high. Reduce the gas percentage using the “GAS” control knob.

Summary

PREFACE

1.1 INTRODUCTION

Background and purpose of the manual.

1.2 IMPORTANT INFORMATION

Key information, contact details, and disclaimers.

1.3 DOCUMENT PRESERVATION

Guidelines for keeping the manual in good condition.

GENERAL INFORMATION

2.1 MANUFACTURER IDENTIFICATION

Company name, address, and contact details.

2.2 APPLIANCE IDENTIFICATION

Details found on the machine's rating plate.

2.3 TECHNICAL SERVICE & WARRANTY

Information on warranty coverage, defects, and service.

GENERAL SAFETY REGULATIONS

2.4.1 SYMBOLS

Explanation of symbols used in the manual for safety.

2.4.2 WARNINGS AND HAZARDS FROM USE

Specific hazards related to machine operation and safety.

SPECIFIC SAFETY WARNINGS

2.4.2.6 MODIFYING THE APPLIANCE

Rules regarding alterations and modifications to the machine.

2.4.2.7 FIRE PREVENTION

Precautions to prevent fire hazards during operation.

2.4.2.8 CLEANING AND DISMANTLING

Procedures for safe cleaning and dismantling.

TECHNICAL DATA

3.1 TECHNICAL DATA

Detailed technical specifications and dimensions of different models.

FIELD OF USE

3.2 FIELD OF USE

Intended applications and limitations of the vacuum packaging machine.

HANDLING AND UNPACKING

4.1 GENERAL WARNINGS

Important precautions for handling and receiving the machine.

4.2 UNPACKING

Procedures for safely removing packaging and checking the machine.

4.3 HANDLING AND STORAGE

Guidelines for transporting and storing the machine safely.

INSTALLATION

5.1 APPLIANCE DESCRIPTION

Overview of the machine's main components and parts.

5.2 SUPPLY VOLTAGE

Information on electrical power requirements and connection.

5.3 GENERAL REGULATIONS FOR USE

Rules and precautions for safe operation of the appliance.

CONTROL PANEL

5.4 CONTROL PANEL

Description of controls for electro-mechanical and digital versions.

FUNCTION DEFINITIONS (PART 1)

5.5.1 VACUUM FUNCTION

Explanation of the vacuum function and its settings for different models.

FUNCTION DEFINITIONS (PART 2)

5.5.2 GAS FUNCTION

Description of the optional gas flushing function and its parameters.

5.5.3 SEALING FUNCTION

Details on the sealing function, time settings, and material considerations.

5.5.4 SOFTAIR FUNCTION

Explanation of the Softair function for gentle decompression.

5.5.5 JARS FUNCTION

Description of the Jars function for external containers and bags.

USING THE MACHINE

6.1 PREPARATION

Steps for preparing the product and machine before vacuum packaging.

OPERATION

6.2.1 ELECTRO-MECHANICAL CONTROLS OPERATION

Basic vacuum and sealing operation for electro-mechanical models.

OPERATION WITH GAS OPTION

6.2 OPERATION WITH GAS OPTION

Operating procedure when using the gas flushing option.

SOFT AIR AND PUMP OPERATIONS

6.2 OPERATION WITH SOFTAIR OPTION

Procedure for using the Softair option for gentle decompression.

5.5.7 PUMP FUNCTION

Details on activating and using the continuous pump operation.

SPECIAL FUNCTIONS

CREATING VACUUM IN EXTERNAL CONTAINERS

Procedure for vacuum packaging in external containers using the Jars function.

CREATING VACUUM INSIDE EXTERNAL CHANNELLED BAGS

Method for vacuum packaging channelled bags outside the chamber.

DIGITAL CONTROL OPERATIONS

6.2.2 MACHINES WITH DIGITAL CONTROLS

Operation and programming for models with digital controls.

PROGRAMMING FUNCTIONS (DIGITAL)

PROGRAMMING THE VAC, GAS, SEAL E SOFTAIR FUNCTIONS

Guide to programming vacuum, gas, seal, and softair functions.

MORE PROGRAMMING & SPECIAL CYCLES

PROGRAMMING THE JARS FUNCTION

Steps for programming the Jars function for external packaging.

ACTIVATING AND DEACTIVATING GAS;SOFTAIR

How to activate and deactivate gas and Softair functions.

PACKING LIQUID PRODUCTS

6.2.3 PACKING LIQUID PRODUCTS

Specific procedures and warnings for packaging liquid products.

MAINTENANCE OVERVIEW

7.1 GENERAL WARNINGS

General safety precautions for maintenance operations.

7.2 PROGRAMMED MAINTENANCE

Scheduled maintenance tasks based on frequency and machine parts.

CLEANING PROCEDURES

7.3.1 CLEANING THE PLEXIGLAS COVER

Instructions for cleaning the plexiglas cover.

7.3.2 CLEANING THE SEALING BARS

Procedure for cleaning the sealing bars, with a burn warning.

7.3.3 CLEANING THE VACUUM CHAMBER

Steps for cleaning the vacuum chamber and its components.

7.3.4 DISINFECTING THE MACHINE

Process for disinfecting the machine's surfaces.

ROUTINE MAINTENANCE

7.4.1 REPLACING THE SEALING BAR COVER TEFLON BAND

Guide to replacing the worn Teflon band on the sealing bar.

PUMP MAINTENANCE

7.4.2 CHANGING THE PUMP OIL

Detailed procedure for changing the vacuum pump oil.

FILTER AND GASKET REPLACEMENT

7.4.3 CHANGING THE PUMP EXHAUST FILTER

Procedure for replacing the pump exhaust filter.

7.4.5 CHANGING THE LID GASKET AND RED SILICONE

Instructions for replacing the lid gasket and red silicone.

WIRING DIAGRAMS & FUSE REPLACEMENT

7.4.6 WIRING DIAGRAMS

Schematic diagrams for single-phase and three-phase machine wiring.

REPLACING FUSES

Instructions for replacing fuses in the machine's electrical panel.

TROUBLESHOOTING

PROBLEM: MACHINE NOT WORKING

Troubleshooting steps when the machine is not operating.

PROBLEM: INSUFFICIENT VACUUM

Diagnosing and resolving issues with insufficient vacuum.

PROBLEM: MACHINE DOES NOT CREATE VACUUM

Solutions for when the machine fails to create vacuum.

MORE TROUBLESHOOTING

PROBLEM: THE MACHINE DOES NOT SEAL

Troubleshooting steps for sealing failures.

PROBLEM: POOR SEALING

Addressing issues related to inadequate or faulty sealing.

PROBLEM: GAS QUANTITY INSUFFICIENT

Resolving problems with insufficient gas flushing.

SPARE PARTS ILLUSTRATION

MOD.CARRELLATI FLOOR MODELS STANDMODELLE

Illustration of main spare parts for floor-standing models.

SPARE PARTS LIST

RICAMBIO-Spare Part-Pièce de Rechange-Ersatzteil-Repuesto

List of main spare parts and their codes for various models.

Orved MULTIPLE 315VM P4 Specifications

General IconGeneral
BrandOrved
ModelMULTIPLE 315VM P4
CategoryKitchen Appliances
LanguageEnglish

Related product manuals