8 9SETTING UP XS1 USER MANUAL
The XS1 has four connection points for connecting acces-
sories. Two are slide connections located on the vertical
positioner, each support 70 pounds of digital tension (or a
combined weight of 140 pounds). The remaining two are in
the deck and support a combined total of 250 pounds of re-
sistance. See XS1 DIAGRAM on page 4.
ADJUSTING SLIDE POSITION
When using the slide connection and cable, adjust the verti-
cal position of the slide handle to your preference.
WARNING: NEVER adjust the slide position while the
weight is loaded and an exercise is in progress. Always press
UNLOAD before adjusting the vertical position of the slide.
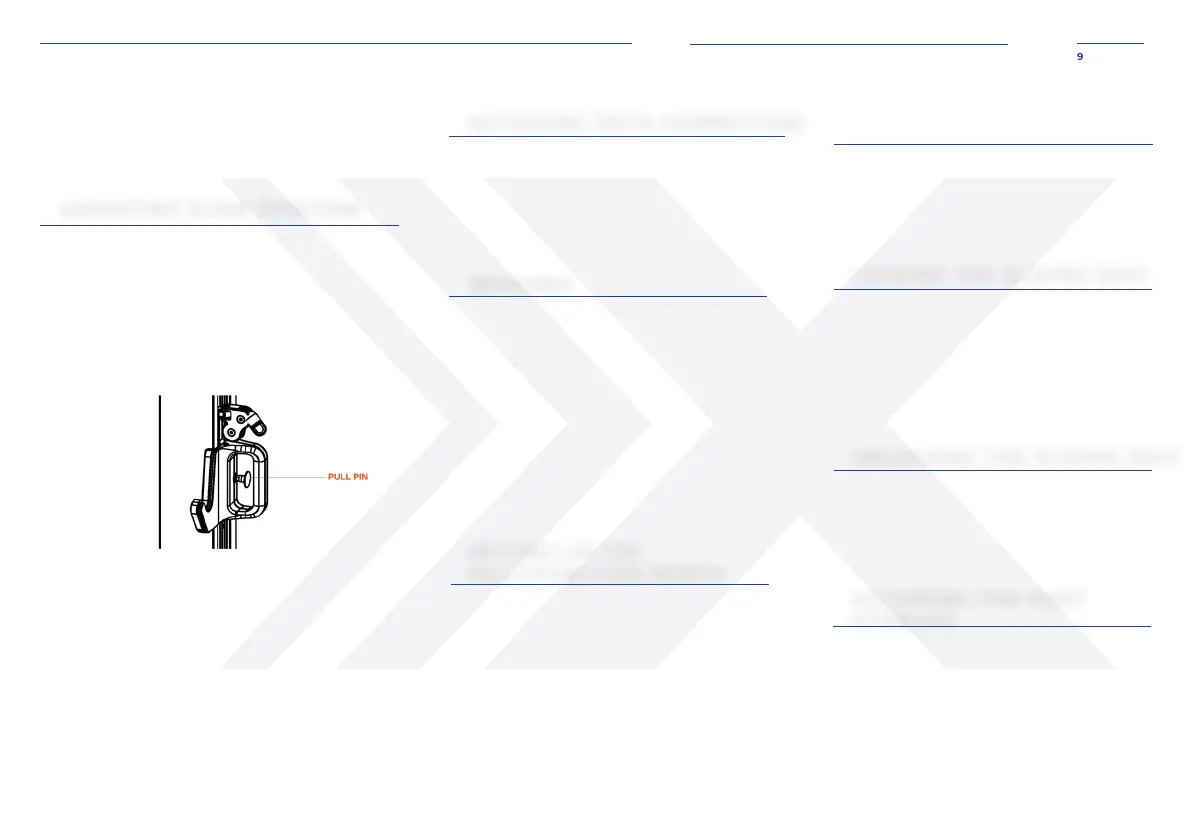
1. Firmly grasp the slide handle and pull the spring-load-
ed pin knob to release the handle. See Figure 3.
FIGURE 3
2. Carefully glide the handle up or down to your desired
position while holding the pull pin out.
3. Release the pull pin into an available hole to lock the
handle in position.
4. Before beginning an exercise, ensure the pull pin is
fully engaged in a locking hole. Verify proper engage-
ment by ensuring the orange band on the pin is not
visible. If the orange band is visible, adjust the slide
handle slightly up and down until the pin is fully en-
gaged.
WARNING: NEVER start an exercise if the orange band is vis-
ible on the locking pin.
ACCESSING DECK CONNECTION
The deck connections are located on the left and right
sides of the force plate. Press the ridged center as you
slide the deck connection doors open.
WARNING: Connect the cable extenders to the deck
cables when performing exercises that cause the deck
cables to rub against the skin.
SETTING UP THE
MULTIFUNCTION BENCH
BENCHES
STRENGTH BENCH (*FOR FLEX PACKAGES
ONLY)
The strength bench is included in the Flex accessory
training activities, such as bench presses and seated
curls.
MULTIFUNCTION BENCH (*FOR FLOW AND
PEAK PACKAGES ONLY)
The multifunction bench is included in the Flow and
Peak accessory packages. It is multifunctional for var-
ious activities, such as strength exercises, rowing activi-
ties, and digital Pilates.
1.
wrench.
2. Position the end of the bench with the long axis
perpendicular to the sliding axis of the bench.
3. Depending on your exercise, bring the foot stir-
rup end of the bench to the center of the deck,
almost to the baseline of the force plate, for exer-
cises that need space away from the vertical po-
sitioners (i.e., canoeing) or position the end of the
bench near the crease at which the deck folds for
exercises that need space near the veritical posi-
tioners (i.e., bench press).
ACCESSING THE FOOT
STIRRUPS
LOCKING THE SLIDING SEAT
UNLOCKING THE SLIDING SEAT
4. Center the bench using the two small lines that
are at the end of the deck.
5. If the bench is hanging off of the deck, push ei-
ther the left or right foot pedal, located at the
bottom of the bench and below the seat, to re-
lease the kickstand.
1. Remove the bench pad.
2. Lift the footplate until it reaches a hard stop.
3. Tighten the center knob to lock the footplate
in place.
4. Secure your feet in the foot stirrups for all row-
ing activities.
1. Remove the bench pad.
2. Slide the seat to your preferred position.
3. Align the center locking pin to the nearest avail-
able hole.
4. Twist the locking knob until the pin is released
and locked into the hole.
1. Pull the locking knob up.
2. Twist the knob a quarter of a turn. The knob
should be outside of the silver inserts and resting
directly on top of the bottom half of the pin.
SETTING UP THE MULTIFUNCTION
BENCH (CONTINUED)