ONLINE MANUAL
Scan this QR Code with
your mobile device to take
you to the online manual.
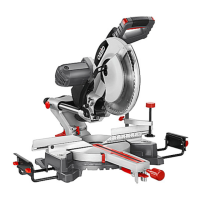
Attaching The Material Support Bars
1. On the underside of the saw, unwind
the Phillips head screw, then insert the
support rail into the side of the mitre
saw base. Retighten the screw to hold
it in place.
2. Attach a support foot to the material
support bar.
3. Repeat steps 1 and 2 on the other side of the mitre saw.
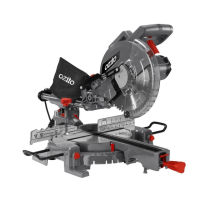
Attaching The Dust Bag
1. Pinch the metal tabs together to widen
the dust bag opening.
2. Slide it onto the dust extraction port
and release the tabs to attach the dust
bag.
Note: The dust extraction port can
block easily with dust and requires periodic
cleaning. For more ecient operation, empty
the dust bag when it is no more than half full.
This allows better air ow through the bag.
Note: Dust bags will not collect all the saw dust generated by the
mitre saw. For best results use a vacuum for dust extraction by
attaching a vacuum hose to the dust extraction port.
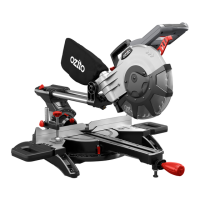
Attaching The Carry Handle
1. Align the carry handle with the slot and
use the provided screws to fasten it in
place.
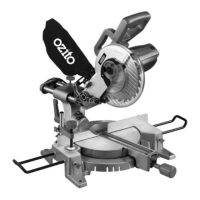
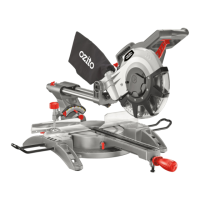
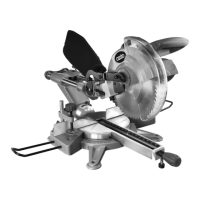
1. Lock-O Button
2. On/O Trigger
3. Spindle Lock
4. Motor Head
5. Lock Down Pin
6. Material Clamp
7. Back Fence
8. Mounting Holes
9. Mitre Angle Guide
10. Support Rail
11. Support Foot
12. Material Support Bar
13. Upper Back Fence
14. Bevel Angle Guide
15. Cutting Depth Screw
16. Laser Guide
17. Slide Lock
18. Dust Bag
19. Carry Handle
20. Laser Button
21. Cutting Head Handle
22. Blade Guard
23. Saw Blade
24. Trenching Stop
25. Mitre Lock
26. Release Button
27. Table Insert
28. Table Support Foot
29. Fence Screw
30. Bevel Lock
SLIDING COMPOUND MITRE SAW
KNOW YOUR PRODUCT
1. ASSEMBLY
SETUP & PREPARATION
12
17
252627
13
18 19
9
29
10
2
8
5
24
4
22
6
7
21
23
3
1
20
16
14
15
11
30 28
WARNING! ENSURE THE TOOL IS TURNED OFF
AND DISCONNECTED FROM THE POWER SUPPLY
BEFORE PERFORMING ANY OF THE FOLLOWING
OPERATIONS.

 Loading...