28
RQT8033
Recording
Timer recording
[HDD] [RAM] [-R] [-RW‹V›] [+R]
≥[-R] [-RW‹V›] [+R] When recording bilingual broadcasts, only the
audio selected in “Bilingual Audio Selection” (➡ 58) is recorded
(“M 1” or “M 2”).
≥[HDD] If you set “Rec for High Speed dubbing” to “On” before
recording to the HDD, you can later high speed transfer (dub) the
programme to DVD-R, DVD-RW(DVD-Video format) and +R.
Before recording
≥Refer to the “Using DVD-R, DVD-RW and +R on this unit” for more
information (➡ 7).
≥See also the notes “Before recording” (➡ 25).
Preparation
≥Turn on the television and select the appropriate video input to suit
the connections to this unit.
≥If recording to DVD, insert a disc that you can use for recording
(➡ 24).
≥Make sure that the clock settings are correct (➡ 61).
Entering PlusCode numbers is an easy way of timer recording. You
can find these numbers in TV listings in newspapers and magazines.
≥
Using PlusCode numbers for Satellite stations or Digital terrestrial
stations
Set this unit to recognise PlusCode numbers for Satellite stations or
Digital terrestrial stations before you start the following operations
(➡ 21, VIDEO Plus+ system for Satellite/Digital terrestrial stations).
≥You can enter up to 32 programmes up to a month in advance.
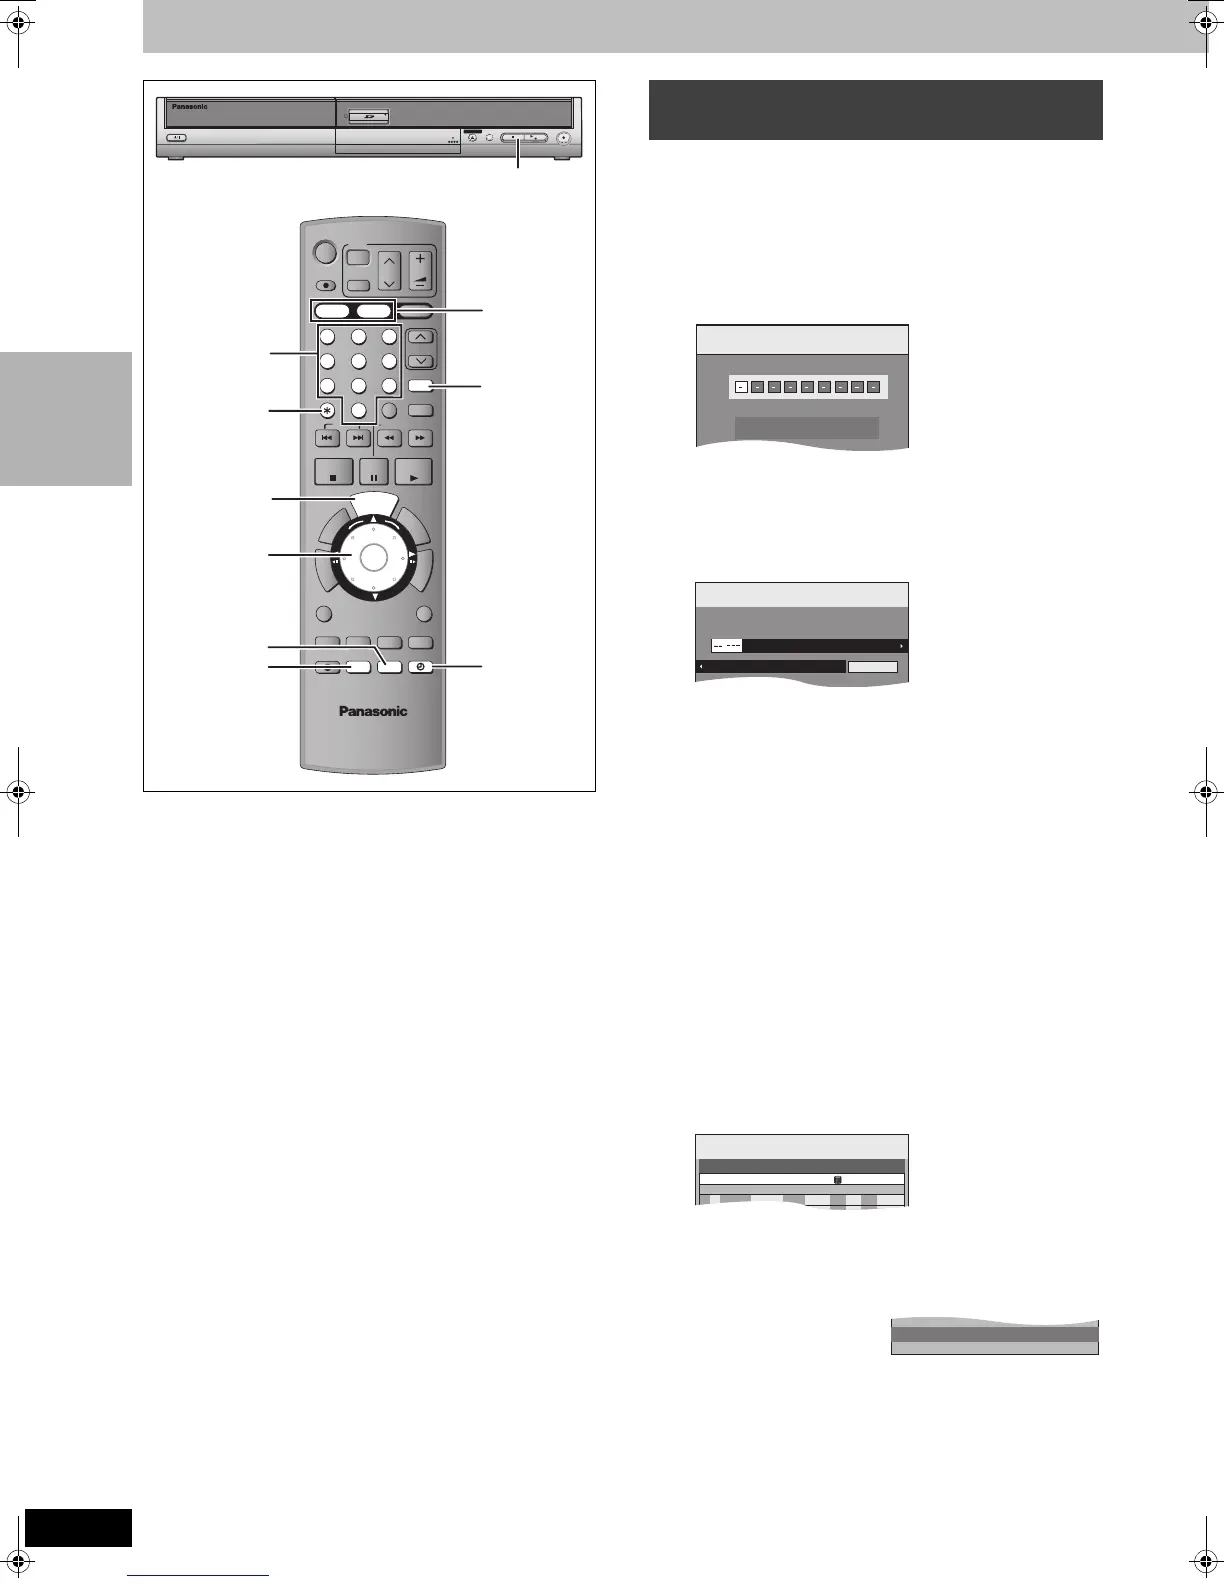
1 Press [VIDEO Plus+].
2 Press the numbered buttons to enter
the PlusCode number.
Press [2] to move back to correct a digit.
3 Press [ENTER].
≥Confirm the programme and make corrections if necessary
using [3, 4, 2, 1] (➡ 30, step 3).
≥When “-- ---” appears in the “Name” column, you cannot set
timer recording. Press [3, 4] to select desired programme
position. After you have entered the information of a TV
station, it is kept in the unit’s memory.
≥You can also press [HDD] or [DVD] to select the recording
drive.
When the recording drive is “DVD” and there is not enough
remaining space, recording automatically switches to the
“HDD” (➡ 29, Relief Recording).
≥You can also press [REC MODE] to change the recording
mode.
≥PDC (➡ 29)
ON!)OFF (– – –)
≥RENEW (Auto Renewal Recording) [HDD] (➡ 30)
ON!)OFF
≥Programme Name
Press [2, 1] to select “Programme Name” and press
[ENTER] (➡ 55, Entering text).
4 Press [ENTER].
The settings are stored.
Repeat steps 1–4 to programme other recordings.
5 Press [F TIMER].
The unit turns off and “F” lights on the unit’s display to
indicate timer recording standby has been activated.
≥If you turn on the unit, a
message screen appears.
Recording is not possible
while timer recording is in standby. [Playback is possible
however you cannot play a title recorded using a different
encoding system (PAL or NTSC) from that of the TV system
currently selected on the unit.]
DVD
HDD
DVD
SD
1
2 3
4 5 6
7
8
9
P
R
O
G
/
C
H
E
C
K
D
I
S
P
L
A
Y
㧿
Í
Í
DIRECT TV REC
AV
CH
VOLUME
TV
CH
VIDEO Plus+
MANUAL SKIP
0
INPUT SELECT
SKIP
SLOW/SEARCH
STOP
PAU SE
PLAY/x1.3
T
I
M
E
S
L
I
P
D
I
R
E
C
T
N
A
V
I
G
A
T
O
R
SUB MENU
RETURN
STATUS
CREATE
CHAPTER
ERASE
REC
REC MODE
EXT LINK
TIMER
AUDIO
DVD/TV
ENTER
CANCEL
T
O
P
M
E
N
U
F
U
N
C
T
I
O
N
S
A
B C
3,4,2,1
ENTER
F TIMER
PROG/CHECK
EXT LINK
REC MODE
VIDEO Plus+
HDD, DVD
¢ CANCEL
HDD
DVD SD
OPEN/CLOSE
DRIVE
SELECT
REC
/k 1.3
∫
Numbered
buttons
Using VIDEO Plus+ system to make
timer recordings
Enter
PlusCode
Number by using 0-9 keys.
VIDEO Plus
+
1:58 SP
DVD
30:24 SP
Remain HDD
12:53:00 15/ 7 TUE
TIMER
RECORDING
1:58 SP
DVD
30:24 SP
HDDRemain
12:54:00 15/ 7 TUE
Mode
StopStartName Date
PDC
HDD
DVD
20:0019:0015/ 7 TUE SP OFFHDD
Programme Name
TIMER
RECORDING
1:58 SP
DVD
30:24 SP
HDDRemain
12:56:00 15/ 7 TUE
Mode
StopStart
No.
Date
PDC
HDD
DVD
Name
Disc
space
New Timer Programme
SP
OK
20:00
19:00
AV2
15/ 7 TUE
01
OFF
Check to make sure “OK”
is displayed (➡ 31).
Timer standby is active. Playback is possible.
EH50.book Page 28 Tuesday, July 5, 2005 11:03 AM

 Loading...