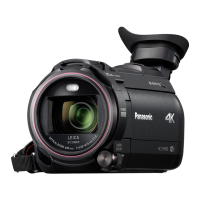
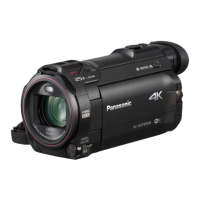
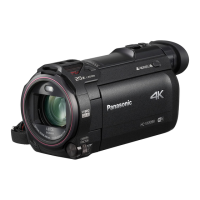
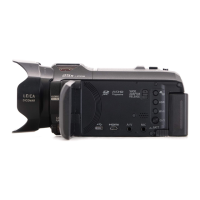
EasyManua.ls Logo

Panasonic HC-WXF1 User Manual

Panasonic HC-WXF1
288 pages
To Next Page IconTo Next Page
Page #1 background imageLoading...
Page #1 background image
Operating Instructions
High Definition Video Camera 4K Video Camera
Model No.
HC-V800
Model No.
HC-WXF1
HC-V808 HC-WXF1M
HC-VXF1
HC-VXF11
HC-VX1
HC-VX11
Please read these instructions carefully before using this product, and save this manual for future
use.
DVQP1585ZA
F0218SQ0
until
2018/03/30
HC-WXF1-VXF1-VX1-V800EBEP-DVQP1585_eng.book 1 ージ 018年2月22日 木曜日 午後12時30

Table of Contents

Other manuals for Panasonic HC-WXF1

Questions and Answers:

Panasonic HC-WXF1 Specifications

General IconGeneral
Camera TypeCamcorder
Sensor TypeMOS
Sensor Size1/2.3 inch
Video Resolution4K UHD (3840 x 2160)
Optical Zoom20x
Digital Zoom50x
Focal Length4.08 - 81.6 mm
LCD Screen Resolution460, 800 dots
Touch ScreenYes
Video Recording FormatAVCHD, MP4
Wi-FiYes
NFCYes
Memory Card SlotSD/SDHC/SDXC
Battery TypeLithium-ion
Effective Pixels8.29 MP
Image StabilizationHybrid O.I.S.
LCD Screen Size3.0 inch
ViewfinderYes
Audio RecordingDolby Digital (2ch)
MicrophoneStereo
External Microphone InputYes (3.5mm)
Headphone JackYes (3.5mm)
HDMI OutputYes
USB InterfaceUSB 2.0
Internal MemoryNo

Summary

Operating Instructions

Read this first

About the recording format for recording motion pictures

Explains various recording formats for motion pictures.

Indemnity about recorded content

Panasonic's disclaimer regarding recorded content loss or damage.

Preparation

Handling of built-in memory

Guidelines for using the built-in memory, including backups and precautions.

About Condensation

Explains condensation on lens/viewfinder and how to prevent/resolve it.

Cards that you can use with this unit

Lists compatible memory card types and capacities.

Basic

Before recording

General steps and considerations before starting recording.

Recording motion pictures

Instructions on how to record motion pictures.

Recording still pictures

Instructions on how to record still pictures.

Motion picture/Still picture playback

How to play back recorded motion pictures and still pictures.

Using the menu screen

Guide to navigating and using the camera's menu system.

Using the Setup Menu

Instructions for accessing and using the setup menu options.

Advanced (Recording)

Using the zoom

How to use the zoom function on the camera.

HDR Movie Mode

Explains the HDR Movie Mode for improved dynamic range.

Recording with the Sub Camera (Twin Camera)

How to use the sub camera for twin camera recording.

Changing the Recording Mode

Guide to switching between different recording modes.

Manual recording

Details on manual recording settings like focus, white balance, etc.

Using the Fn buttons

How to customize and use the function buttons.

Advanced (Playback)

Playback Operations

General operations for playing back recorded content.

Deleting scenes/still pictures

How to delete recorded scenes or still pictures.

Convert to MP4

Instructions for converting recorded files to MP4 format.

Slow speed conversion

How to convert recorded scenes for slow playback.

Watching Video/Pictures on your TV

Connecting the unit to a TV for playback.

Copy/Dubbing

Copying between SD card and Built-in Memory

How to copy data between memory card and built-in memory.

Copying/playing back with a USB HDD

Copying or playing back using a USB HDD.

Wi-Fi

Wi-Fi® function

Overview of the Wi-Fi function capabilities.

[Remote Ctrl]

Controlling the unit remotely via smartphone.

[Baby Monitor]

Using the unit as a baby monitor.

[Hom.Monitor]

Monitoring recording from a remote location.

[DLNA Play]

Playing back content on a DLNA-compatible TV.

[Copy]

Copying files to a PC.

Install the “Image App”

Instructions for installing the smartphone application.

Setting Up a Wi-Fi Connection

Steps to set up Wi-Fi connections.

Wireless Twin/Multi-Camera

Wireless Twin/Multi-Camera function

Overview of using multiple cameras wirelessly.

Using a Smartphone as a Wireless Sub Camera

Using a smartphone as a wireless sub camera.

With a PC

What you can do with a PC

General PC operations with the unit.

Before Installing HD Writer AE 5.4

Prerequisites and license agreement for the software.

Installation

Steps to install the software.

Connecting to a PC

How to connect the unit to a PC.

Starting HD Writer AE 5.4

How to launch the software.

Others

Indications

Explains various on-screen indications and icons.

Messages

Lists and explains common messages.

Troubleshooting

Solutions for common problems.

Cautions for use

Important warnings and precautions for using the unit.

Names and Functions of Main Parts

Power supply

Inserting/removing the battery

Instructions for installing and removing the camera battery.

Charging the battery

Connecting to the AC outlet

Using the unit with AC power.

To charge by connecting to other device

Charging via USB connection.

Charging and recording time

Recording to a card

Cards that you can use with this unit

Lists compatible memory card types and capacities.

About the Speed Class ratings for recording motion pictures

Details required SD Speed Class ratings for different recording formats.

Inserting/removing an SD card

Turning the unit on/off

Selecting a mode

Switching this unit between Recording Mode and Playback Mode

Using the recording/playback button to change modes.

LCD monitor/viewfinder

How to use the touch screen

Guide to operating the camera using the touch screen.

Viewfinder adjustment

Instructions on adjusting the viewfinder for clarity.

Setting date and time

Before recording

Basic camera positioning

Tips for steady and smooth motion picture recording.

Recording Yourself

Instructions on how to record yourself using the camera.

Selecting a media to record [WXF1M]

Recording motion pictures

Screen indications in the Motion Picture Recording Mode

Explains the icons and displays during motion picture recording.

Recording still pictures

To set the desired Fn button as the Photoshot button

Customizing Fn button for photshot function.

Recording still pictures in Motion Picture Recording Mode

Motion picture/Still picture playback

Using the menu screen

Using the Setup Menu

Using the zoom

Zoom ratio during the Still Picture Recording Mode

Details on zoom capabilities in still picture mode.

HDR Movie Mode

To set the desired Fn button as the HDR button

Customizing Fn button for HDR functionality.

Recording with the Sub Camera (Twin Camera) [WXF1] series

Changing the size of the Sub Window

Adjusting the display size of the sub window.

Zooming in/out the Sub Window

Magnifying or reducing the sub window display.

Setting and adjusting the Sub Camera and the Sub Window

Changing the display position of the Sub Window

Modifying the sub window's screen position.

Changing the colour of the Sub Window frame

Selecting the frame color for the sub window.

Recording with the Backup for Twin Camera Function

Changing the Recording Mode

Intelligent Auto

Automatic White Balance

Auto Focus

Details on automatic focusing and custom AF settings.

Creative Control

Intelligent Auto Plus

Adding manual adjustments to Intelligent Auto for color and brightness.

Cinema Like Effect

FULL HD Slow Motion Video Mode

Slow Zoom Mode

Dolly Zoom Mode

4K Photo Mode [WXF1]/[VXF1]/[VX1] series

Stop Motion Animation Assist

Manual recording

Adjust by touching the Manual icon

Using the touch screen to access manual controls.

White Balance

Manual shutter speed adjustment

Iris adjustment

Manual Focus adjustment

Using the Focus Expand function

Magnifying the screen to aid focus adjustment.

Recording with the Touch Function

Image Stabilizer Function

Reducing shake during recording with optical and electrical stabilization.

AF/AE tracking

Automatically tracking subjects for focus and exposure.

Optical Image Stabilizer Lock

Locking the image stabilizer for reduced shake during zoom.

Touch Shutter

Focusing and taking a still picture by touching the screen.

Recording functions of operation icons

Fade

Applying fade-in/fade-out effects to video scenes.

Intelligent Contrast Control

Brightening shadows and suppressing highlights simultaneously.

PRE-REC

Recording starts automatically before the record button is pressed.

Self-timer

Intelligent Exposure

Brightening dark areas for clearer images.

Backlight Compensation

Improving image brightness against backlit subjects.

Guidelines

Displaying guidelines for composition and leveling.

Night Mode

HDR Effect

Adjusting contrast correction levels in HDR Movie Mode.

Level Shot Function

Automatically correcting the unit's horizontal tilt.

Headphone volume adjustment

Recording functions of menus

[SCENE MODE]

Accessing recording functions through menus, including Scene Mode.

[ZOOM MODE]

[REC FORMAT]

[ACTIVE CONTRAST]

Automatically adjusting contrast to suit the scene.

[REC MODE]

[RELAY REC]

[FACE FRAMING]

Detecting and framing faces for prioritized recording.

[LEVEL GAUGE]

[AGS]

Automatically pausing recording if the unit is tilted upside down.

[AUTO SLOW SHTR]

[Digital Cinema Colour]

Recording motion pictures with vivid colors using x.v.Colour™.

[SHOOTING GUIDE]

Displaying guidance messages during rapid movement.

[Wind Noise Canceller]

[AUDIO INPUT SELECT]

Selecting audio input settings for MIC/LINE IN terminal.

[Sound Scene Select]

[LOWCUT]

Reducing low-pitched sound when using external microphone or audio device.

[5.1ch/2ch]

[MIC SETUP]

[AUDIO LEVEL]

[MIC LEVEL]

Adjusting input levels for microphones.

[PICTURE ADJUST]

[FOCUS RING SETTING]

Setting how focus changes when rotating the manual ring.

[PICTURE SIZE]

[ASPECT RATIO]

[SHTR SOUND]

Adding shutter sound for still pictures.

Using the Fn buttons

Changing the Fn button settings

Steps to assign functions to the Fn buttons.

Functions of the Fn button

List of available functions for Fn buttons in different modes.

WB SETTING : VAR

Motion picture playback using operation icon

Creating still picture from motion picture

Time Frame Index

Repeat Playback

Resuming the previous playback

Resuming playback from where it was stopped.

Setting the playback speed of FULL HD Slow Motion Video

Adjusting playback speed for slow motion videos.

Zooming in on a still picture during playback (Playback zoom)

Playing back motion pictures/still pictures by date

4K Cropping [WXF1]/[VXF1]/[VX1] series

Function Effect

Applying [Auto Tracking Crop]

Applying [Manual Tracking Crop]

Applying [Fixed Crop]

Applying [Zooming Crop]

Applying [Stabilizing Crop]

Saving previews

Saving a previewed scene as one scene.

Highlight Playback

Setting up the custom effect

Customizing effects and music for highlight playback.

Playing back with the settings changed

Adjusting scene selection, date, and effects for playback.

Checking the favourite scenes

Viewing and managing scenes marked as favorite.

Playing back the favourite scenes

Including favorite scenes in highlight playback.

Priority settings

Setting playback priority for detected faces.

Playback time setting

Setting the duration for highlight playback.

Setting up the title

Adding titles to highlight playback sequences.

Entering text

Instructions for entering text for titles and names.

Saving the Highlight Playback

Manual Edit

To select a scene

Choosing scenes for manual editing.

To select part of a scene

Selecting specific segments of scenes for editing.

To set the music

Adding music to edited scenes, including user-provided tracks.

To save a manually-edited scene

Saving edited scenes in different formats.

Baby Calendar

To change/add a baby’s registered details

Modifying or adding baby information.

To delete a baby’s registered details

Removing baby information.

Tagging Favorite Scene [WXF1]/[VXF1]/[VX1] series

Changing the playback settings and playing back the slide show

Playing back still pictures recorded in Stop Motion Animation Assist Mode as a slide show

To play back other recording groups

Accessing different stop motion recording groups.

Deleting scenes/still pictures

To delete the scene or still picture being played back

Deleting the currently playing scene or still picture.

To delete scenes or still pictures from the thumbnail display

Deleting scenes or still pictures from the thumbnail view.

Deleting part of a scene (AVCHD/Backup for Twin Camera)

Dividing a scene (AVCHD/Backup for Twin Camera)

Dividing a scene to partially delete (4K MP4, MP4)

Protecting scenes/still pictures

Convert to MP4

Slow speed conversion

Relay scene combining [WXF1M]

Watching Video/Pictures on your TV

Connect this unit to a TV

Connecting the camera to a TV using an HDMI micro cable.

Select the video input on the TV

Choosing the correct input source on the TV.

Connecting with an HDMI micro cable

Listening in 5.1 channel sound (AVCHD)

Playback using VIERA Link

Copying between SD card and Built-in Memory [WXF1M]

Copying

Steps for copying files between SD card and built-in memory.

Copying/playing back with a USB HDD

Preparing for copying/playing back

Steps required before copying or playing back with a USB HDD.

Copying/playing back with a USB HDD

Simple copy

Copying all scenes and still pictures that have not been copied yet.

Copy selected files

Selecting and copying specific scenes or still pictures.

[Playback HDD]

Playing back scenes and still pictures stored on a USB HDD.

Formatting

Displaying media information

Checking the used space of the USB HDD.

Using the Eye-Fi™ card

Using Eye-Fi direct mode

Selecting files to transfer

Choosing specific files for transfer via PC.

Wi-Fi® function

Use this unit as a wireless LAN device

Using the unit as a wireless LAN device.

Do not connect to the wireless network you are not authorised to use

Warning against connecting to unauthorized networks.

Before use

Requirements for using the Wi-Fi function.

This unit is WPS-compatible

Information about WPS compatibility.

The Wi-Fi button (WXF1/VXF1 series)

[Remote Ctrl]

Preparations before using [Remote Ctrl]

Steps to prepare for remote control setup.

Setting up a direct Wi-Fi connection between this unit and a smartphone

Establishing a direct Wi-Fi connection with a smartphone.

Setting up a Wi-Fi connection via a wireless access point

Connecting the unit to a wireless access point.

Using [Remote Ctrl] with a direct connection

Using [Remote Ctrl] with a wireless access point connection

[Baby Monitor]

Preparations before using [Baby Monitor]

Steps to prepare for setting up the baby monitor function.

Using [Baby Monitor]

What you can do with [Baby Monitor]

Features and capabilities of the baby monitor function.

Changing [Baby Monitor] settings

[Hom.Monitor]

Preparations before using [Hom.Monitor]

Steps to prepare for home monitoring setup.

Using [Hom.Monitor]

Using [Hom.Monitor]

Line quality

Recommended optimal speeds for Wi-Fi connections.

What you can operate/set with a smartphone during home monitoring

[DLNA Play]

Preparations before using [DLNA Play]

Steps to prepare for DLNA playback.

Playing back on a TV

[Copy]

Preparations before using [Copy]

Steps to prepare for copying files to a PC.

Creating a shared folder (destination folder) on the PC

Copying to a PC

[Live Cast]

Preparations before using [Live Cast]

Steps to prepare for live broadcasting.

Broadcasting live

To send e-mails

Sending broadcast notification emails.

To start the live broadcast

Initiating a live broadcast.

To stop the live broadcast

Terminating a live broadcast.

Configuring the live broadcast settings

To configure the e-mail delivery settings

Setting up broadcast notification emails.

To set the line quality

Adjusting line quality settings for optimal streaming.

Install the “Image App”

Setting Up a Wi-Fi Connection

Using the [Wi-Fi Setup Wizard] to set up a connection

Connecting to a wireless access point

[Easy Connection (WPS)]

Connecting using WPS for easy setup.

Searching for wireless access points to set up a connection

Setting up a connection manually

Setting up a direct connection to a smartphone

Connecting with QR code

Connecting by entering an SSID and Password

Connecting from the history

Reconnecting using previous Wi-Fi connection settings.

If the Wi-Fi connection cannot be established (Wireless Twin/Multi-Camera)

The Sub Window image is interrupted.

Troubleshooting interrupted sub window images due to weak Wi-Fi signal.

What you can do with a PC

Operating environment for HD Writer AE 5.4

System requirements for HD Writer AE 5.4 software.

Before Installing HD Writer AE 5.4

End User License Agreement

Terms and conditions for using the software.

Operating environment

Operating environment for the card reader function (mass storage)

System requirements for using the unit as a mass storage device.

Installation

Uninstalling HD Writer AE 5.4

Steps for removing HD Writer AE 5.4 software.

Connecting to a PC

To disconnect USB cable safely

Safely disconnecting the USB cable from the PC.

Charging the battery by connecting it to different devices

Charging the battery via PC or other devices.

About the PC display

Copying your still pictures to your PC

Copying still pictures from the unit to a PC.

Starting HD Writer AE 5.4

Reading the operating instructions of the software applications

Locating and reading software instructions.

If using Mac

Indications

Recording indications

Explanation of various on-screen icons and indicators during recording.

Still Picture Recording Mode

Icons indicating still picture recording status.

Messages

About recovery

Troubleshooting

Power

Solutions for common operational and power-related problems.

Indication

Recording

Troubleshooting recording issues like stopping or focus problems.

Playback

With other products

Troubleshooting connection issues with TVs and other devices.

About the Wi-Fi function

With a PC

Troubleshooting PC connection and software issues.

About the Wi-Fi function

Troubleshooting DLNA Play, Live Broadcast, and Hom.Monitor issues.

If AVCHD scenes do not change smoothly when played back on another device

Principal reasons for not playing back smoothly

Identifies factors causing choppy playback of AVCHD scenes on other devices.

Cautions for use

About this unit

General precautions for using the unit, including environmental and cleaning advice.

When you are not going to use the unit for an extended time

When disposing of or giving away this unit

Notes on formatting and physically disposing of the unit and its memory.

About the battery

Information on battery care, lifespan, and handling.

About the AC adaptor

About status indicator during charging

Understanding charging status indicator lights.

About the SD card

Important notes regarding SD card formatting and disposal.

LCD monitor/viewfinder

About personal information

Handling of personal data stored on the unit, including Wi-Fi and Baby Calendar info.

About copyright

Licenses

List of trademarks and licenses associated with the product.

Recording modes/approximate recordable time

Approximate number of recordable pictures

Optional accessories

About the Remote Pan Tilt Cradle

Description of the optional remote pan tilt cradle.

Connecting the Remote Pan Tilt Cradle to this unit

Steps to connect the camera to the remote pan tilt cradle.

Using the Remote Pan Tilt Cradle

Setting up [Preset Positions]

Registering and managing preset positions for the cradle.

Moving the Remote Pan Tilt Cradle to a registered position

Moving the cradle to pre-saved positions.

Using Cycle Mode

Rearranging the Cycle Mode sequence

Changing the order of positions in cycle mode.

Deleting positions registered to the position buttons

Removing saved positions from the cradle.

Remote Pan Tilt Cradle settings

[Panning Angle]

Setting the horizontal panning range for the cradle.

[Tilt Angle]

Setting the vertical tilt range for the cradle.

[Tilt Speed]

Adjusting the tilt speed of the cradle.

[Pan/Tilt Check]

Confirming the operating range of the cradle.

[Version Disp.]

Displaying firmware version information.

[Version Up]

Updating the cradle's firmware.

[Party Scene Demo]

Watching a demonstration of Party Scene mode.

[Moving Object Demo]

Watching a demonstration of Moving Object mode.

Related product manuals