Do you have a question about the Panasonic PV-DV102 and is the answer not in the manual?
General safety warnings and precautions for operating the camcorder.
Manufacturer's statement of compliance with regulatory standards.
Covers reading instructions, cleaning, water, ventilation, power sources, grounding, and lightning protection.
Addresses power lines, objects, liquids, servicing, damage, and replacement parts.
Instructions for unpacking the camcorder and its accessories.
Procedure for removing the sensor tag from the camcorder.
Explanation of the cassette's sliding record tab for protecting recordings.
Steps for inserting and ejecting a cassette tape.
Instructions for attaching the shoulder strap, hand strap, and lens cap.
Guide on using the camcorder's built-in light for scene illumination.
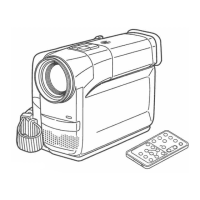
Information on operating the camcorder using an optional remote control.
Procedure for replacing the battery in the remote control.
Instructions for controlling two Palmcorders with one remote.
Steps to insert the battery pack into the camcorder.
Procedure for inserting a cassette tape into the camcorder.
Basic steps for recording video using the camcorder.
Steps for playing back recorded video using the LCD monitor.
Instructions for inserting an optional memory card.
Explanation of the SD memory card's write protection switch.
Details on the M-CARD lock switch function.
Procedure for charging the camcorder's battery pack using the AC adaptor.
Important notes and precautions for battery care and handling.
Instructions for using the AC adaptor to supply power to the camcorder.
Procedure for setting the camcorder's date and time.
How to access and display the camcorder's menu screens.
Guide on navigating and setting various menu options.
Step-by-step guide for basic video recording.
Critical warnings regarding camcorder handling and sun exposure.
How to use the LCD monitor for recording and viewing.
Instructions for adjusting display brightness and color settings.
How to record seven-second still images with audio.
Using PhotoShot for higher resolution still pictures.
How to use the zoom function for close-ups or wide-angle shots.
Using the microphone's sensitivity and angle adjustment with zoom.
How to playback the last few seconds of recorded footage.
Recording still pictures with sound for a desired duration.
Instructions for recording yourself using the camcorder.
Recording for wide-screen TV compatibility with black bars.
Using the backlight feature to improve subject visibility in dark scenes.
Using Auto Exposure modes for various scene situations.
Specialized modes for different shooting environments and subjects.
Making smoother scene transitions with fade effects.
Starting a scene with a gradual fade-in effect.
Creating a soft ending or transition with a fade-out effect.
Displaying a still image screen on the main picture.
Adding titles with WIPE or MIX effects using PhotoShot images.
Adjusting white balance for optimal color in different lighting conditions.
Using manual focus for specific recording scenarios.
Using auto focus for close-up shots.
Recording high-speed motion with improved still or slow motion playback.
Manually adjusting the iris for exposure compensation in challenging lighting.
Reducing sound distortion caused by wind hitting the microphone.
Steps for playing back recorded video using the LCD monitor.
How to connect earphones for audio playback.
Setting the camcorder for automatic repeat playback.
How to adjust the volume of the built-in speaker during playback.
Finding a blank portion of tape to start recording.
Monitoring playback during fast forward or rewind.
Pausing playback to view still frames.
Monitoring normal picture playback during fast forward or rewind.
Playing back recorded video in slow motion.
Searching tape content at various speeds.
Advancing or reversing playback one frame at a time.
Searching for scenes or photos using index marks.
Advancing or reversing playback one frame at a time using the jog key.
Searching for recorded scenes or photos using index marks.
Scanning for scenes and playing back the first few seconds.
Capturing a sequence of still screens at selectable rates.
Connecting the camcorder to a TV for viewing recordings or playback.
Using digital zoom for magnification beyond the optical zoom range.
Further details on using digital zoom in VCR mode.
Recording video or still images in low lighting.
Compensating for unintentional hand or body movement during recording and playback.
Overview of twelve special effects for recordings and playback.
Replacing original sound with new sound using the built-in microphone.
Setting an automatic dubbing stop point for editing.
Instructions for copying camcorder tapes to VHS cassettes.
High-quality digital-to-digital copying using i.LINK.
Recording still images to a memory card.
Details on image sizes and capacities for memory cards.
Precautions for handling and using memory cards to prevent data loss.
Recording still images from a cassette tape to a memory card.
Viewing still images stored on the memory card.
Deleting specific unwanted images from the memory card.
Deleting all images from the memory card.
Formatting the memory card to erase all image data.
Selecting images and print numbers for digital print orders.
Hardware and software requirements for connecting the camcorder to a PC.
Installing drivers and software for USB, i.LINK, and file conversion.
Step-by-step guide for installing software on a PC.
Important operational notes for the PHOTOVU/MPEG4 Movie Messenger™ System.
Procedure for uninstalling application software from the PC.
Connecting the camcorder to a PC using a USB cable.
Steps to launch and run the PHOTOVU/MPEG4 Movie Messenger™ System.
Instructions for connecting USB or i.LINK cables.
Instructions for disconnecting USB or i.LINK cables.
Transferring motion and still images from DV tape to PC via USB.
Capturing still images from the DV tape to the PC.
Capturing motion images from the DV tape to the PC.
Playing back saved motion and still images on the PC.
Overview of features available within the VideoGift screen.
Using motion images within the VideoGift screen.
Using still images within the VideoGift screen.
Configuring mail software to start automatically from VideoGift.
Transferring and compressing images for email attachments.
Attaching motion images to emails.
Attaching still images to emails.
Selecting and sending a specific portion of a motion image.
Editing a collection of still images into a slide show.
Adjusting image size and quality for compressed files.
Extracting individual frames from motion images as still images.
Connecting camcorder to PC via DV interface cable (i.LINK).
Transferring motion and still images from DV tape to PC using i.LINK.
Capturing motion images in normal mode via i.LINK.
Capturing specific motion segments via i.LINK.
Capturing still images in normal mode via i.LINK.
Capturing specific still images via i.LINK.
Connecting the camcorder to a PC via USB for driver installation.
Transferring still images from memory card to PC via USB.
Converting PC JPEG data to DCF format for camcorder transfer via USB.
Prerequisites and conditions for using the web camera feature.
Requirements for internet connection, software, and user setup.
Steps for connecting the camcorder to a PC for web camera use.
Initial setup and configuration for Windows Messenger on XP.
Prerequisites before starting web camera setup for XP users.
Entering email address and password for Windows Messenger.
Using the audio tuning wizard for microphone and speaker settings.
Registering contacts in Windows Messenger for communication.
Initiating a video call from the inviting user's side.
Receiving and accepting a video call invitation.
Setup for MSN Messenger and NetMeeting on older Windows versions.
Prerequisites before starting web camera setup for 98SE/Me/2000 users.
Using the audio tuning wizard for microphone and speaker settings.
Registering contacts in MSN Messenger for communication.
Initiating a NetMeeting call from the inviting user's side.
Specific error indications and solutions for Windows 2000 users.
System requirements for Mac OS transfer via USB.
Connecting the camcorder to a Macintosh via USB cable.
Transferring images from memory card to Macintosh using USB.
Procedure for replacing the camcorder's built-in light bulb.
Information about compatible memory cards and their features.
Table showing brightness and color temperature values for different lighting conditions.
Guidance on video head cleaning, tape operations, and lens hood usage.
Error codes indicating potential service needs for the camcorder.
List of common symptoms and their corresponding corrections.
Explanation of warning displays and their meanings in the EVF/LCD monitor.
Form and instructions for requesting product service.
Safety precautions for preventing fire and electric shock.
Instructions for inserting the battery pack.
Procedure for inserting a cassette tape.
Basic steps for recording video using the camcorder.
Steps for playing back recorded video using the LCD monitor.
Instructions for inserting an optional memory card.
Explanation of the SD memory card's write protection switch.
Details on the M-CARD lock switch function.
List and explanation of menu options available in camera mode.
List and explanation of menu options available in VCR mode.
Menu options for memory card recording and playback modes.
Basic indications appearing on the EVF and LCD monitor in camera/VCR modes.
Detailed explanation of indications in camera and VCR modes.
Further explanation of indications on the EVF and LCD monitor.
Indications specific to the photo recording and playback modes.
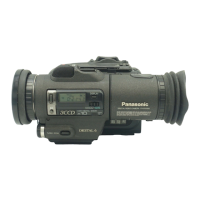
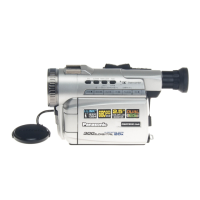
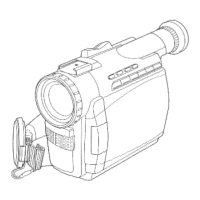
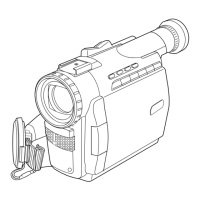
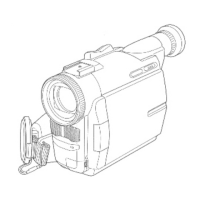
Identification of controls on the front view of the camcorder.
Identification of controls on the side view of the camcorder.
Identification of controls on the rear view of the camcorder.
Identification of controls located on different views of the camcorder.
Identification and explanation of the AC adaptor and its components.
Identification and explanation of the optional remote control buttons.