English
7 / 8
ICEP007-024 (60Hz)
4. Press the button “
set
” to see the alarm code.
5. Press the button “
” to see the next code.
6. Press the button “
esc
” to exit
4.8.1 Analog /Digital input alarms
CODICE DESCRIZIONE AZIONE RE-
SET
Er01
Sensor B1 cutout or broken Alarm A
Er02
Sensor B2 cutout or broken Alarm A
Er03
Sensor B3 cutout or broken Alarm A
Er04
High pressure Alarm M
Er05
Low pressure Alarm M
Er06
Pump thermal cutout Alarm M
Er07
Low water level Alarm M
Er08
High pressure trasducer cutout or broken Alarm A
Er10
Sensor B4 cutout or broken Warning M
Er12
Compressor thermal * Alarm M
Er14
High temperature sensor B1 Alarm A
Er15
Low temperature sensor B1 Alarm A
Er16
High temperature sensor B2 Alarm A
Er17
Low temperature sensor B2 Alarm A
Er18
High temperature sensor B3 Alarm A
Er19
Low temperature sensor B3 Alarm A
Er20
Antifreeze Alarm A
Er21
Exceeded compressor working hours Warning A
Er23
Phase monitor Alarm M
Er24
Exceeded unit working hours Warning A
Er25
Communication expansion Alarm A
Er26
Controller memory Warning A
* ! (Only oil model)
If the evaporator temperature falls below 5°C for more than 120s
then an alarm “
Er12 “ will occur, blocking the unit.
!Press the button “
esc
” to reset alarms (5sec).
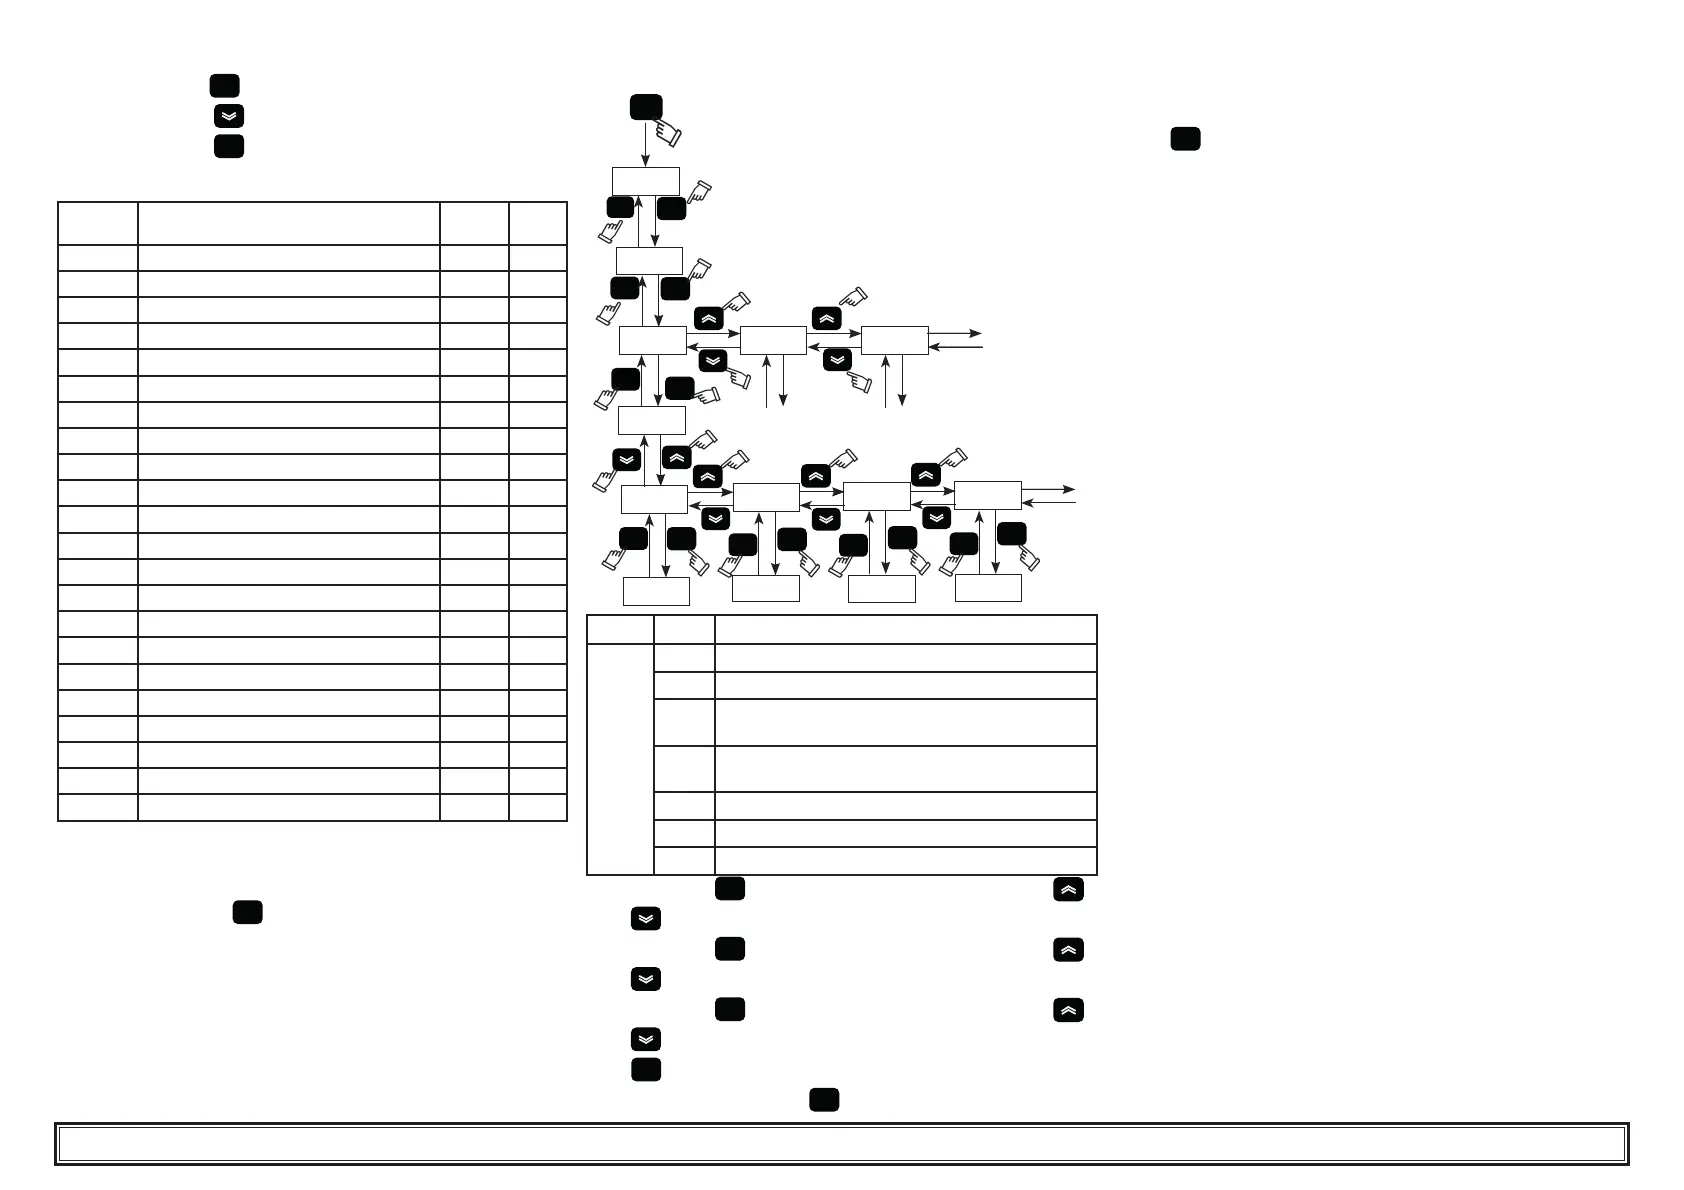
4.9 Alarm/Warning history
ALHi
HySP
esc
set
esc
set
0
1 2
set
HySP
HySC
04
18.06
HySd
HySt
13.46
HyS1
28
set
esc
esc
set
esc
set
esc
set
esc
set
Menu Code DESCRIPTION
ALHi
HySP Alarm number
HySC See alarm code
HySd
See day and month of the alarm
(if the clock option is present)
HySt
See hour and minutes of the alarm
(if the clock option is present)
HyS1 b1 temperature at time of the alarm
HyS2 b2 temperature at time of the alarm
HyS3
SET conditions at time of the alarm
Press the button “
set
” to enter in the menu, using the buttons “
”and “ ” select the parameter “ ALHi”.
Press the button “
set
” to enter in the menu, using the buttons “
”and “ ” select the parameter “HySP”.
Press the button “
set
” to enter in the menu, using the buttons “
”and “ ” select the alarm number insert (0,1,2......39) and con rm
with “
set
” (the number 0 is the last alarm started) .
“HySP” appears again, press “
set
” to enter and see the date of the
alarm: “HySC” code (es:HP), “HySd” Date (day, month), “HySt” hour
(hour, minutes), “HyS1” “HyS2” “HyS3” sensor b1, b2 and set when the
alarm occurred.
Press “
esc
” to exit.
4.10 Automatic restart
In the event of a power failure, when power is restored the chiller will
assume the On-Off status held at the moment the power was lost.
5 MaintenanceMaintenance
a) The machine is designed and built to guarantee continuous operaa)
The machine is designed and built to guarantee continuous opera-
tion; however, the life of its components depends on the mainte-
nance performed.
b) When requesting assistance or spare parts, identify the machine
(model and serial number) by reading the dataplate located on the
unit.
5.1 General instructions
! Before performing any maintenance, make sure the power to the
refrigerator is disconnected.
Y Always use the Manufacturer’s original spare parts: otherwise the
Manufacturer is relieved of all liability regarding machine malfunction-
ing.
Y In case of refrigerant leakage, contact quali ed and authorized
personnel.
Y The Schrader valve must only be used in case of machine mal-
function: otherwise any damage caused by incorrect refrigerant charg-
ing will not be covered by the warranty.
5.2 Preventive maintenance
To guarantee lasting maximum chiller ef ciency and reliability, carry out:
a)
Z every 6 months - clean the condenser ns and make sure
compressor electrical absorption is within the dataplate values;
b)
Z kit for maintenance (par.7.5)
• kit for maintenance;
• service kit;
• individual spare parts.
 Loading...