5
1. Break electrical connections to motor or take other steps
needed to prevent drive unit from being unintentionally
energized during disassembly.
2. Close such valves or flow-control devices necessary to make
certain flow of liquid will not take place during disassembly.
NOTE
Discharge and suction piping need not be disturbed
unless complete pump assembly is to be removed.
3. Drain liquid from pump by removing plugs (1 and 2).
Disconnect any flushing, cooling, bypass lines that are
connected to parts that will be removed.
4. Loosen and remove capscrews (6) securing casing half (8)
to remainder of pump assembly.
NOTE
If pump being disassembled is size 4 x 5 x 11 or larger,
remove capscrews (7) also before attempting to separate
casing halves.
5. Make certain all securing capscrews are removed, then
carefully remove casing half (8) using hoist or crane with a
sling attached around cast hooks on the casing and under the
casing. Refer to Fig. 8.
Use extreme care when casing comes loose that it does
not drop out of sling as this would cause extensive
damage to other components of pump.
6. Remove gasket (9) and scrape mating surfaces of casing
halves to remove pieces of gasket that have adhered in
separation. Take care not to scratch or mar mating surfaces.
7. On Models 411 and 413, loosen flexible coupling and slide the
halves apart. On pump Model 412 remove flexible shafting.
8. Remove four capscrews (25) securing two bearing caps
(26). Lift off bearing caps (26) and pins (27). Mark caps to
ensure correct replacement and orientation on the respective
bearing arms.
9. Loosen and remove four nuts (18), washers (19) and gland
clamps (20), securing split halves of two packing glands
(21). Remove four swing bolts (22).
10. Assuming that further work is required on shaft and
impeller assembly, use properly secured rope and hoist or
crane as required to lift it from casing half (69) single stage
and (74) two stage and place it on a suitable bench or work
surface. Refer to Fig. 9.
Take care not to dent or damage impeller and/or other
parts. Use of a supporting cradle or work stand is
recommended. Refer to Fig. 10.
NOTE
Disassembly procedure from this point covers pumps
having standard packing. If pump has mechanical seals,
refer to specific instructions.
11. Remove and discard rings of packing (23). Replacement with
new packing is recommended whenever pump is disassembled.
12. Slip off flexible coupling half or flexible shafting from shaft
(65) single stage or (71) two stage, and remove key (24). If
preferred. the key may be removed by carefully tapping it
from outer end with a brass drift or similar nonmarring tool,
using a small hammer.
13. Remove two casing wearing rings (28).
14. Remove zerks (10) and pipe plugs (12) from cartridge caps
(32 and 42).
15. Loosen and remove four capscrews (31) from cartridge cap
(32). The outboard shaft end protector (29) may be removed
from its recess in the outboard cartridge cap if necessary.
Remove retainer ring (35) with a pair of truarc pliers. On
431B pump, remove lock nut (77). Also remove gasket (34).
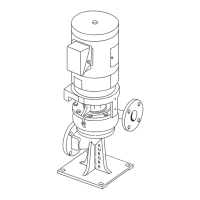
Figure 8. Casing half removed.
CAUTION
Figure 9. Rotating element removed from casing half.
Figure 10. Element placed in a protective cradle for
further disassembly.
CAUTION
MODELS 411-412-413
 Loading...