Mounting and Connecting Power 9
PL House Light MKII LED Luminaires
User’s Manual
WARNING! The PL House Light MKII LED Luminaire is not suitable for mounting to
combustible surfaces is a NON-IC Rated Lighting Fixture. If the space that a light fixture is to be
installed does not contain insulation, a NON-IC rated fixture should be used (NON-IC stands for
NON Insulated Contact). If insulation is present in an application where a NON-IC rated fixture is
used, a minimum 3-inch (76 mm) clearance should exist on all sides of the fixture, and no
insulation may be present across the top of the installed fixture. By maintaining these clearance
requirements, overheating should not be an issue according to testing conducted on the fixture.
To mount PL House Light MKII LED Luminaire:
Step 1. Cut 7-7/8 inch hole in ceiling as desired.
CAUTION: PL House Light MKII LED Luminaires must be installed with mounting bars (by others). Mounting
bars must always be secured to structural ceiling members. Refer to "Additional Mounting Accessories" on page 4 for
more information. Check applicable codes in your area for specific requirements.
Step 2. If not already installed, attach Control / Menu Assembly to J-Box.
Step 3. Mount luminaire assembly into ceiling.
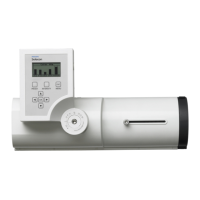
Figure 5: PL House Light MKII LED Luminaire Components
INSTALL WITH MINIMUM SPACINGS BETWEEN:
(a) CENTER-TO-CENTER OF ADJACENT LUMINAIRES:
153 mm (6 in);
(b) TOP OF LUMINAIRE TO OVERHEAD BUILDING MEMBER:
153 mm (6 in);
(c) LUMINAIRE CENTER TO SIDE BUILDING MEMBER:
153 mm (6 in).
ASSURER LES DÉGAGEMENTS MINIMAUX SUIVANTS:
(a) ENTRE L’ENTRAXE DES LUMINAIRES ADJACENTS:
153 mm (6 po);
(b) ENTRE LE DESSUS DU LUMINAIRE ET L’ÉLÉMENT DE
CHARPENTE SE TROUVANT AU-DESSUS:
153 mm (6 po);
(c) ENTRE LE CENTRE DU LUMINAIRE ET UN ÉLÉMENT DE
CHARPENTE LATÉRAL: 153 mm (6 po) (S24-L2).
04.9668.2006 0
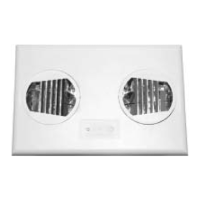
Trim Ring / Reflector
J-Box
Luminaire Power Supply / Control / Menu
LED Engine Assembly
Fixture / Ring
Mounting Brackets (x3)
Reflector Assembly
Mounting Assembly
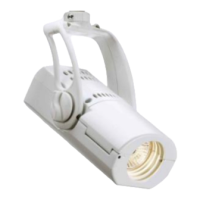
Lens Tube
(Beam Spread Adjustment)
Sample Drawings - Brackets
Note: brackets shown - channels and bars (by others)