Do you have a question about the Phrozen Sonic Mega 8K and is the answer not in the manual?
Remove resin vat and any objects from the printer platform before calibration.
Unscrew and remove the building plate handles using an Allen wrench.
Attach the building plate to the printer, aligning pins, and tighten securely.
Loosen the four larger and four smaller screws on the building plate.
Use Allen wrench to loosen smaller screws until they do not protrude.
Use a folded A4 paper on the LCD screen for leveling the building plate.
Navigate to Tools > Z-CALIB > START on the touch panel to begin calibration.
Stabilize the plate and check friction force with paper at all four corners.
Rotate smaller screws at a smaller angle until they touch the lower platform.
Tighten larger screws in two rounds using the long and short sides of the Allen wrench.
Verify friction force at all corners using the A4 paper after tightening.
Move plate up, remove building plate and paper, reattach handles.
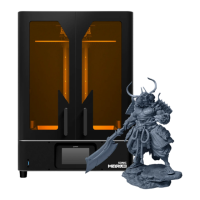
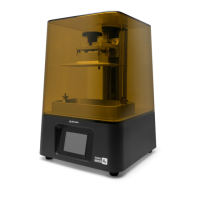
The Phrozen Sonic Mega 8K is a 3D printer designed for high-precision resin printing, with a strong emphasis on user-friendly calibration and maintenance. Its primary function is to create detailed 3D models by curing liquid resin layer by layer using an LCD screen. The device is engineered to ensure optimal print quality through a meticulous Z-axis calibration process, which is crucial for successful adhesion of prints to the building plate.
The core function of the Phrozen Sonic Mega 8K is to produce three-dimensional objects from digital designs using stereolithography (SLA) or digital light processing (DLP) technology, specifically leveraging an LCD screen for curing. The Z-axis calibration ensures that the building plate is perfectly level with the LCD screen, which is paramount for the first layer of resin to adhere correctly and for subsequent layers to build accurately. Without proper calibration, prints can fail to stick to the plate, leading to wasted resin and time. The printer is designed to handle large-scale prints, indicated by its "Mega 8K" designation, suggesting a large build volume and high resolution.
The Phrozen Sonic Mega 8K incorporates several features to facilitate its use, particularly concerning its Z-axis calibration. The process begins with the removal of the resin vat and any objects from the machine's platform, ensuring a clear workspace. The building plate handles are then unscrewed using an Allen wrench and removed, preparing the building plate for installation.
The building plate is then attached to the printer, aligning it with specific pins, and subsequently screwed and tightened. A critical note here emphasizes ensuring the building plate cannot shift after tightening, highlighting the importance of stability for accurate prints.
Next, the calibration process involves slightly loosening both the four larger and four smaller screws on the building plate. This step allows for adjustments to be made to the plate's position. The smaller screws on the sides of the building plate are then loosened further, in an upwards motion, until they no longer protrude. During this step, the user is instructed to push the building plate up with one hand, ensuring both sides are tightly connected. The four bigger screws are then rotated at a smaller angle, making sure their height is consistent. A cautionary note advises against rotating these screws too much, as this could cause the building plate to fall and potentially damage the LCD screen.
For the actual calibration test, an A4 paper, split in half, is placed on the LCD screen. This paper serves as a medium to gauge the distance and pressure between the building plate and the LCD screen. The calibration process is initiated through the printer's touch panel, by navigating to "TOOLS," then "Z-CALIB," and finally pressing "START." The building plate then extends downwards to touch the LCD screen, a process that takes approximately 1-2 minutes.
Once the building plate has made contact with the LCD screen, the user is instructed to stabilize the building plate by holding both the upper and lower platforms. The paper is then gently tugged from all four corners to ensure consistent friction force, indicating even contact.
The next step involves tightening the smaller screws on the building plate. These screws are rotated at a smaller angle until they touch the lower platform. While one hand rotates the screws, the other tugs on the paper to maintain the correct tension. A crucial note warns against overtightening these screws, as it can lead to inaccurate Z-axis calibration.
Finally, the four larger screws are tightened in two rounds. First, the long side of the Allen wrench is used, followed by the short side for a final tightening. This two-round approach ensures secure fastening. Another note reiterates the importance of proper tightening to prevent calibration inaccuracy after repeated use.
After the calibration is complete, a double-check is performed by tugging on all four corners of the A4 paper to confirm uniform pressure intensity. The user then uses the touch panel to move the building plate up by 30mm, allowing for the removal of the building plate and the paper. The building plate handles are reinstalled, and the building plate is reattached to the resin 3D printer, making it ready for use.
While the manual primarily focuses on the calibration process, which is a critical aspect of maintaining print quality, it implicitly highlights several maintenance-related considerations:
In summary, the Phrozen Sonic Mega 8K is a high-resolution 3D printer that prioritizes precise Z-axis calibration to ensure successful and high-quality prints. Its usage features are meticulously detailed, guiding the user through a multi-step calibration process involving careful adjustment of screws and verification with an A4 paper. Maintenance is largely integrated into the calibration process itself, emphasizing cleanliness, careful handling of components, and proper tool usage to preserve the printer's accuracy and extend its operational life.
| Build Volume | 330 x 185 x 400 mm |
|---|---|
| XY Resolution | 43 microns |
| LCD Resolution | 8K |
| Layer Thickness | 0.01 - 0.30 mm |
| Connectivity | USB, Ethernet |
| Weight | 35 kg |
| LCD Resolution (px) | 7680 x 4320 |
| Operating System | Phrozen OS |
| Light Source | ParaLED 3.0 |
| Slicer Software | ChiTuBox |
| Power Requirements | AC100-240V 50/60Hz |
| Technology | LCD-based MSLA |