- 4 -
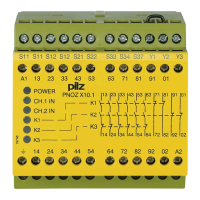
- Zweikanalig mit Querschlußerkennung:
S11-Y3 brücken; Öffnerkontakt von
Auslöseelement an S11-S12/S21-S22
anschließen.
• Startkreis:
Einkanaliger Betrieb und zweikanaliger
Betrieb ohne Querschlußerkennung
(zweikanalig gegen +24 V geschaltet):
- Automatischer Start: S33-S34 brücken.
- Manueller Start: Taster zwischen S33-S34
- Manueller Start mit Überwachung: Taster
zwischen S33-S34, Y1-S37 brücken.
Zweikanaliger Betrieb mit Querschlußer-
kennung:
- Automatischer Start: S12-S34 brücken.
- Manueller Start: Taster zwischen S12-S34
- Manueller Start mit Überwachung: Taster
zwischen S12-S34, Y1-S37 brücken.
• Rückführkreis:
Brücke an Y1-Y2 oder externe Schütze
anschließen.
Die Sicherheitskontakte sind aktiviert (ge-
schlossen) und die Hilfskontakte (71-72/81-82/
91-92/01-02) sind geöffnet. Die Statusan-
zeigen von Kanal 1 und Kanal 2 leuchten. Das
Gerät ist betriebsbereit.
Wird der Eingangskreis geöffnet, öffnen die
Sicherheitskontakte 13-14/23-24/33-34/43-44/
53-54/63-64 und die Hilfskontakte 71-72/81-
82/91-92/01-02 schließen. Die Statusanzeige
erlischt.
Wieder aktivieren
• Eingangskreis schließen.
• Bei manuellem Start zusätzlich Taster
zwischen S12 (S33) und S34 betätigen, bei
manuellem Start mit Überwachung Taster
betätigen und wieder loslassen.
Die Statusanzeigen leuchten wieder, der
Eingangskreis ist aktiviert.
- Two-channel with detection of shorts
across the contacts: Bridge S11 -Y3.
Connect N/C contact from trigger element
(e.g. E-Stop) to S11 - S12/S21 - S22.
• Reset circuit:
Singel-channel operation and dual-channel
operation without detection of shorts across
the contacts (dual-channel switched against
+24 V DC):
- Automatic reset: Bridge S33-S34
- Manual reset: Connect button to S33-S34
- Manual reset with monitoring: Connect
button to S33-S34, bridge Y1-S37.
Dual-channel operation with detection of
shorts across the contacts:
- Automatic reset: Bridge S12-S34
- Manual reset: Connect button to S12-S34
- Manual reset with monitoring: Connect
button to S12-S34, bridge Y1-S37.
• Feedback control loop:
Bridge Y1 - Y2 or connect external N/C
contacts in series from other devices .
The safety contacts are activated (closed)
and the auxiliary contacts (71-72/81-82/91-
92/01-02) are open. The status indicators
from channel 1 and channel 2 are
illuminated. The unit is ready for operation.
If the input circuit is opened, the safety
contacts 13-14/23-24/33-34/43-44/53-54/63-
64 open and the auxiliary contacts 71-72/81-
82/91-92/01-02 close. The status indicator
goes out.
Reactivation
• Close the input circuit.
• For manual reset, momentary closure of the
button between S12 (S33) and S34 must be
pressed; for manual reset with monitoring,
press the button and release again.
The status indicators illuminate once more,
the input circuit is activated.
- Commande par 2 canaux avec détection
de courts-circuits : câblage des contacts
à ouverture entre S11-S12/S21-S22 ,
pontage de S11-Y3
• Circuit de réarmement:
Commande mono-canal et en 2 canaux
sans détection de courts-circuits entre les
canaux (les 2 canaux reliés au +24 V):
- Réarmement automatique: pontage des
bornes S33-S34
- Réarmement manuel: câblage d’un
poussoir sur S33-S34
- Surveillance du circuit de réarmement:
câblage d'un poussoir sur S33-S34 et
pontage des bornes Y1-S37 .
Commande en 2 canaux avec détection de
courts-circuits:
- Réarmement automatique: pontage des
bornes S12-S34
- Réarmement manuel: câblage d’un
poussoir sur S12-S34
- Surveillance du circuit de réarmement:
câblage d'un poussoir sur S12-S34 et
pontage des bornes Y1-S37.
• Boucle de retour:
Pontage de Y1-Y2 ou branchement des
contacts externes
Les contacts de sortie se ferment et les
contacts d’info (71-72/81-82/91-92/01-02)
s’ouvrent. Les LEDs de visualisation des
canaux 1 et 2 sont allumées. L’appareil est
prêt à fonctionner.
Si le circuit d’entrée est ouvert, les contacts de
sortie 13-14/23-24/33-34/43-44/53-54/63-64
s’ouvrent et les contacts d’inform 71-72/81-82/
91-92/01-02 se ferment. Les LEDs s’éteignent.
Remise en route :
• fermer le(s) circuit(s) d’entrée
• en cas de réarmement manuel, appuyer
sur le poussoir de validation entre S12
(S33)-S34. En cas de surveillance du
circuit de réarmement, appuyer puis
relacher le poussoir de validation.
Les LEDs sont à nouveau allumées. Les
contacts de sortie sont fermés.
Anwendung
In Fig. 2 ... Fig. 10 sind Anschlußbeispiele für
NOT-AUS-Beschaltung
Fig. 6: Gleichzeitigkeit: 150 ms
Application
In Fig. 2 ... Fig. 10 are connection examples
for Emergency Stop.
Fig. 6: Simultaneity 150 ms by Safety Gate
Contol
Utilisation
Dans les figures 2 à 10 sont représentés les
différents cablages possibles du PNOZ X10
Fig. 6: Désynchronisme: 150 ms
 Loading...