English - 25 -
Connectivity
Wired Connectivity
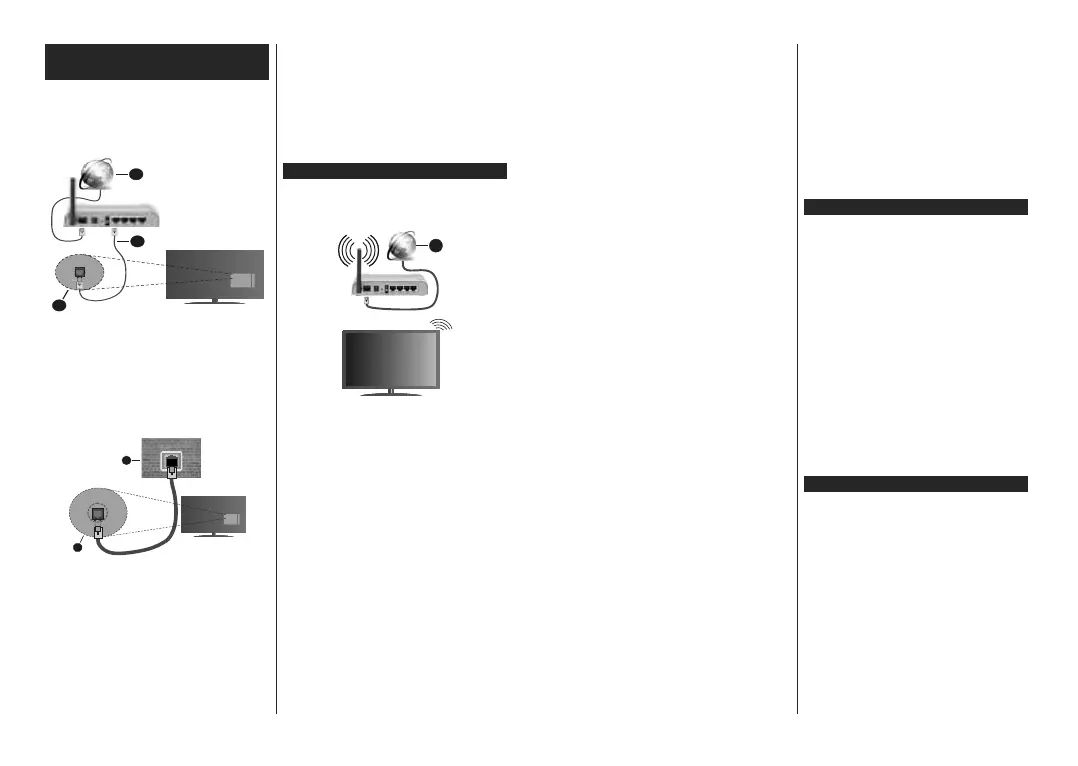
To Connect to a Wired Network
You must have a modem/router connected to an
actve broadband connecton.
Connect your TV to your modem/router va an
Ethernet cable. There s a LAN port at the rear
(back) of your TV.
1. Broadband ISP connection
2. LAN (Ethernet) cable
3. LAN input on the rear side of the TV
To confgure wred settngs refer to the Network
secton n the Settings menu.
You mght be able to connect your TV to your LAN
dependng on your network’s confguraton. In such
a case, use an Ethernet cable to connect your TV
drectly to the network wall outlet.
1. Network wall socket
2. LAN input on the rear side of the TV
Conguring Wired Device Settings
Network Type
The Network Type can be selected as Wired Device,
Wireless Device or Disabled, in accordance with the
active connection to the TV set. Select this as Wired
Device if you are connecting via an Ethernet cable.
Internet Speed Test
Highlight Internet Speed Test and press the OK
button. TV will check the internet connection bandwidth
and display the result when complete.
Advanced Settings
Highlight Advanced Settings and press the OK
button. On the next screen you can change the IP and
DNS settings of the TV. Highlight the desired one and
press Left or Right button to change the setting from
Automatic to Manual. Now you can enter the Manual
IP and / or Manual DNS values. Select the related item
in the drop down menu and enter the new values using
the numeric buttons of the remote. Highlight Save and
press the OK button to save settings when complete.
Wireless Connectivity
To Connect to a Wireless Network
The TV cannot
detect networks with a hidden SSID. To
make your modem’s SSID visible, you should change
your SSID settings via the modem’s software.
1. Broadband ISP connection
A Wireless-N router (IEEE 802.11a/b/g/n) with
simultaneous 2.4 and 5 GHz bands is designed to
increase bandwidth. These are optimised for smoother
and faster HD video streaming, le transfers and
wireless gaming.
The frequency and channel der dependng on
the area.
The transmsson speed ders dependng on the
dstance and number of obstructons between the
transmsson products, the confguraton of these
products, the rado wave condtons, the lne trac
and the products that you use. The transmsson may
also be cut o or may get dsconnected dependng
on the rado wave condtons, DECT phones or any
other WLAN 11b applances. The standard values of
the transmsson speed are the theoretcal maxmum
values for the wreless standards. They are not the
actual speeds of data transmsson.
The locaton where the transmsson s most eectve
ders dependng on the usage envronment.
The Wreless feature of the TV supports 802.11 a,b,g
& n type modems. It s hghly recommended that
you should use the IEEE 802.11n communcaton
protocol n order to avod any possble problems
whle watchng vdeos.
English - 26 -
You must change your modem’s SSID when there
are any other modems around wth the same SSID.
You can encounter connecton problems otherwse.
Use a wred connecton f you experence problems
wth a wreless connecton.
Conguring Wireless Device Settings
Open the Network menu and select Network Type as
Wreless Devce to start connecton process.
Hghlght Scan Wreless Networks opton and press
OK to start a search for avalable wreless networks.
All found networks wll be lsted. Hghlght your desred
network from the lst and press OK to connect.
Note: If the modem supports N mode, you should set N
mode settings.
If the selected network s password-protected, enter
the correct key by usng the vrtual keyboard. You can
use ths keyboard va the drectonal buttons and the
OK button on the remote control.
Wat untl the IP address s shown on the screen.
Ths means that the connecton s now establshed.
To dsconnect from a wreless network, hghlght
Network Type and press Left or Rght buttons to set
as Dsabled.
If your router has WPS, you can directly connect to the
modem/router without entering a password or adding
the network rst. Highlight Press WPS on your wi
router option and press OK. Go to your modem/router
device and press the WPS button on it to make the
connection. You will see a connection conrmation on
your TV once the devices have paired. Select OK to
proceed. No further conguration is required.
Hghlght Internet Speed Test and press the OK button
to check your nternet connecton speed. Hghlght
Advanced Settngs and press the OK button to
open the advanced settng menu. Use drectonal and
numerc buttons to set. Hghlght Save and press the
OK button to save settngs when complete.
Other Informaton
The status of the connecton wll be dsplayed as
Connected or Not Connected and the current IP
address, f a connecton s establshed.
Connectng to your moble devce va WLAN
If your moble devce has WLAN feature, you can
connect t to your TV va a router, n order to access
the content n your devce. For ths, your moble
devce must have an approprate sharng software.
Connect your TV to your router followng the steps
mentoned n the sectons above.
Afterwards, connect your moble devce to the router
and then actvate the sharng software on your moble
devce. Then, select fles that you want to share wth
your TV.
If the connecton s establshed correctly, you wll
be able to access the shared fles nstalled on your
moble devce va the Audo Vdeo Sharng (AVS)
feature of your TV.
Hghlght the AVS opton n the Sources menu and
press OK, avalable meda server devces n the
network wll be dsplayed. Select your moble devce
and press the OK button to contnue.
If available, you can download a virtual remote
controller application from the server of your mobile
device application provider.
Note: This feature may not be supported on all mobile
devices.
Networked Standby Mode
Networked Standby Mode is a standard that allows
a
device to be turned on or woken up by a network
message. The message is sent to the device by a
program executed on a remote device connected to
the same local area network, such as a smartphone.
To enable this feature set the Networked Standby
Mode o
ption in the Network menu as On. It is
necessary that both the device, from which the
network message will be sent to the TV, and the
TV are connected to the same networ
k. Networked
Standby Mode f
eature is only supported for Android
OS devices and can only be used via YouTube and
Netix applications.
In order to use this feature the TV and the remote
device should be connected at least once while the
TV is on. If the TV is powered o, the connection
should be re-established, the next time it is switched
on. Otherwise this feature will be unavailable. This
does not apply, when the TV is switched into the
standby mode.
If you want your TV to consume less power in standby
mode, you can disable this feature by setting th
e
Networked Standby Mode o
ption as O.
Wireless Display
Wireless Display is a standard for streaming video and
sound content. This feature provides the ability to use
your TV as wireless display device.
Using with mobile devices
There are dierent standards which enable sharing of
screens including graphical, video and audio content
between your mobile device and TV.
Then press the Source button on the remote and
switch to Wireless Display source.
A screen appears stating that the TV is ready for
connection.
Open the sharing application on your mobile device.
These applications are named dierently for each
brand, refer to the instruction manual of your mobile
device for detailed information.
Scan for devices. After you select your TV and connect,
the screen of your device will be displayed on your TV.

 Loading...