EasyManua.ls Logo

Prepac DC-6330-V - User Manual

Prepac DC-6330-V
18 pages
Print Icon
To Next Page IconTo Next Page
Loading...
6 Drawer Dresser
Commode à six tiroirs
Comoda seis cajones
Model / Modèle / Modelo #
DC-6330-V
Assembly Instructions
Instructions de montage
Instrucciones de armado
DATE STAMP
Prepac Manufacturing Ltd. 6705 Dennett Place, Delta, BC V4G 1N4 LB-1105 2019-08-29
WEBSITE
www.prepacmfg.com/content/replacement-part-order
Complete our easy to use order form
BY EMAIL
parts@prepacmfg.com
BY PHONE
1-877-PREPAC1 (1-877-773-7221)
Mon - Fri: 7am - 4pm PST / 10am - 7pm EST
If you have received a damaged or defective part
If you are missing hardware or parts
For help with assembly
Replacement parts will leave our facility within two business days
via UPS ground or mail. Please note: shipping times will vary
depending on location.
Before you call please:
1) Record the following information from the shipping label on the
outside of the box. You will need it for warranty purposes:
Ship To Name
Sales Order Number
2) Note the product model number.
3) Review the contents of your shipment to determine
what you are missing.
CONTACT US FIRST
Option de service en ligne
Complétez le formulaire Commande de Pièces de Rechange disponible
dans la section Soutien à la clientèle de notre site web : www.
prepacmfg.com
Si vous avez reçu une pièce endommagée ou défectueuse
Si vous manquez la quincaillerie ou les pièces
Les pièces de rechange quitteront notre installation dans deux jours
ouvrables via UPS par terre ou le courrier. Notez s’il vous plaît que les
temps d’expédition varieront selon l’emplacement.
Pour parler avec quelqu’un en français, s’il vous plaît contacter
votre détaillant.
Opción de servicio en línea
Si usted ha recibido una parte dañada o defectuosa, o
Si falta alguna parte o componente
Complete la forma para solicitud de piezas de remplazo en la sección
de soporte al cliente en nuestra página web www.prepacmfg.com
O envíenos sus preguntas al correo parts@prepacmfg.com
Para solicitar ayuda en español por favor contacte su
distribuidor.
Las piezas de recambio dejarán nuestras instalaciónes dentro de dos
días hábiles vía UPS correo terrestre. Por favor note que el tiempo de
transporte variara según la ubicación.
This product is packaged in 1 carton
Ce produit est emballé dans 1 carton
Este producto está empaquetado en 1 caja de cartón.
Question and Answer IconNeed help?

Do you have a question about the Prepac DC-6330-V and is the answer not in the manual?

Summary

Contact and Support Information

How to Contact PREPAC

Provides website, email, and phone number for customer assistance and replacement parts.

Preparing for Support Calls

Lists necessary information to have ready before contacting PREPAC for warranty or assembly help.

Assembly Preparation and Safety

Required Tools and Optional Aids

Lists tools needed for assembly and optional tools that can expedite the process.

Important Assembly Precautions

Advises on screw tightening techniques and checking all parts before starting assembly.

Hardware Identification

Dresser Hardware Components

Catalog of hardware for the main dresser structure, including cams, dowels, and screws.

Drawer and Cable Hardware

Lists hardware specific to drawer assembly and cable management, such as knobs and ties.

Dresser Component Identification

Main Dresser Panels

Identifies and labels all the primary wooden panels that form the dresser's structure.

Cabinet Slide Installation

Identifying Left and Right Cabinet Slides

Instructions for distinguishing and separating cabinet slides for left and right sides.

Identifying Left and Right Drawer Slides

Instructions for distinguishing and separating drawer slides for left and right sides.

Cabinet Slide Attachment

Attaching Slides to Side Panels

Details attaching cabinet slides to the dresser's left and right side panels.

Attaching Slides to Center Gable

Details attaching cabinet slides to both sides of the center gable panel.

Main Frame Assembly - Step 1

Attaching Cams to Backer Panel

Instructions for attaching large zinc cams to the backer panel (C9).

Securing Center Gable to Frame

Instructions for attaching the center gable (C4) to the backer panel (C9) with screws.

Main Frame Assembly - Step 2

Installing the Front Stabilizer

Shows how to attach the front stabilizer (C6) to the frame using rapid rods.

Main Frame Assembly - Step 3

Attaching Right Side Moulding

Details attaching the right side moulding (C6) to the dresser frame using cams.

Attaching Left Side Moulding

Details attaching the left side moulding (C7) to the dresser frame using cams.

Main Frame Assembly - Step 4

Inserting Dowels and Rods for Connection

Instructions for inserting dowels and rapid rods into panels for frame connection.

Connecting Frame Sections

Shows how to connect frame components, noting molding overhang.

Moulding Attachment

Attaching Top Moulding

Instructions for attaching the top moulding to the top panel using screws and dowels.

Attaching Side Mouldings with Caution

Details attaching side mouldings, emphasizing hand pressure and avoiding hammers.

Back Panel Installation

Securing the Backer Panel

Instructions for attaching the backer panel using nails, with guidance on proper nail placement.

Drawer Assembly - Step 1

Drawer Part Identification

Identifies all the specific parts needed for assembling the drawers.

Preparing Drawer Fronts

Details attaching dowels to the drawer front panels as the first step.

Drawer Assembly - Step 2

Attaching Drawer Slides to Sides

Instructions for attaching the drawer slides to the left and right drawer sides.

Connecting Drawer Sides to Front

Shows how to join the drawer sides to the drawer front using cams.

Drawer Assembly - Step 3

Attaching Drawer Back Panel

Details attaching the drawer back panel to the assembled drawer structure.

Inserting Drawer Bottom Panel

Instructions for sliding the drawer bottom panel into the grooves of the drawer assembly.

Drawer Assembly - Step 4

Securing Drawer Assembly with Screws

Instructions for securing the completed drawer assembly using screws.

Final Drawer and Safety Steps

Attaching Drawer Handles

Instructions for attaching the hooded cup handles to the top drawer.

Inserting Drawers and Slide Color Matching

Guidance on inserting the assembled drawers and noting the slide color matching.

Warning Label Application

Instructions for attaching the critical tip-over warning label to the top drawer.

Furniture Safety and Anti-Tip Installation

General Safety Recommendations

Emphasizes anchoring furniture to prevent tip-over injuries, as recommended by safety commissions.

Wall Anchoring Procedure

Provides detailed steps for securely attaching the anti-tip hardware to walls of different construction types.
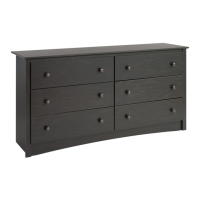
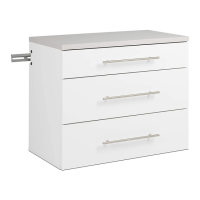
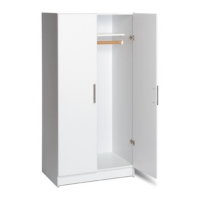
Prepac DC-6330-V Specifications

General IconGeneral
Product NamePrepac DC-6330-V
CategoryIndoor Furnishing
Number of Doors2
Number of Shelves3
Assembly RequiredYes
MaterialComposite Wood

Related product manuals