EasyManua.ls Logo

Pro-Form 440R PFRW3914.0 - User Manual

Pro-Form 440R PFRW3914.0
24 pages
Print Icon
To Next Page IconTo Next Page
Loading...
Serial Number
Decal
USER’S MANUAL
Model No. PFRW3914.0
Serial No.
Write the serial number in the space
above for reference.
www.proform.com
CAUTION
Read all precautions and instruc-
tions in this manual before using
this equipment. Keep this manual
for future reference.
To activate your warranty today,
go to www.proformservice.com/
registration.
For service at any time, go to
www.proformservice.com.
Or call 1-888-533-1333
Mon.–Fri. 6 a.m.–6 p.m. MT
Sat. 8 a.m.–12 p.m. MT
Please do not contact the store.
ACTIVATE YOUR
WARRANTY
CUSTOMER CARE
Question and Answer IconNeed help?

Do you have a question about the Pro-Form 440R PFRW3914.0 and is the answer not in the manual?

Summary

Product Information

Activate Your Warranty

Register your product online to activate your warranty and receive support.

Customer Care Contact

Find contact information for service and support via phone or website.

Important Precautions

Before You Begin

Part Identification Chart

Assembly Instructions

Initial Setup and Front Stabilizer

Register product online and attach the front stabilizer to the frame.

Frame Pin and Rail Bracket Attachment

Remove frame pin, unwrap bungee cord, and attach rail bracket to frame.

Rear Stabilizer and Bungee Cord Routing

Attach rear stabilizer, raise rail, insert frame pin, and route bungee cord.

Component Installation and Covers

Secure rear stabilizer cover and attach bungee clip to the rail bracket.

Rail Cover and Frame Knob

Install rail cover, lower rail, insert frame pin, and tighten frame knob.

Pedals, Foot Plates, and Console Setup

Install stop rod, pedal axle, pedals, foot plates, and console batteries.

Using Your Rower

Adjusting Resistance and Rowing Technique

Learn to adjust resistance, and master the correct rowing form for optimal exercise.

Console Operation and Features

Understand display modes, turn on/off the console, and follow progress.

Storage and Unfolding

Maintenance and Troubleshooting

Routine Maintenance and Cleaning

Inspect, tighten, and clean the rower regularly. Keep liquids away from the console.

Troubleshooting Common Issues

Address console battery issues and pedal/roller squeaks by greasing components.

Exercise Guidance

Exercise Intensity and Heart Rate

Use heart rate zones for fat burning and aerobic exercise to optimize workouts.

Workout Structure and Suggested Stretches

Follow workout phases and perform suggested stretches for flexibility.

Important Documentation

FCC Compliance Information

Details on equipment compliance with FCC rules for radio frequency energy.

Notes, Parts List, and Drawing

Contains notes, a comprehensive part list, and visual part breakdown.

Ordering Replacement Parts and Warranty

Information on ordering parts and the product's limited warranty terms.

Overview

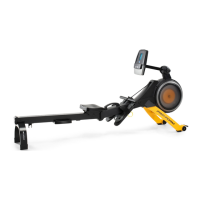
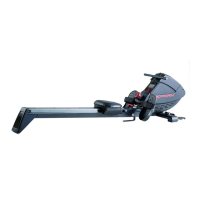
This document describes the ProForm 440R Rower, a fitness equipment designed for home use to enhance cardiovascular fitness, build endurance, and tone the body through effective rowing exercises. The manual provides comprehensive instructions for assembly, operation, maintenance, and exercise guidelines to ensure safe and effective use.

Function Description

The ProForm 440R Rower serves as a cardiovascular exercise machine that simulates the motion of rowing. It allows users to engage in a full-body workout, targeting various muscle groups while improving heart health and stamina. The rower features a console that displays key workout metrics, enabling users to monitor their progress and adjust their exercise intensity. The design incorporates a resistance control mechanism, allowing users to customize the difficulty of their workout. The rower is also designed for convenient storage, with a folding mechanism that helps conserve space when not in use.

Usage Features

The rower offers several features to enhance the user experience and provide a versatile workout.

Assembly and Setup:

The manual guides users through a step-by-step assembly process, emphasizing the need for two persons for certain steps and the use of included tools. It advises users to register their product online to activate the warranty, save time when contacting customer care, and receive notifications about upgrades and offers. The assembly involves attaching stabilizers, orienting the rail, securing the seat, and installing the console.

Console Operation:

The console is an integral part of the rower, providing real-time feedback during workouts. It requires two AA alkaline batteries (not included) and should be allowed to warm to room temperature if exposed to cold conditions before battery insertion to prevent damage.

  • Turning On: The console can be turned on by pressing the Mode button or simply by beginning to row.
  • Display Modes: The console offers several display modes:
    • Strokes/Min.: Shows the number of rowing strokes completed per minute.
    • Calories: Displays the approximate number of calories burned.
    • Total Strokes: Shows the cumulative number of rowing strokes since the last reset. To reset, users must remove and reinsert the batteries.
    • Time: Displays the elapsed workout time.
    • Scan Mode: Cycles through all the above modes (time, strokes, total strokes, calories, and strokes per minute) for a few seconds each.
    • Strokes: Shows the number of rowing strokes completed during the current workout.
  • Selecting Modes: Users can select a continuous display mode by repeatedly pressing the Mode button until an arrow appears next to the desired label. To select scan mode, the arrow should appear next to the Scan label.
  • Resetting Display: Pressing and holding the Mode button for several seconds will reset the display to zero.
  • Auto-Off Feature: The console automatically turns off after a few minutes of inactivity to conserve battery life. It will pause if the row bar does not move for a few seconds.

Adjusting Resistance:

The rower's intensity can be varied by adjusting the resistance control. Turning the control clockwise increases resistance, making the workout more challenging, while turning it counterclockwise decreases resistance. Users are cautioned to stop turning the control when it becomes difficult to avoid damaging the mechanism.

Rowing Form:

The manual outlines the correct rowing form, divided into three phases:

  1. Catch: Slide the seat forward until knees are near the chest, pulling the row bar until hands are above the feet.
  2. Drive: Push backward with legs, lean back slightly at the hips (keeping the back straight), and pull the row bar toward the chest with elbows outward.
  3. Finish: Legs should be nearly straight, continuing to pull the row bar until hands are even with the chest. After the finish, users should extend their arms forward and pull the seat forward with their legs, repeating the sequence with a smooth, fluid motion while breathing normally.

Curl Exercises:

The rower can also be used for curl exercises. Users stand on the foot plates facing the rower, hold the row bar with an underhand or overhand grip, and raise the bar to shoulder level while keeping their back straight and elbows at their sides. They then lower their hands to the starting position, repeating as desired.

Moving the Rower:

To move the rower, users stand behind it and lift the rear stabilizer until the rower rolls on its wheels. It can then be carefully moved to the desired location and lowered to the floor.

Folding and Storing:

The rower can be folded for space-saving storage. This involves removing the Frame Knob and M13 x 32mm Washer, then the Frame Pin, and raising the Rail to a vertical position, securing it with the Frame Pin into the Rail Bracket. Batteries should be removed from the console during extended storage.

Unfolding the Rower:

To unfold, the process is reversed: remove the Frame Pin, lower the Rail to the floor, reinsert the Frame Pin into the Frame and Rail Bracket, and tighten the Frame Knob and Washer.

Exercise Guidelines:

The manual provides guidelines for planning an exercise program, emphasizing consulting a physician before starting, especially for individuals over 35 or with pre-existing health problems.

  • Exercise Intensity: Heart rate is used as a guide for intensity, with a chart showing recommended heart rates for fat burning and aerobic exercise based on age.
    • Burning Fat: Exercise at a low intensity for a sustained period, aiming for the lowest to middle heart rate in the training zone.
    • Aerobic Exercise: Exercise at a higher intensity, aiming for the highest heart rate in the training zone, to strengthen the cardiovascular system.
  • Measuring Heart Rate: Users can measure their heart rate by taking a six-second pulse count at the wrist and multiplying by 10.
  • Workout Structure:
    • Warming Up: 5 to 10 minutes of stretching and light exercise to prepare the body.
    • Training Zone Exercise: 20 to 30 minutes within the target heart rate zone, breathing regularly and deeply.
    • Cooling Down: 5 to 10 minutes of stretching to improve flexibility and prevent post-exercise problems.
  • Exercise Frequency: Three workouts per week with at least one rest day are recommended to maintain or improve condition, potentially increasing to five workouts after several months.

Suggested Stretches:

The manual includes illustrations and descriptions for five basic stretches: Toe Touch Stretch, Hamstring Stretch, Calf/Achilles Stretch, Quadriceps Stretch, and Inner Thigh Stretch, advising users to move slowly and avoid bouncing.

Maintenance Features

Regular maintenance is crucial for the longevity and optimal performance of the ProForm 440R Rower.

General Maintenance:

  • Inspection and Tightening: All parts of the rower should be inspected and properly tightened regularly. Worn parts must be replaced immediately.
  • Cleaning: The rower should be cleaned with a damp cloth and a small amount of mild detergent. It is important to keep liquids away from the console and protect it from direct sunlight to prevent damage.

Troubleshooting:

  • Console Problems: Most console issues are attributed to low batteries. Users are directed to the assembly section for battery replacement instructions.

Greasing:

  • Pedal Axle: If the pedals squeak, users should remove the Right and Left Pedals, apply a small amount of the included grease to both sides of the Pedal Axle, and then reattach the pedals.
  • Rollers: If the rollers beneath the seat squeak, users should apply a small amount of the included grease to a paper towel and spread a thin, even layer along the rail where the rollers move, wiping off any excess grease.

Warranty and Replacement Parts:

The product comes with a limited warranty: five years for the frame and ninety days for parts and labor, covering defects under normal use. To order replacement parts, users need to provide the model number, serial number, product name, and the key number and description of the required part.

Pro-Form 440R PFRW3914.0 Specifications

General IconGeneral
Product NamePro-Form 440R PFRW3914.0
CategoryFitness Equipment
Resistance TypeMagnetic
Resistance Levels8
DisplayLCD
Weight Capacity250 lbs
FoldableYes
FootrestsYes
Warranty5-Year Frame

Related product manuals