EasyManua.ls Logo

Pro-Form PFEL04915.0 - User Manual

Pro-Form PFEL04915.0
32 pages
Print Icon
To Next Page IconTo Next Page
Loading...
Serial
Number
Decal
Model No. PFEL04915.0
Serial No.
Write the serial number in the
space above for reference.
USER’S MANUAL
CAUTION
Read all precautions and
instructions in this manual before
using this equipment. Keep this
manual for future reference.
iconeurope.com
CUSTOMER SERVICE
UNITED KINGDOM
Call: 0330 123 1045
From Ireland: 053 92 36102
Website: iconsupport.eu
E-mail: csuk@iconeurope.com
Write:
ICON Health & Fitness, Ltd.
Unit 4, Westgate Court
Silkwood Park
OSSETT
WF5 9TT
UNITED KINGDOM
AUSTRALIA
Call: 1800 993 770
E-mail: australiacc@iconfitness.com
Write:
ICON Health & Fitness
PO Box 635
WINSTON HILLS NSW 2153
AUSTRALIA
Question and Answer IconNeed help?

Do you have a question about the Pro-Form PFEL04915.0 and is the answer not in the manual?

Pro-Form PFEL04915.0 Specifications

General IconGeneral
ModelPFEL04915.0
TypeElliptical Trainer
Resistance Levels16
DisplayLCD
Weight Capacity250 lbs
Maximum User Weight250 lbs
Display TypeLCD
Heart Rate MonitoringYes

Summary

Initial Safety Advisories

Essential Safety Warnings

Critical Safety Precautions

Read manual, avoid misuse, keep children away, respect weight limits.

Important Precautions

User Health and Safety Guidelines

Physician consultation, user capabilities, home use, and proper form.

Operational Safety Rules

Placement, inspection, clothing, handlebars, and avoiding over-exercising.

Assembly Procedure

Step 2: Attach Front Stabilizer

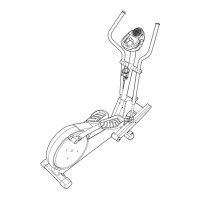
Attaching the front stabilizer to the base using carriage bolts and locknuts.

Assembly Procedure (Continued)

Step 3: Base Foot and Bracket Removal

Removing shipping bracket and tightening the base foot.

Step 5: Crank Arm and Hub Cover Installation

Attaching hub covers and crank arms to the crank.

Step 7: Upright Cover Attachment

Securing the left and right upright covers using screws.

Step 9: Pulse Wire Routing

Guiding pulse wires upwards through the upright.

Step 4: Rear Stabilizer Attachment

Connecting the rear stabilizer to the frame with screws.

Step 6: Upright and Wire Harness Connection

Connecting the upright to the base and attaching wire harnesses.

Step 8: Handlebar Installation

Attaching handlebars to the upright using bolts and jam nuts.

Using the Elliptical

Using the Elliptical (Continued)

Exercise Procedure

Steps for mounting, pedaling, and dismounting the elliptical safely.

Console Operation

Console Features Overview

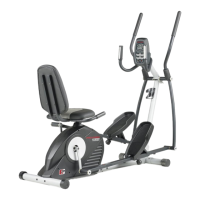
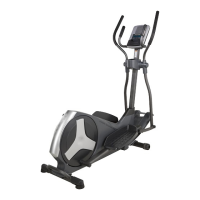
Description of the console's advanced features and connectivity.

Manual Mode Operation

Manual Mode Operation (Continued)

8-Week Weight-Loss Workout

Preset Workout Usage

Console Connectivity & Features

Console Settings & Connectivity

Maintenance and Troubleshooting

Exercise Guidelines

Related product manuals