6
USER MANUAL FOR KRYPTON XG50 THERMAL IMAGING MONOCULAR
Ring Adapter model The internal diameter of the insert needs to match the outer diameter
of the objective lens housing of the daylight optical device it is being
installed on.
Insert internal diameter, mm Suitable for lens housing of
daylight optical devices with an
outer diameter of, mm
PSP Ring Adapter 56 mm 60 59.7-60.6
61 60.7-61.6
62 61.7-62.6
63 62.7-63.6
64 63.7-64.6
65 64.7-65.6
•
Screw together the Ring Adapter (15) and the thermal imaging module along the threads of the mount (20).
The recommended lever (19) position is on the right (see Fig.).
•
Evenly tighten the screws (16) until
it just grips onto the Krypton mount
(20) (they will be fully tightened in a
later step)
•
Push the insert (14) of your choice
into the Ring Adapter (15) until it
stops.
•
Before installing the Ring Adapter
(15) onto the optical device, it is
recommended to degrease the lens
body of the optical device (13).
•
Mount the Ring Adapter with the
insert onto the lens of the daylight
optical device (13) as far as it will go.
•
Move the lever (19) from its initial OPEN position to the CLOSE position.
•
Ensure that the Ring Adapter ts snugly against the lens housing and there is no movement.
•
If the Ring Adapter with the thermal imaging module moves freely relative to the lens of the optical device
(13), do the following:
Loosen the locking screw (17) with a 2 mm Allen key.
Tighten the screw (18) using a 4 mm Allen key. The clamping force should ensure the tight operation of the
lever (19), while the Ring Adapter with the thermal imaging module should not move relative to the body of
the optical device (13). If necessary, tighten or loosen the screw (18) to operate the lever (19) in the best way
possible.
Tighten the locking screw (17) as far as it will go.
•
Turn on the thermal imaging module by briey pressing the ON (9) button.
•
Turn on the device and align the image center on the KRYPTON XG50 display with the image center of the
daylight optical device by carefully tilting the thermal imaging module.
•
Align the top and bottom display boundaries of the KRYPTON XG50 parallel to the horizontal line of the
daylight optical device’s reticle.
•
Having reached the best possible position of the thermal imaging module, tighten the two screws (16) until
stop. The clamping force should be 7 N·m (use a torque screwdriver to check).
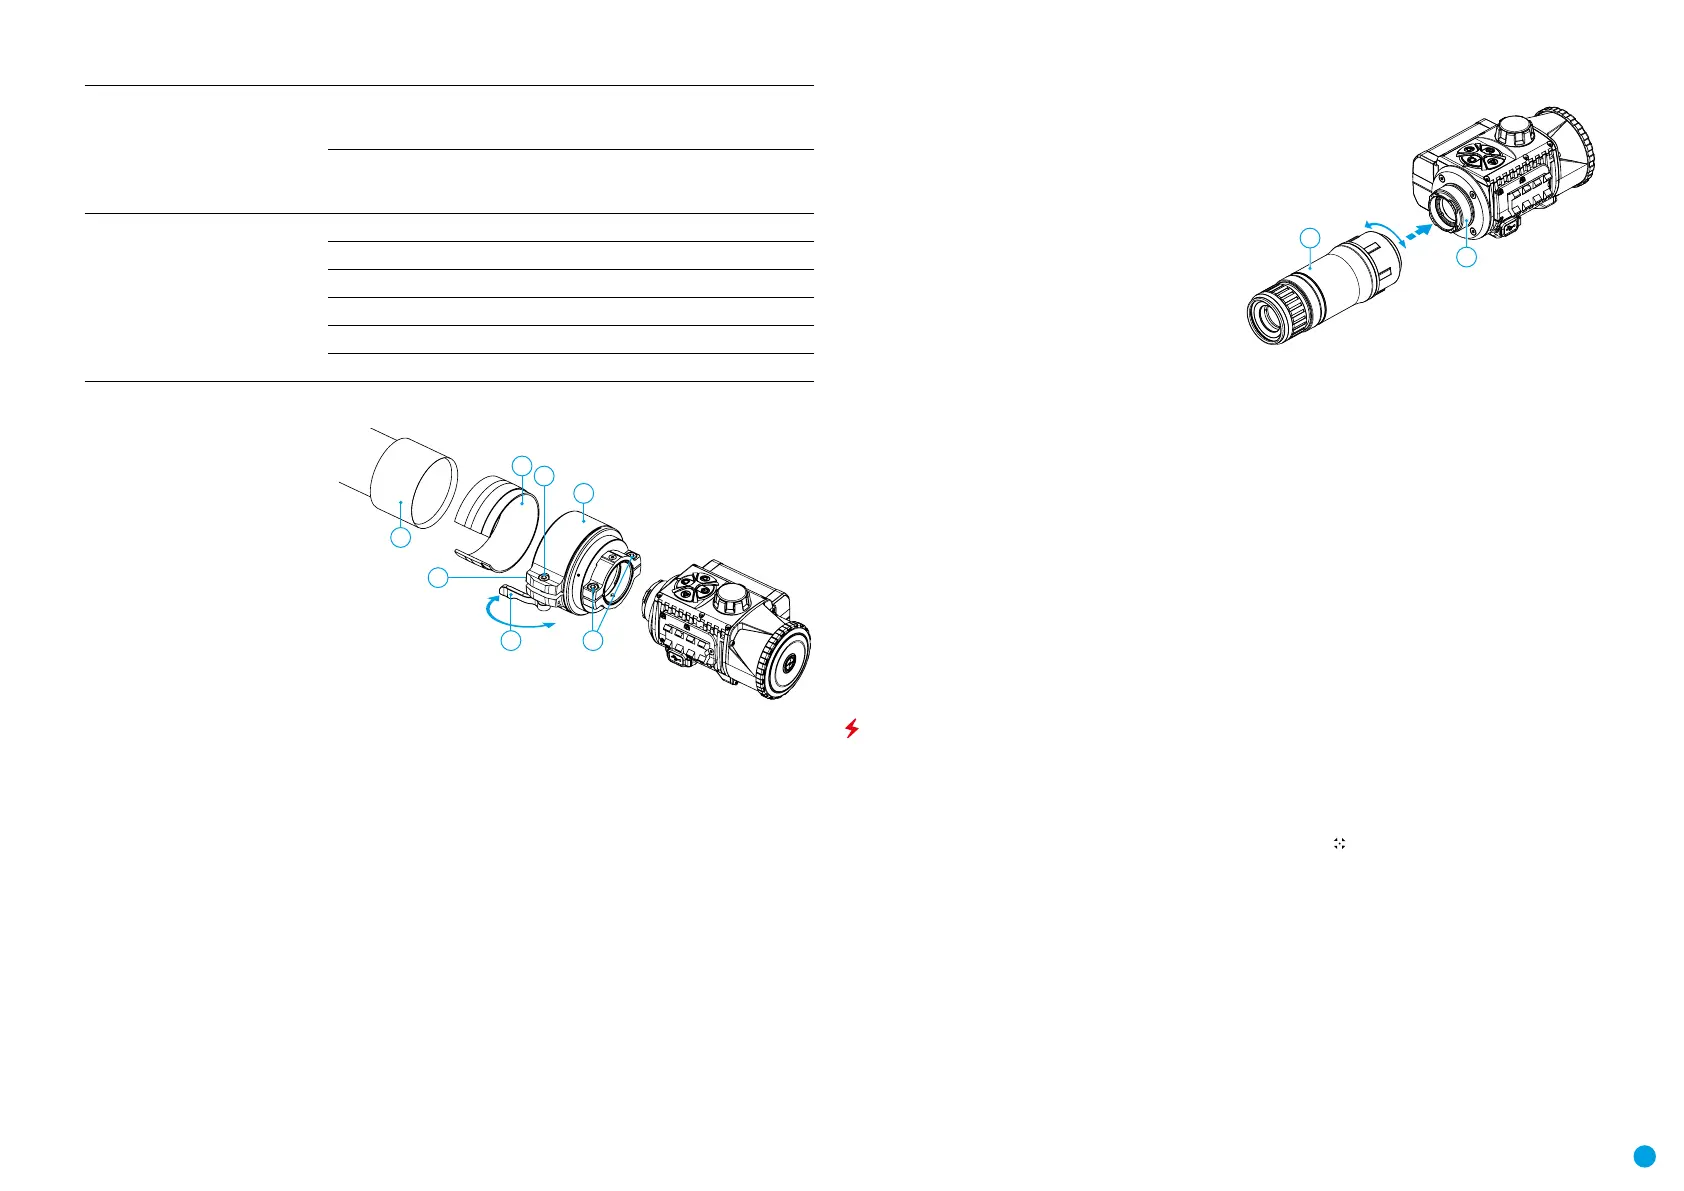
INSTALLING PULSAR 5X30 B MONOCULAR ON TO THE KRYPTON XG50
The Pulsar 5x30 B monocular (21) allows you to
transform the KRYPTON XG50 into a hand-held thermal
imager with 5x magnication.
•
Align the tabs on the monocular with the slots of the
mount (20).
•
Turn the monocular clockwise to secure it on the
thermal imaging module.
•
To remove the monocular, turn it counterclockwise and
disconnect from the thermal imaging module.
Note: the monocular can be installed on the thermal
imaging module with the Ring Adapter already installed.
POWERING ON AND IMAGE SETUP
•
Remove the lens cover (1) by turning it counterclockwise.
•
Press the ON (9) button to turn on the thermal imager.
•
Adjust the eyepiece diopter ring of your daylight optical device until the symbols in the display are sharp. In
future, it will not be necessary to adjust the eyepiece diopter, regardless of the distance and other conditions.
•
Rotate the lens focus knob (10) to focus on the visual target.
•
Enter the main menu with a long press of the MENU (7) button and select the desired calibration mode:
manual (M), semi-automatic (SA) or automatic (A).
•
Calibrate the image by briey pressing the ON (9) button. Close the lens cover when calibrating manually.
•
Select the desired observation mode (Forest, Rocks, Identication or User) by briey pressing the MODE (8)
button or in the main menu. User mode allows you to change and save user brightness and contrast settings
in the quick menu.
•
Select one of the two color palettes by a long press of the MODE (8) button.
•
Activate the quick menu by briey pressing the MENU (7) button to adjust the brightness and contrast of the
display (see the Quick Menu Functions section of the manual for details).
•
Upon completion of use, turn the device off by a long press of the ON (9) button.
MICROBOLOMETER CALIBRATION
Calibration enables the microbolometer temperature background to be equalized and defects in the image
(such as vertical lines, phantom images etc.) to be eliminated.
During calibration, the image on the display freezes briey for up to 1 second.
There are three calibration modes: manual (M), semi-automatic (SA) and automatic (A).
Select the required mode in the Calibration mode section of the menu
.
M mode (manual).
•
Secure the lens cap and briey press the ON (9) button.
•
After completing the calibration process, remove the lens cap.
SA mode (semi-automatic)
•
Calibration is engaged by a brief press of the ON (9) button.
•
The lens cap does not need to be secured (the microbolometer is closed by an internal shutter).
A mode (automatic)
•
The device is calibrated autonomously, in accordance with the rmware algorithm.
•
The lens cap does not need to be secured (the microbolometer is closed by an internal shutter).
•
In this mode, the device may be calibrated by the user using the ON (9) button.
Open
Close
13
14
18
15
19 16
17
20
21