EasyManua.ls Logo

quadient IS-300 Series User Manual

quadient IS-300 Series
2 pages
To Next Page IconTo Next Page
Page #1 background imageLoading...
Page #1 background image
Machine components:
1
7 98
5
Caution: Product weighs 10.8kg,
please seek assistance before lifting
3
Please do not connect your replacement
machine to the power until step N6
The machine must be disconnected from the
power supply before continuing to the next step!
1 42
Remove the Meter (f)
IS-300 Series Base
Product Replacement Guide
Average Time Required: 20 minutes
Slide the Meter (f) towards you
N1. Remove the components from your original machine
Machine Base
Open the door of the compartment situated to the
left of the Ink Cartridge (e) to reveal the Meter (f)
Feed Table
Disconnect the LAN Cable (c) from the left hand
side by pressing and holding down the clip
LAN Cable
Remove replacement unit from box & place
original unit back into box ready for collection
N2. Unpack your replacement
Power Cable
Ink Cartridge Meter
Removal
Disconnect the Power Cable (d) from the right hand
side of the machine
Installation
Lift the top cover to reveal Ink Cartridge (e)
and Meter (f) compartment
Press down on the Cartridge (e) below the word
TOP’ until you hear a click
Remove the Ink Cartridge (e) and close the
machine cover
Remove the Feed Table (a) by lifting the machine
(b) slightly and sliding the Feed Table downwards
to unlock
66
Question and Answer IconNeed help?

Do you have a question about the quadient IS-300 Series and is the answer not in the manual?

quadient IS-300 Series Specifications

General IconGeneral
Printing TechnologyInkjet
Print ResolutionUp to 600 x 600 dpi
Folding TypesC, Z, Half
Media Typesenvelopes
ConnectivityEthernet

Summary

Remove Components from Original Machine

Remove Feed Table

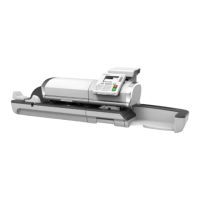
Lift the machine slightly and slide the Feed Table downwards to unlock.

Access Ink Cartridge and Meter Compartment

Lift the top cover to reveal the Ink Cartridge and Meter compartments.

Release and Remove Ink Cartridge

Press down on the Ink Cartridge until it clicks, then remove it.

Disconnect LAN and Power Cables

Disconnect the LAN Cable and Power Cable from the machine.

Access and Remove Meter

Open compartment door to reveal Meter, then slide and remove it.

Power Disconnection Warning

Ensure the machine is disconnected from the power supply before continuing.

Unpack and Prepare Replacement Machine

Unpack Replacement Unit

Remove the new unit from the box and place the original unit back.

Lifting Safety Advisory

Caution: Product weighs 10.8kg; seek assistance before lifting.

Insert Meter and Install Cartridge

Insert Meter into Compartment

Place the Meter into its compartment and push it back until it slots.

Install Ink Cartridge

Insert the Ink Cartridge at an angle and push it back until it clicks.

Connect Cables and Power On

Attach Feed Table

Align the hooks to attach the Feed Table to the machine.

Connect LAN and Power Cables

Re-connect the LAN Cable and Power Cable to the machine.

Switch On Machine

Turn on the machine using the switch behind the Power Cable.

Establish Machine Connection

Initiate Audit Call

Follow prompts to choose 'AUDIT CALL' and confirm the connection.

Connect to Online Services

Select 'ONLINE SERVICES' and choose 'GENERIC CALL' to connect.

Related product manuals